1 Discoverer analysis
1.1 Worksheet execution history
1.2 Workbook consolidation
1.3 Blitz Report license estimate
2 Migration process
2.1 Generate export commands
2.2 Execute export commands
2.3 Create ZIP file
2.4 Configure EUL (if applicable)
2.5 Upload ZIP to Blitz Report
2.6 Run the Discoverer Import program
2.7 Validate the migration
3 Results
3.1 Multiple templates per report
3.2 Cross-tab to pivot conversion
4 Useful scripts
4.1 Grant full workbook access to a specific EBS user
4.2 Fix missing EUL grants for Discoverer Administrator
4.3 Re-running the import
5 Prerequisites for execution history
5.1 Enable statistics collection
5.2 Discoverer server configuration file
5.3 Discoverer Desktop Windows registry setting
5.4 Enable Collect Query Statistics for users
6 Summary
Introduction
Oracle de-supported Discoverer in 2017, yet many organizations still have hundreds of critical workbooks that need migrating. Blitz Report’s automated import utility can migrate your entire Discoverer library in minutes — not months.
The migration process consists of exporting your active workbooks as .eex files using the Discoverer Administrator command line tool, uploading them as a ZIP file into the database through the Blitz Report UI, running the import concurrent program to convert them into Blitz Reports, and then performing validations and manual corrections where needed.
The following video walks through a complete end-to-end migration of 311 Discoverer workbooks.
1 Discoverer analysis
Before starting the migration, Blitz Report provides a comprehensive set of Discoverer analysis reports that help you understand your existing Discoverer environment. These reports cover workbook and folder structures, user permissions, execution history, and usage patterns — giving you a clear picture of which workbooks are actively used, who uses them, and how they relate to each other.

1.1 Worksheet execution history
The DIS Worksheet execution history report shows the historic usage of your Discoverer reports — one row per execution, including the user, duration, row count, and which folders (data sources) were accessed.

The report also includes summary sheets showing active users, popular workbooks, and folder consolidation.
If this report returns no data — meaning the worksheet execution history is not being captured — see chapter 5 for the Discoverer setup required to enable it.
1.2 Workbook consolidation
The Blitz Report migration automatically combines workbooks and worksheets into single reports when they use the same underlying folders. For example, if five different workbook/worksheet combinations all access the same folder, they become one Blitz Report with five layout templates — reducing maintenance and eliminating redundancy.
Reviewing the ‘Folders with workbooks’ sheet before migrating helps you understand how your workbooks will consolidate into a smaller number of Blitz Reports, and which workbooks share the same data sources.

1.3 Blitz Report license estimate
Blitz Report licensing is based on the number of distinct users that run at least one report during a rolling 60-day window. The DIS Worksheet Execution Summary report reads the same Discoverer execution history and reports the number of active users per month, so you can use it to estimate how many Blitz Report licenses are required to cover your Discoverer user base.
If you don’t have Blitz Report installed yet, you can instead execute the underlying script directly against your Discoverer EUL schema: DIS_Worksheet_Execution_Summary.sql. The user_count_60_days column shows the distinct user count for the 60 days preceding each month – take this value as your active user estimate and look up the corresponding subscription cost on our pricing page.

2 Migration process
2.1 Generate export commands
Run the DIS Workbook Export Script report to generate a list of commands to export XMLs for all recently used Discoverer workbooks.
The report has an Accessed After date parameter that controls which workbooks to include. You don’t need to migrate everything — focus on workbooks that were actually used recently.
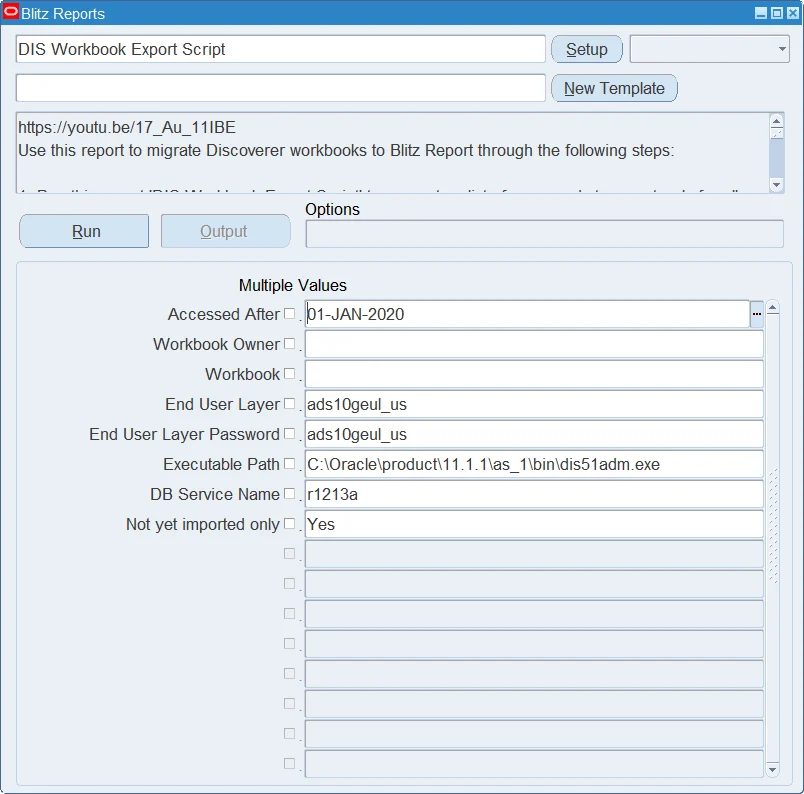
Each row in the output contains a Discoverer Administrator export command.

2.2 Execute export commands
Create a new folder on a Windows machine that has the Discoverer Admin executable dis51adm.exe installed. Contact Enginatics if you need help with the Discoverer Administrator installation.
Open a Command Prompt window, cd to the new folder, and execute (copy and paste) the commands generated in step 2.1. This will start individual processes to export the workbooks as .eex files.

Depending on your client’s CPU and memory capacity, you can run between 100 and 400 export processes at the same time. While the processes are running, the .eex files appear with zero size in the folder. Once an export completes, the file shows its actual size. You can verify all exports have completed by trying to delete the .log files — if they delete without error, all processes have finished.

In case of errors, delete all zero size .eex files and rerun the export. You can simply copy and paste all export commands and it will only re-process the missing ones, as each export command starts with a ‘if not exist workbook_*.eex’ condition.
2.3 Create ZIP file
Zip together all generated (non-zero size) workbook_*.eex files. Do not include the generated .log files.
Important: The .zip needs to be created with older Windows 10 compression methods (in the classic format, no ZIP64, no data descriptors) — this is the Oracle-compatible approach., as the latest Windows 11 method cannot be processed by the Oracle 19c database yet.
2.4 Configure EUL (if applicable)
In case you have more than one Discoverer End User Layer, set the profile option Blitz Report Discoverer Default EUL to the end user layer for which you run the migration.
2.5 Upload ZIP to Blitz Report
Navigate to Setup > Tools > Import > XML Upload and upload the .zip file generated in step 2.3. You will see a message with the count of uploaded XML files.

2.6 Run the Discoverer Import program
Navigate to the System Administrator responsibility and run the Blitz Report Discoverer Import concurrent program with the following parameters:
- End User Layer — the Discoverer EUL schema name (e.g.
eul_us). If you have only one EUL, this is auto-populated from the profile option - Accessed After — restricts the import to workbooks and worksheets that were executed after the specified date. Use the same date as the export script’s ‘Accessed After’ parameter
- Report Name Prefix — a short prefix added to all imported report names to easily distinguish migrated reports from the seeded Blitz Report library
- Object Use Key — use this parameter to rerun the import for workbooks that access a specific folder (object use key) combination, for example if workbooks were missing in the initial import. If specified, the program will delete and re-import a previously created Blitz Report and all related templates for this object use key.
- Workbook Owner — optionally include all workbooks owned by the specified Discoverer user, regardless of whether they appear in the execution history. This is useful when a dedicated admin user maintains ‘official’ workbooks that may not have been run recently, and you want to migrate all of them in addition to the recently used ones

2.7 Validate the migration
Verify the migration result by running the DIS Workbook Import Validation report, which shows one row per workbook/worksheet with execution statistics, upload status, and the created Blitz Report name.

Then run the following validation reports and correct any issues found:
- Blitz Report Parameter Uniqueness Validation — correct the nonunique parameter names
- Blitz Report LOV SQL Validation — correct errors and change slow ‘distinct’ style LOV queries to faster SQLs
- Blitz Report SQL Validation — correct any SQL syntax problems
- Blitz Report Parameter Bind Variable Validation — verify parameter bind variables are correctly mapped
- DIS Migration identify missing EulConditions — identify any conditions that could not be migrated
- Blitz Report Parameter Table Alias Validation — verify table alias references in parameter SQL
- Blitz Reports (for Discoverer category) — validate syntax of all advanced required parameter conditions in column ‘required_parameters’
- Blitz Report Parameter Default Values — for Discoverer reports, check for default values having partition references

In a production migration, you should see very few or no SQL validation errors. The 26 errors in our demo are expected on a test system with inconsistent data.
3 Results
The imported reports appear immediately in Blitz Report under the Discoverer category. In our demo, 323 report templates were created from 311 workbooks — some workbooks contained multiple worksheets.

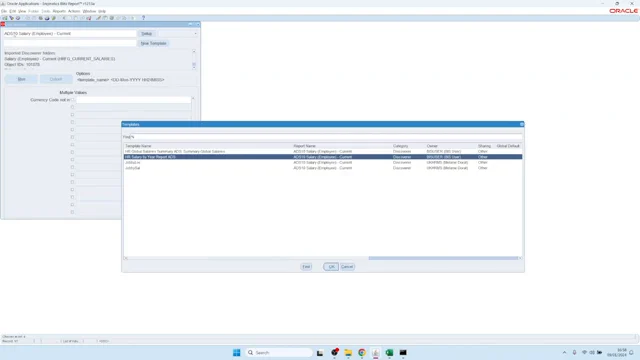
3.1 Multiple templates per report
Because the migration consolidates workbooks that share the same underlying folders, a single Blitz Report can have multiple templates. In this example, the “Salary (Employees – Current)” folder was used by four different workbook/worksheet combinations, resulting in one Blitz Report with four templates.
3.2 Cross-tab to pivot conversion
Discoverer cross-tab layouts are automatically converted to Excel pivot tables in Blitz Report. The first sheet contains the detail data, and the second sheet provides the pivoted view — preserving the analytical layout your users are accustomed to.

4 Useful scripts
The following scripts address common challenges encountered during Discoverer migration projects.
4.1 Grant full workbook access to a specific EBS user
A common problem during Discoverer migration is that workbooks are owned by individual users and may only be shared with specific people. If the owner has left the organization, even the System Administrator cannot access those workbooks because Discoverer’s access control is separate from EBS security.
To allow a specific user — such as an administrator or the technical team member performing the migration — to access all workbooks across all EULs in the system, use the script create_discoverer_access_privileges.sql. Change the user name in the xxen_util.user_id() call to match the EBS user who needs access. A prerequisite is that the EBS user already exists in the Discoverer users table (eul5_eul_users), which is created automatically when the user logs into Discoverer Plus for the first time.
4.2 Fix missing EUL grants for Discoverer Administrator
When connecting to an EUL through the Discoverer Administrator, you may encounter the following warning:

“You have connected to an Applications EUL, but the required Applications tables cannot be found on the same database.”
This error occurs because the EUL schema is missing the required SELECT grants on key EBS foundation tables and EXECUTE grant on FND_CLIENT_INFO. Run grant_eul_privileges.sql to grant the necessary privileges to all EUL schemas, then restart Discoverer Administrator.
4.3 Re-running the import
In case you need to completely re-run the Discoverer import, for example with a different cut-off date parameter, you can use the script purge_discoverer_import.sql to purge the previously imported data. Change the l_eul variable to match your End User Layer schema name. The script deletes the Discoverer staging data, removes all reports from the ‘Discoverer’ category, and cleans up any orphaned LOVs that were automatically created during the import.
, removes all reports from the ‘Discoverer’ category, and cleans up any orphaned LOVs that were automatically created during the import.
5 Prerequisites for execution history
Blitz Report’s automated migration uses worksheet execution history from the Discoverer EUL5_QPP_STATS table to identify which workbooks are still in use and to prioritise them. In the vast majority of Discoverer environments this table is already populated by default. If the DIS Worksheet execution history report returns no rows or only old/incomplete data, follow the steps below to enable statistics collection. This matches the prerequisites documented in the Blitz Report Developer Guide.
5.1 Enable statistics collection
The EUL5_QPP_STATS table is populated by Discoverer Desktop or Discoverer Plus with a history of worksheet query execution statistics. The information is written to the table upon exit from these applications, so always use File > Exit — do not just close the browser or application.
When exiting Discoverer Plus, choose No when prompted to save the changes to a workbook.
5.2 Discoverer server configuration file
For Discoverer Plus and Viewer users, the following actions are also outlined in this Oracle document, section “9.4 How to set default user preferences for all users”, and in Doc ID 387367. The instructions below use our own demo Discoverer server installation as an example.
Open pref.txt under $ORACLE_INSTANCE/config/PreferenceServer/$DISCO_COMP_NAME:
nano /u01/disco/middleware/asinst_1/config/PreferenceServer/Discoverer_asinst_1/pref.txt
Update or add the required parameters in the respective sections and save the file:
[Application]
SaveLastUsedParamValue = 1
[Database]
QPPEnable = 1
QPPCreateNewStats = 1
Run applypreferences.sh (UNIX) or applypreferences.bat (Windows) under $ORACLE_INSTANCE/Discoverer/$DISCO_COMP_NAME/util:
/u01/disco/middleware/asinst_1/Discoverer/Discoverer_asinst_1/util/applypreferences.sh
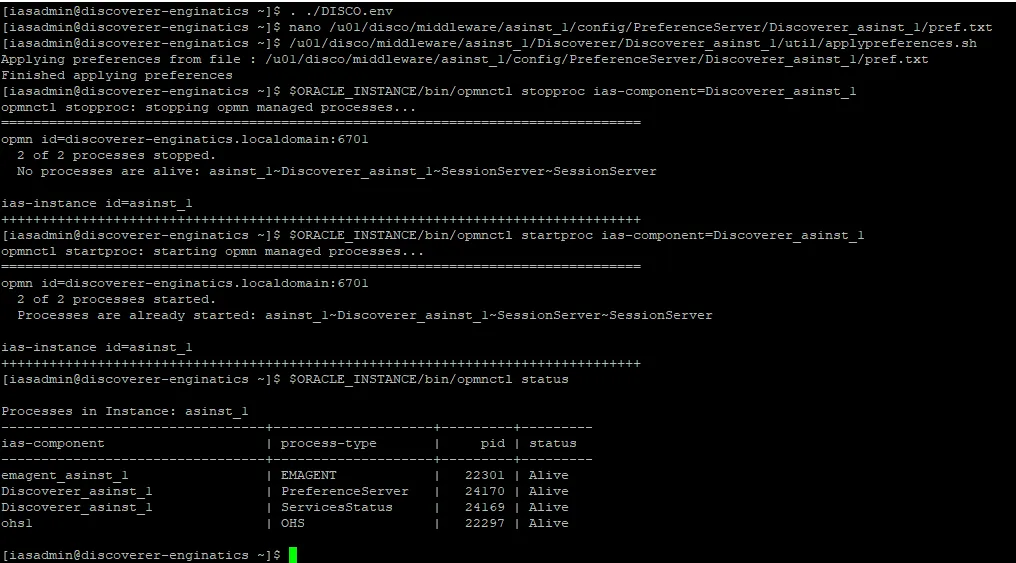
Restart the Discoverer_[instance_name] ias-component:
$ORACLE_INSTANCE/bin/opmnctl stopproc ias-component=Discoverer_asinst_1
$ORACLE_INSTANCE/bin/opmnctl startproc ias-component=Discoverer_asinst_1
$ORACLE_INSTANCE/bin/opmnctl status
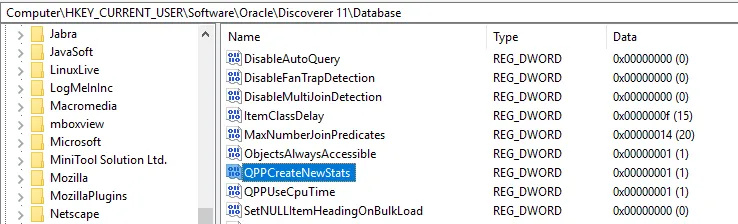
5.3 Discoverer Desktop Windows registry setting
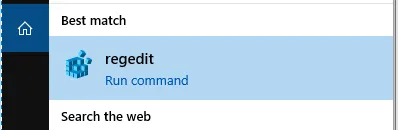
To ensure that statistics are written for Discoverer Desktop, Windows registry settings for parameters QPPEnable and QPPCreateNewStats need to be added or adjusted, as described in Oracle’s Discoverer Administrator Guide and Doc ID 1340849. Open the Windows registry editor.
Navigate to the following path (replace Discoverer 11 with your version):
Computer\HKEY_CURRENT_USER\Software\Oracle\Discoverer 11\Database
If the QPPCreateNewStats key already exists, ensure that its value is set to 1.
If the key does not exist, create it via Edit > New > DWORD (32-bit) Value:
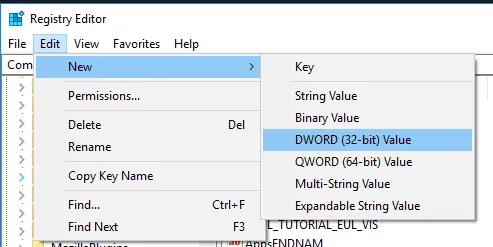
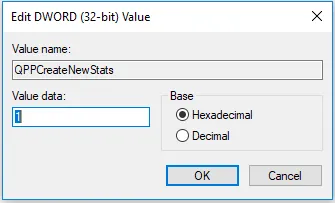
Create the QPPEnable key in the same way.
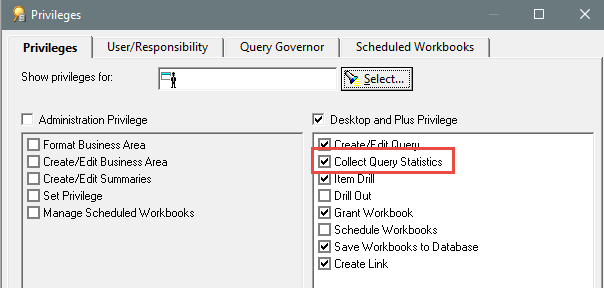
5.4 Enable Collect Query Statistics for users
Login to Discoverer Administrator and enable Collect Query Statistics for all Discoverer users for whom you want to collect statistics.
6 Summary
The entire migration process — from export to validated reports — can be completed in under 15 minutes for hundreds of workbooks:
- Download and install Blitz Report into your EBS environment (typically 20 minutes)
- Run the DIS Workbook Export Script to generate export commands
- Execute the export commands, ZIP the .eex files, and upload to Blitz Report
- Navigate to the System Administrator responsibility and run the Blitz Report Discoverer Import concurrent program
- Validate using the Import Validation, SQL Validation, and LOV Validation reports
Key benefits of the migration:
- Automated consolidation — Similar workbooks sharing the same folders are combined into single reports with multiple templates, reducing maintenance
- Cross-tab preservation — Discoverer cross-tab layouts are automatically converted to Excel pivot tables
- Security migration — User assignments and parameters are preserved during import
- No new concurrent programs — All imported reports run through Blitz Report’s single concurrent program
- Same EBS interface — Users work within the familiar EBS forms, reducing training needs
- Performance improvement — Reports often run faster with Blitz Report’s optimized Excel generation engine
The Blitz Report software is free to use for up to 30 reports, so you can import your most critical workbooks and start using them immediately.
To try the migration yourself, use our demonstration instance, or request a live demonstration in your own EBS environment.
Please refer to the Blitz Report developer guide for detailed usage instructions on the Discoverer import process.
For more Blitz Report ideas and examples, visit our YouTube channel.