1 References
2 Requirements
2.1 Supported OS versions
2.2 Required OS resources
3 Perform backups
3.1 Shutdown ECC
3.2 Compress ECC installation directory
3.3 Export Oracle Enterprise Command Center Framework Schema
3.4 Startup ECC
4 Upgrade ECC
4.1 Run the upgrade scripts
4.2 Verify the upgrade
5 EBS 12.2.13 required patches
6 Import Enterprise Command Center Applications
7 Loading product data to ECC
8 Providing users access to ECC
8.1 Providing access manually
8.2 Automating access provision using script
8.3 Clear cache
9 Conclusion
Introduction
This post describes Oracle Enterprise Command Center Framework (ECC) upgrade from versions V2 and later to V11. It is not meant to replace MOS Doc ID 2495053.1, which is very clear and detailed. We want to share our experience including faced errors and solutions.
For installation instructions of ECC V2 please refer to this post.
For upgrade instructions for different ECC versions please refer to this link.
And good news for those who would like to see the latest ECC in action. You can try it yourself in our demo environment. Just log in as ECC and find a desired commnand center.
Please also try Blitz Report which is the fastest way to export Oracle EBS and ECC data into Excel.
1 References
Following sources have been used to get ECC upgrade instructions:
Installing Oracle Enterprise Command Center Framework, Release 12.2 (Doc ID 2495053.1)
2 Requirements
2.1 Supported OS versions
Oracle Linux 7 or Red Hat Enterprise Linux 7 (64-bit)
Our existing ECC installation uses a standalone Oracle Linux 7 virtual machine.
If you initially installed Oracle Enterprise Command Center Framework Release 12.2 V2 on Oracle Linux 6 or Red Hat Enterprise Linux 6, then you must upgrade the operating system to Oracle Linux 7 or Red Hat Enterprise Linux 7 before you begin the upgrade to Oracle Enterprise Command Center Framework Release 12.2 V11.
2.2 Required OS resources
MOS Doc ID 2495053.1 provides table describing OS resources requirements. We started with minimal resources assignment as it can be easily changed for a virtual machine.
| Number of users | Number of records | Number of Cores | Required Memory |
| 50 | 2 million | 2 | 5 GB |
3 Perform backups
Ensure that you have sufficient disk space to back up the existing ECC installation and to extract the new .bsx file from the latest ECC version quick install package.
If you use virtual machines, then as an alternative to the backup commands below you can just take snapshots.
3.1 Shutdown ECC
[oracle@ecc ~]$ $ECC_BASE/Oracle/quickInstall/bin/stopAllEcc.sh |
3.2 Compress ECC installation directory
[oracle@ecc u01]$ nohup tar -czvf ecc_demo_bkp.tar.gz ecc_demo>/tmp/bkp_log & |
3.3 Export Oracle Enterprise Command Center Framework Schema
After adjusting directory path run the following commands to export the ECC_SCHEMA from the database instance as user with DBA privileges:
[oracle@ecc ~]$ sqlplus '/as sysdba' |
SQL> create or replace directory ECC_EXP_DIR_NAME as '/backup/snapshots/BACKUPS/ecc/ECC_schema_backup'; SQL> grant read, write on directory ECC_EXP_DIR_NAME to ECC; SQL> exit |
[oracle@ecc ~]$ export ECC_SOURCE_SCHEMA=ECC
[oracle@ecc ~]$ read -s ECC_SOURCE_SCHEMA_PASSWORD
[oracle@ecc ~]$ expdp ${ECC_SOURCE_SCHEMA}/${ECC_SOURCE_SCHEMA_PASSWORD} DIRECTORY=ECC_EXP_DIR_NAME DUMPFILE=ecc_dump.dmp LOGFILE=ECC_EXP_DIR_NAME:exportSchema.log |
3.4 Startup ECC
[oracle@ecc ~]$ $ECC_BASE/Oracle/quickInstall/bin/startAllEcc.sh |
4 Upgrade ECC
Create directory a staging directory
Download the latest ECC patch from MOS.
At the time of writing it was ECC v11 patch 35307900.
Unzip patch into a stage directory
unzip p35307900_R12_GENERIC.zip |
Copy the .bsx file to the $ECC_BASE directory. Add executable permissions to it
chmod +x *.bsx |
From $ECC_BASE directory, execute installer:
for f in *.bsx; do sh $f; done |
Installer creates two directories:
- insta_client: The SQL*Plus client directory
- Oracle: Oracle Enterprise Command Center Framework quick install scripts and software
4.1 Run the upgrade scripts
With ECC v11 the upgrade process changed. In previous versions it was required to run one script upgrade.sh. In ECC v11 run the following scripts:
Back up the datasets
cd /u01/stage/Oracle/quickInstall/ ./backup_datasets.sh |
The script prompts for the backup directory which must be located under the SOLR_HOME directory. E.g. /u01/ecc_demo/Oracle/data/backup. The default SOLR_HOME directory is: $ECC_HOME/Oracle/data.
Move the backup directory
If you are upgrading from ECC V9 or V10, then after backing up the datasets move the directory to a location outside the data directory, as the data directory will be renamed as part of the upgrade.
mv /u01/ecc_demo/Oracle/data/backup /u01/stage/backup |
Upgrade the schema
Run the following script
cd /u01/stage/Oracle/quickInstall/ ./upgradeSchema.sh |
Stop all the ECC services
$ECC_BASE/Oracle/quickInstall/bin/stopAllEcc.sh |
Run the upgrade script
cd /u01/stage/Oracle/quickInstall/ ./upgrade.sh |
When prompted, enter the following details:
- The base directory of the existing Oracle Enterprise Command Center Framework installation that you want to upgrade. It’s the directory under which insta_client and Oracle directories are located.
- The password for the Oracle Enterprise Command Center Framework domain admin user
- The password for the Oracle Enterprise Command Center Framework database user
The script displays messages indicating the actions performed to carry out the upgrade.
These messages are also recorded in a log file in the directory specified for the ECC_LOG_DIR configuration property in your installation. The log file is named $ECC_LOG_DIR/upgrade.log.
Note: The following warning message may appear during the upgrade process:
java.rmi.RemoteException: [Deployer:149145]Unable to contact "eccManaged". Deployment is deferred until "eccManaged" becomes available. WARNING: If this is a redeploy app and contains JSP pages that have been touched, these JSP changes won't be reflected when the server starts unless precompile is set to true in weblogic.xml |
You can safely ignore this message. This is an informational message indicating that deployment is marked as delayed because the Oracle Enterprise Command Center Framework domain managed server is shut down at this point. The upgrade will proceed to the next step, and new deployment along with relevant changes will take effect when the upgrade script restarts the managed server.
Restart the ECC services
$ECC_BASE/Oracle/quickInstall/bin/startAllEcc.sh |
Restore the data sets
If you previously created the backup of the databasets, run the following script to restore it:
cd /u01/stage/Oracle/quickInstall/ ./restore_datasets.sh |
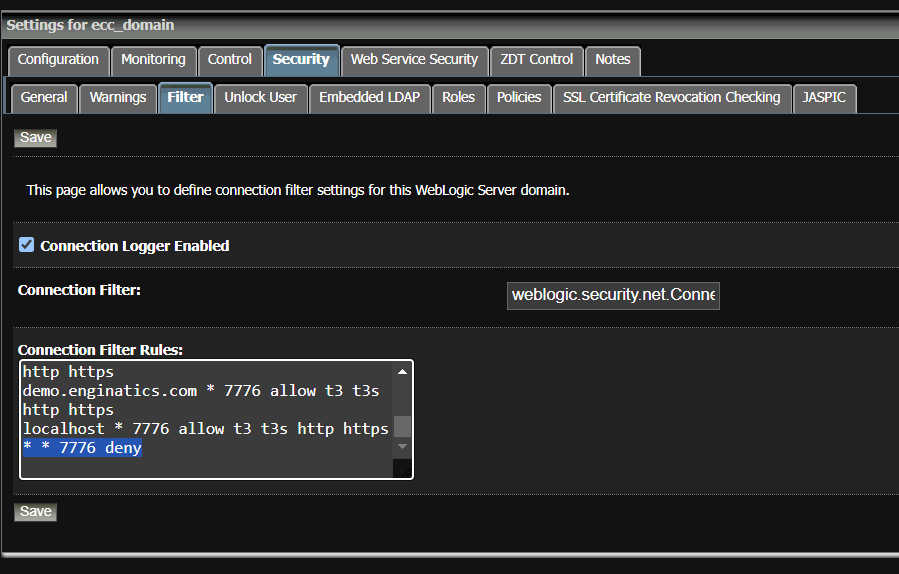
I faced the following errors running this script:
Restoring dataset: activity-audit... Restore failed for dataset while retry activity-audit Restoring dataset: ap-hold... Restore failed for dataset while retry ap-hold Restoring dataset: ap-paid... Restore failed for dataset while retry ap-paid Restoring dataset: ap-period-close... Restore failed for dataset while retry ap-period-close Restoring dataset: ap-trx... Restore failed for dataset while retry ap-trx |
To resolve the issue login to the ECC weblogic admin console, e.g:
http://ecc_host.ecc_domain:7775/console
Remove the following deny rule which has been added by the upgrade scripts.
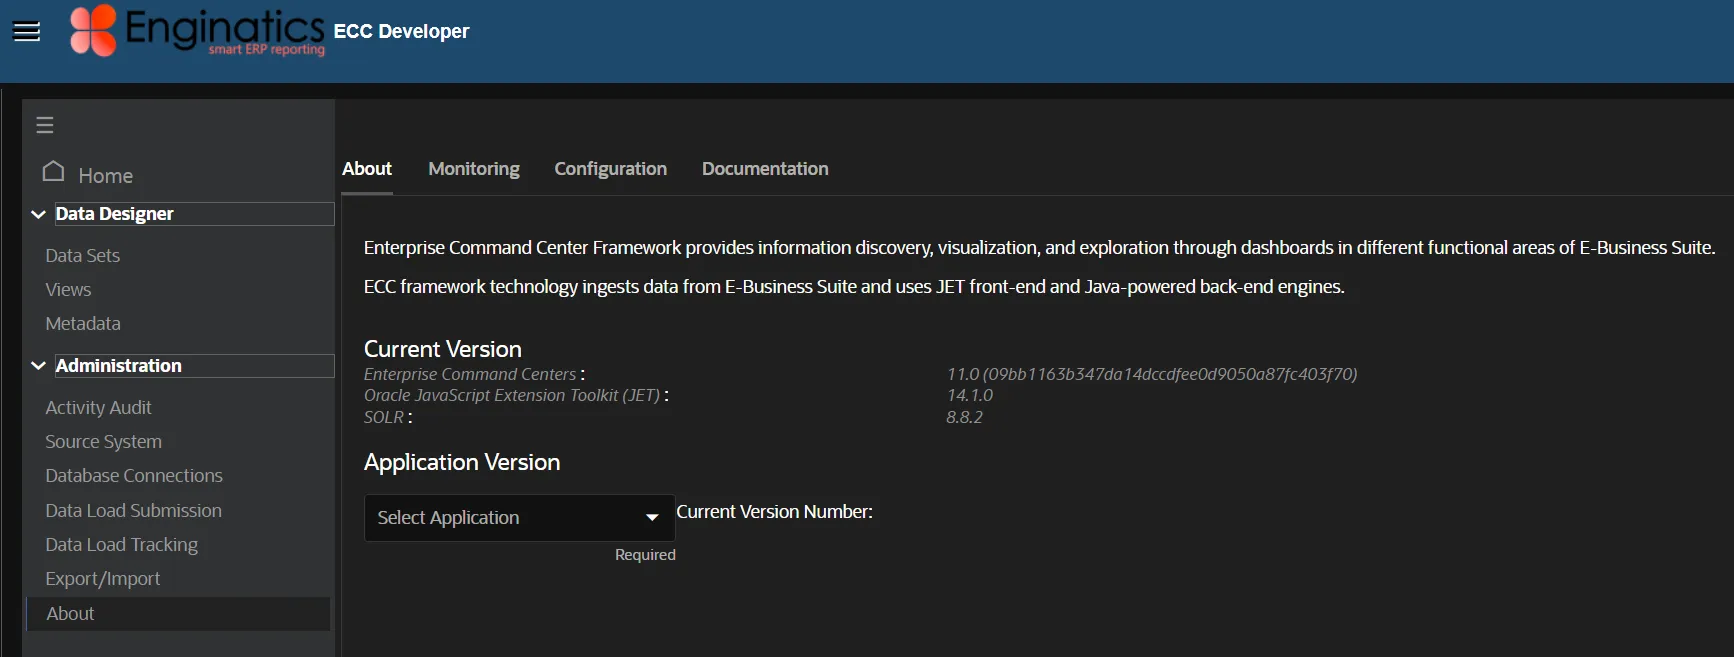
4.2 Verify the upgrade
After the upgrade script finishes running, verify the upgrade by opening the ECC Developer function under ECC Developer responsibility
5 EBS 12.2.13 required patches
EBS patches need to be applied before configuring ECC. Below list of patches is specific to our EBS 12.2.13 instance as we have some of the patches applied. For example we had R12.AD.C.Delta.15 and R12.TXK.C.Delta.15 applied as we recently upgraded to EBS 12.2.13. First two patches: ATG consolidated patch and adapter patch are mandatory. Other patches depend on the products with Enterprise Command Centers that you want to use and installed languages.
Patches must be applied in the order below. MOS Document 2495053.1 prohibits merging between ATG consolidated patch, adapter patch and the product family consolidated patches. Following this rule I applied ATG consolidated patch and the adapter patch. Then I merged and applied all product family consolidated patches.
[+] 34776655 12.2.13 RUP
[+] 34695811 R12.AD.C.Delta.15
[+] 34785677 R12.TXK.C.Delta.15
[+] 34776645 R12.ATG_PF.C.delta.12
[+] 34747474 R12.FIN_PF.C.Delta.13
[+] 33568654 R12.PJ_PF.C.Delta.13
[+] 34809366 R12.SCM_PF.C.Delta.13
[-] 35302518 ATG consolidated patch ECC patch
[-] 35302526 adapter patch ECC patch
[-] 35302560 Customer Relationship Management ECC patch
[-] 35302562 Financials ECC patch
[-] 35302552 Human Resources ECC patch
[-] 35302576 Procurement ECC patch
[-] 35302558 Projects ECC patch
[-] 35302548 Supply Chain Management ECC patch
        [+] 33377862:R12.SCM_PF.C (bug 33377862)
[+] 34617743 Oracle Advanced Pricing Command Center (bug 34617743)
[+] 32656676 Oracle Contract Lifecycle Management for Public Sector Command Center (bug 32656676)
[+] 35045912 Oracle Enterprise Asset Management Command Center (bug 35045912)
[+] 32379321 Oracle Inventory Command Center (bug 32379321)
[+] 34276560 Oracle Inventory Command Center (bug 34276560)
[+] 33282888 Oracle Inventory Command Center (bug 33282888)
[+] 33828966 Oracle Inventory Command Center (bug 33828966)
[+] 33655564 Oracle Inventory Command Center (bug 33655564)
[+] 35164929 Oracle Inventory Command Center (bug 35164929)
[+] 35059202 Oracle Inventory Command Center (bug 35059202)
[-] 35680702 Oracle Inventory Command Center
[-] 35625136 Oracle iProcurement Command Center
[-] 35544266 Oracle Lease and Finance Management Command Center
  [-] 31691231:R12.OKL.C : OKL: ADDITIONAL SERVICE CONTRACTS PATCH FOR ECC V5
  [+] 27949145:R12.OWF.C - ISG Consolidated Patch for 12.2 (18_3_3) (bug 27949145)
  [+] 34769485:R12.AD.C - ORACLE DATA MINING - GRANT CREATE MINING MODEL TO APPS. (bug 34769485)
  [-] 34584064 - MINING MODEL UPGRADE DOES NOT DROP AND RECREATE VIEWS THAT ARE NON-EDITIONED.
[-] 35573606 Oracle Lease Contracts Command Center (Oracle Property Manager)
[+] 35211868 Oracle Procurement Command Center (bug 35211868)
[+] 31604775 Oracle Projects Command Center (bug 31604775)
[+] 35088899 Oracle Projects Command Center (bug 35088899)
[+] 35135853 Oracle Service Contracts Command Center (bug 35135853)
[-] 35616296 Customer Relationship Management Online help
[-] 35616278 Financials Online help
[-] 35616306 Human Resources Online help
[-] 35616263 Procurement Online help
[-] 35616287 Projects Online help
[-] 35616199 Supply Chain Management Online help |
Start ADOP patching cycle
{ echo $appspass; echo $systempass; echo $wlspass; }|adop phase=prepare |
Apply the ATG consolidated and adapter patches without merging them.
{ echo $appspass; echo $systempass; echo $wlspass; }| adop phase=apply patchtop=/backup_bx10/temp/ECC_v11/ patches=35302518,35302526 |
Apply the rest of the patches merging them.
{ echo $appspass; echo $systempass; echo $wlspass; }| adop phase=apply patchtop=/backup_bx10/temp/ECC_v11/ patches=35302560,35302562,35302552,35302576,35302558,35302548,35680702,35625136,35544266,31691231,35573606,35616296,35616278,35616306,35616263,35616287,35616199 merge=yes |
I don’t apply NLS patches as I find it easier to request translation synchronization patches after all ECC related patches are applied. I will not list steps to apply translation synchronization patches here – they are applied as any patch using adop and the patches numbers are unique as they’re generated for a specific EBS instance.
Please note that it’s not required to run actualize_all phase and finalize and cleanup phases in full mode every patching cycle. I did it to get rid of old patching editions in the database.
{ echo $appspass; echo $systempass; echo $wlspass; } | adop phase=finalize finalize_mode=full

{ echo $appspass; echo $systempass; echo $wlspass; } | adop phase=cutover

source ~/EBSapps.env run
{ echo $appspass; echo $systempass; echo $wlspass; } | adop phase=cleanup cleanup_mode=full

{ echo $appspass; echo $systempass; echo $wlspass; } | adop phase=fs_clone |
6 Import Enterprise Command Center Applications
Login to EBS server and apply run fs environment.
[oracle@demo ~]$ . ./EBSapps.env run |
Create empty staging directory.
[oracle@demo scripts]$ mkdir /tmp/staging |
Run patchEccFiles.pl script
[oracle@demo tmp]$ cd $FND_TOP/bin
[oracle@demo tmp]$ perl patchEccFiles.pl
Enter temporary directory for ECC Files (Should be used only for this task and be empty): /tmp/staging
Enter EBS DB apps user id (default: apps) :

Enter EBS DB apps user password:
List of languages installed in EBS:
--------------------------------------------------
| Language| ECC Language Code|
--------------------------------------------------
| ARABIC | ar |
| GERMAN | de |
| FRENCH | fr |
| AMERICAN | en |
| SIMPLIFIED CHINESE | zh-Hans |
---------------------------------------------------

List of languages supported in ECC:
Arabic(ar), Brazilian Portugese(pt), Canadian French(fr-CA),Croatian(hr), Cyrillic Kazakh(kk), Cyrillic Serbian(sr), Czech(cs), Danish(da), Dutch(nl), English(en), Finnish(fi), French(fr), German(de), Greek(el), Hebrew(he), Hungarian(hu), Indonesian(id), Italian(it), Japanese(ja), Korean(ko), Latin Spanish(es-419),Latin Serbian(sr-Latn), Lithuanian(lt), Norwegian(no), Polish(pl), Portugese(pt-PT),Romania(ro), Russian(ru), Simplified Chinese(zh-Hans), Slovak(sk), Slovenian(sl), Spanish(es), Swedish(sv), Thai(th), Traditional Chinese(zh-Hant), Turkish(tr), Ukranian(uk), Vietnamese(vi)

NOTE: Only languages installed and enabled in ECC will be processed successfully
Example: Enter ar,pt for Arabic and Brazilian Portugese language respectively. Enter all(ALL) for all languages

Enter the Language code(s) from the list mentioned above to run the translation for:

Do you want to add all products at once(Y) or specify the subset(N): Y

Adding product top AP

Adding product top AR

Adding product top BOM

Adding product top CN

Adding product top CS

Adding product top EAM

Adding product top FA

Adding product top GMO

Adding product top ICX

Adding product top INV

Adding product top JMF

Adding product top OKL

Adding product top OKS

Adding product top ONT

Adding product top OZF

Adding product top PA

Adding product top PO

Adding product top WIP

Importing application /tmp/staging/ap/12.0.0/patch/115/ecc/applications/ap_ecc.zip
ECC WEB ENTRY URL:http://demo.enginatics.com:80/ecc
ECC Application File:/tmp/staging/ap/12.0.0/patch/115/ecc/applications/ap_ecc.zip
Importing file /tmp/staging/ap/12.0.0/patch/115/ecc/applications/ap_ecc.zip finished with response [{"STATUS":200,"logFileName":"import_20190529095220.log"}]
Imported application /tmp/staging/ap/12.0.0/patch/115/ecc/applications/ap_ecc.zip successfully

Importing application /tmp/staging/ar/12.0.0/patch/115/ecc/applications/ar_ecc.zip
ECC WEB ENTRY URL:http://demo.enginatics.com:80/ecc
ECC Application File:/tmp/staging/ar/12.0.0/patch/115/ecc/applications/ar_ecc.zip
Importing file /tmp/staging/ar/12.0.0/patch/115/ecc/applications/ar_ecc.zip finished with response [{"STATUS":200,"logFileName":"import_20190529095227.log"}]
Imported application /tmp/staging/ar/12.0.0/patch/115/ecc/applications/ar_ecc.zip successfully

Importing application /tmp/staging/fa/12.0.0/patch/115/ecc/applications/fa_ecc.zip
ECC WEB ENTRY URL:http://demo.enginatics.com:80/ecc
ECC Application File:/tmp/staging/fa/12.0.0/patch/115/ecc/applications/fa_ecc.zip
Importing file /tmp/staging/fa/12.0.0/patch/115/ecc/applications/fa_ecc.zip finished with response [{"STATUS":200,"logFileName":"import_20190529095228.log"}]
Imported application /tmp/staging/fa/12.0.0/patch/115/ecc/applications/fa_ecc.zip successfully

Importing application /tmp/staging/okl/12.0.0/patch/115/ecc/applications/okl_ecc.zip
ECC WEB ENTRY URL:http://demo.enginatics.com:80/ecc
ECC Application File:/tmp/staging/okl/12.0.0/patch/115/ecc/applications/okl_ecc.zip
Importing file /tmp/staging/okl/12.0.0/patch/115/ecc/applications/okl_ecc.zip finished with response [{"STATUS":200,"logFileName":"import_20190529095229.log"}]
Imported application /tmp/staging/okl/12.0.0/patch/115/ecc/applications/okl_ecc.zip successfully

SUMMARY REPORT:
-----------------------------------------------
| Product| Application | Status|
-----------------------------------------------
| AP | ap_ecc.zip | Success |
| AR | ar_ecc.zip | Success |
| FA | fa_ecc.zip | Success |
| OKL | okl_ecc.zip | Success |
----------------------------------------------- |
7 Loading product data to ECC
Run concurrent programs for each product to perform full data load into the ECC. Programs should also be scheduled to perform periodic incremental loads to update the data. For the full list of the loader concurrent programs please refer to Doc ID 2495053.1. For an overview of the many different load programs, you can also use the ECC Concurrent Programs report to check which ones are already scheduled.
Example for the Oracle Receivables : Receivables Command Center Data Load
To run this request you need to switch to Receivables responsibility as it’s not available under System Administrator responsibility. I used ‘Receivables manager’ responsibility.

To update data, requests can be rerun in INCREMENTAL_LOAD mode. Example of Payables Command Center Data Load:

8 Providing users access to ECC
This step needs to be performed for the new command centers after the upgrade. Also perform this step if you notice any changes in the roles, responsibilities or permission sets names provided in the MOS Doc ID 2495053.1.
Product-specific roles are used to provide access to ECC.
For list of the roles please refer to Doc ID 2495053.1.
Below is the example of role assignment performed in our system.
8.1 Providing access manually
In Oracle E-Business Suite, log in to the User Management responsibility, and navigate to the Roles and Role Inheritance page.
Search for desired responsibility

Click the “View In Hierarchy” icon for your responsibility

Click the Add Node icon for your responsibility

Search for the role you want to add and click ‘Select’

Next step is to update the associated grant for the product-specific Enterprise Command Center roles to reference the specific responsibility as the security context.
Click on expand to see the added role and click on update icon for the new role:

If this is the first responsibility to which you are adding to the role, click the Update icon for the grant you want to update.

Enter the name of the responsibility to which ECC role is added and click Apply


After this step Receivables Command Center should appear under Receivables Manager responsibility.


Note: If you don’t see function appear after the responsibility, you may need to clear EBS cache using Functional Administrator responsibility.
8.2 Automating access provision using script
To automate roles and grants configuration following script can be used. It should be ran from EBS run fs:
source EBSapps.env run $FND_TOP/bin/UMX_ENDECA_RBACAuto.sh |
It will prompt for csv file location, which should be prepared before running the script. If csv file is called UMX_ENDECA_RBAC.csv and located under same directory as UMX_ENDECA_RBACAuto.sh, it will be used automatically. Example of the file we used in our system to assign payables and receivables ecc roles to Payables manager, Receivables manager and ECC Developer:
PERMISSION_SET_CODE,RESPONSIBILITY_CODE,ENDECA_ROLE_CODE AP_ECC_ACCESS_PS,FND_RESP|SQLAP|PAYABLES_MANAGER|STANDARD,UMX|AP_ECC_ACCESS_ROLE AP_ECC_ACCESS_PS,FND_RESP|FND|ECC_DEVELOPER_RESP|STANDARD,UMX|AP_ECC_ACCESS_ROLE AR_ECC_ACCESS_PS,FND_RESP|AR|RECEIVABLES_MANAGER|STANDARD,UMX|AR_ECC_ACCESS_ROLE AR_ECC_ACCESS_PS,FND_RESP|FND|ECC_DEVELOPER_RESP|STANDARD,UMX|AR_ECC_ACCESS_ROLE IAR_ECC_ACCESS_PS,FND_RESP|FND|ECC_DEVELOPER_RESP|STANDARD,UMX|IAR_ECC_ACCESS_ROLE IAR_ECC_INT_ACCESS_PS,FND_RESP|FND|ECC_DEVELOPER_RESP|STANDARD,UMX|IAR_ECC_INT_ACCESS_ROLE |
Example output:
[oracle@demo bin]$ ./UMX_ENDECA_RBACAuto.sh APPS username: apps APPS password: Executing for Permission_set AP_ECC_ACCESS_PS , Responsibility_name FND_RESP|SQLAP|PAYABLES_MANAGER|STANDARD and Endeca_Role UMX|AP_ECC_ACCESS_ROLE old 6: L_MENU_NAME varchar2(100) := '&1'; new 6: L_MENU_NAME varchar2(100) := 'AP_ECC_ACCESS_PS'; old 8: l_responsibility_name varchar2(300) := '&2'; new 8: l_responsibility_name varchar2(300) := 'FND_RESP|SQLAP|PAYABLES_MANAGER|STANDARD'; old 10: endeca_role_name varchar2(300) := '&3'; new 10: endeca_role_name varchar2(300) := 'UMX|AP_ECC_ACCESS_ROLE'; Completed Successfully. PL/SQL procedure successfully completed. Executing for Permission_set AP_ECC_ACCESS_PS , Responsibility_name FND_RESP|FND|ECC_DEVELOPER_RESP|STANDARD and Endeca_Role UMX|AP_ECC_ACCESS_ROLE old 6: L_MENU_NAME varchar2(100) := '&1'; new 6: L_MENU_NAME varchar2(100) := 'AP_ECC_ACCESS_PS'; old 8: l_responsibility_name varchar2(300) := '&2'; new 8: l_responsibility_name varchar2(300) := 'FND_RESP|FND|ECC_DEVELOPER_RESP|STANDARD'; old 10: endeca_role_name varchar2(300) := '&3'; new 10: endeca_role_name varchar2(300) := 'UMX|AP_ECC_ACCESS_ROLE'; Completed Successfully. PL/SQL procedure successfully completed. Executing for Permission_set AR_ECC_ACCESS_PS , Responsibility_name FND_RESP|AR|RECEIVABLES_MANAGER|STANDARD and Endeca_Role UMX|AR_ECC_ACCESS_ROLE old 6: L_MENU_NAME varchar2(100) := '&1'; new 6: L_MENU_NAME varchar2(100) := 'AR_ECC_ACCESS_PS'; old 8: l_responsibility_name varchar2(300) := '&2'; new 8: l_responsibility_name varchar2(300) := 'FND_RESP|AR|RECEIVABLES_MANAGER|STANDARD'; old 10: endeca_role_name varchar2(300) := '&3'; new 10: endeca_role_name varchar2(300) := 'UMX|AR_ECC_ACCESS_ROLE'; Role - Responsibility relationship already exists Grant already exists PL/SQL procedure successfully completed. Executing for Permission_set AR_ECC_ACCESS_PS , Responsibility_name FND_RESP|FND|ECC_DEVELOPER_RESP|STANDARD and Endeca_Role UMX|AR_ECC_ACCESS_ROLE old 6: L_MENU_NAME varchar2(100) := '&1'; new 6: L_MENU_NAME varchar2(100) := 'AR_ECC_ACCESS_PS'; old 8: l_responsibility_name varchar2(300) := '&2'; new 8: l_responsibility_name varchar2(300) := 'FND_RESP|FND|ECC_DEVELOPER_RESP|STANDARD'; old 10: endeca_role_name varchar2(300) := '&3'; new 10: endeca_role_name varchar2(300) := 'UMX|AR_ECC_ACCESS_ROLE'; Completed Successfully. PL/SQL procedure successfully completed. |
8.3 Clear cache
Command centers didn’t appear under the responsibilities after running above script. It was fixed by clearing EBS cache using Functional Administrator responsibility.
9 Conclusion
At this stage ECC installation and integration is complete. Reminding you again that you can try ECC in our demo instance. Just log in as ECC and choose desired product responsibility and find associated command center menu entry.
Please leave your comments if this article helped you or you faced any issues – we’re always happy to help you.
And please check out Blitz Report which complements ECC nicely with the fast excel export feature.