1 References
2 Diagnostic Steps
3 Configuration Steps
3.1 Update the AdminServer and the Managed Server (WLS) Configuration
3.2 Run Autoconfig on the Apps Tier
3.3 Append JVM Parameter to All Managed Servers
3.4 Configure Custom Hostname Verifier
3.5 Update the Truststore with the CA Certificate
3.6 Restart the Application Services
3.7 Verify the WebLogic Server Startup Options
3.8 Test the Connection to the ISG REST Service
3.9 Run fs_clone
Introduction
Oracle E-Business Suite Integrated SOA Gateway configuration is simplified in EBS 12.2 release. However additional steps are required if your EBS instance is configured for TLS. Actually all the required steps are included in the Doc ID 1367293.1, but may be overlooked as they do not affect the main EBS functionality with TLS. It was the story with me as I just skipped some steps when enabling TLS in one of our dev environments. But later when our developers tried to access ISG and faced errors I had to read the instruction more closely and perform the required steps. In this post I will share my experience.
1 References
Enabling TLS in Oracle E-Business Suite Release 12.2 (Doc ID 1367293.1)
2 Diagnostic Steps
Make an ISG call that does not work and check the following log file for errors:
$EBS_DOMAIN_HOME/servers/oafm_server1/logs/oafm_server1.out |
If you see the following error messages, then you need to configure loopback connections as per Doc ID 1367293.1:
java.lang.ClassCastException: weblogic.net.http.SOAPHttpsURLConnection cannot be cast to javax.net.ssl.HttpsURLConnection |
If you don’t see any error messages in the oafm_server1.out, configure the ISG logging as per the following doc and reproduce the issue again:
How to Generate File ISGLog.log for SOAP Services in Release 12.2.X? (Doc ID 2008707.1)
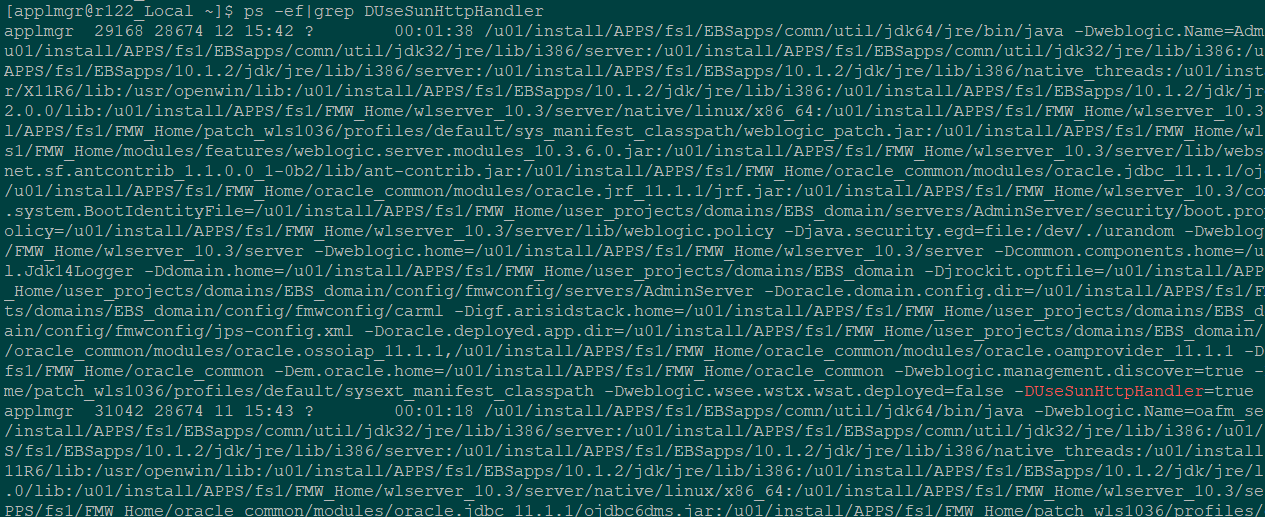
The additional justification: login to the apps node and execute the following command
ps -ef|grep DUseSunHttpHandler|grep -v grep |
If no processes are returned, then WLS servers are not configured to use the DUseSunHttpHandler option and it may lead to the issue. If the WLS servers are configured properly you will see an output similar to the following:
3 Configuration Steps
3.1 Update the AdminServer and the Managed Server (WLS) Configuration
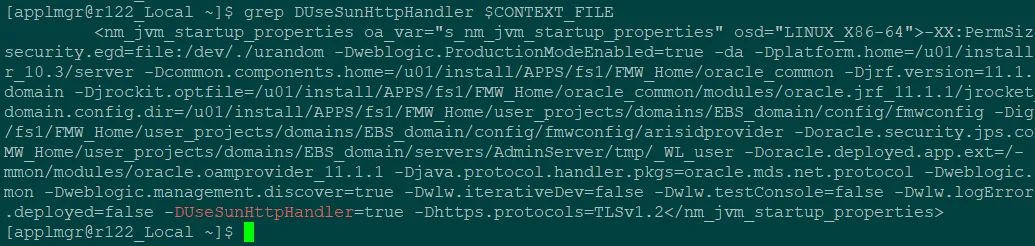
For the AdminServer, update the context variable
s_nm_jvm_startup_properties |
and append the JVM parameters to the end of the line, separated by a space.
-DUseSunHttpHandler=true -Dhttps.protocols=TLSv1.2 |
3.2 Run Autoconfig on the Apps Tier
su - applmgr cd $ADMIN_SCRIPTS_HOME ./adautocfg.sh |
3.3 Append JVM Parameter to All Managed Servers
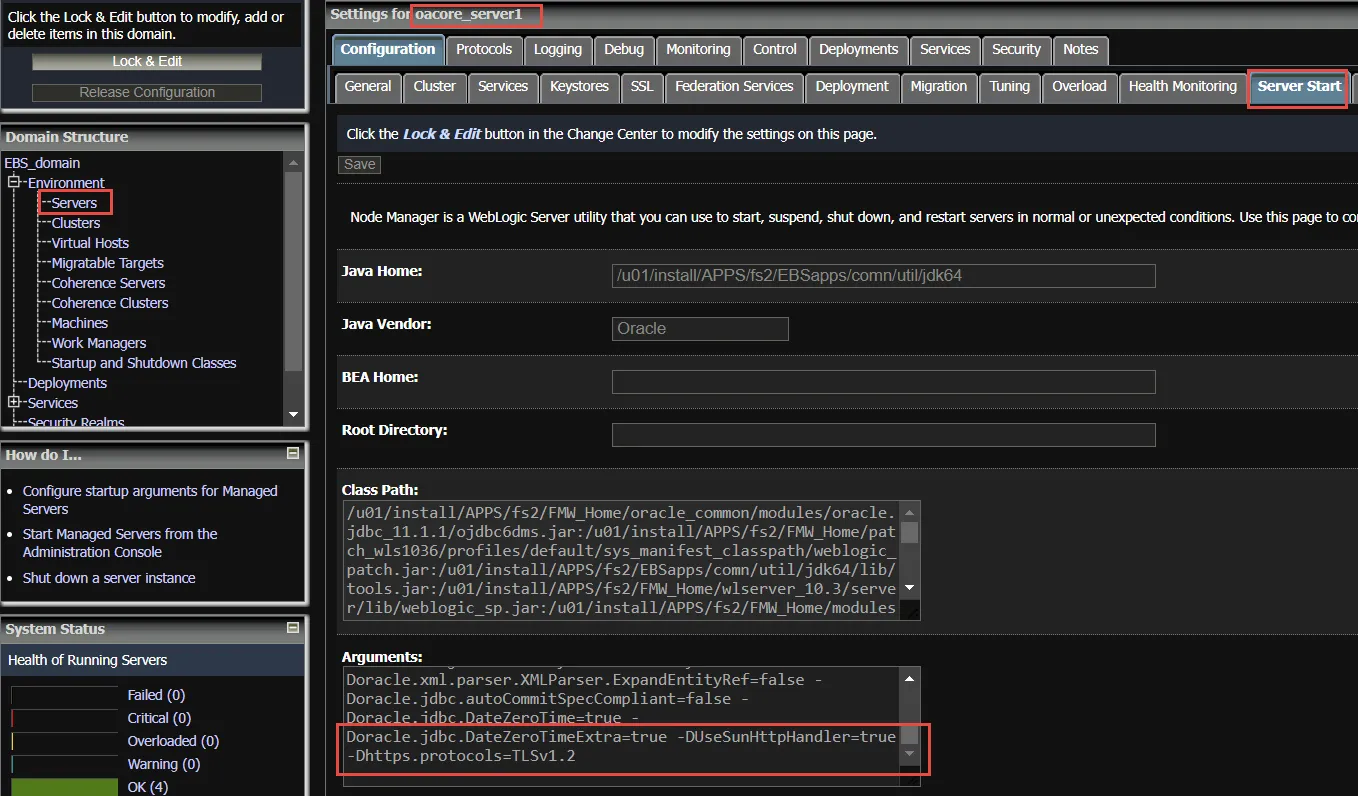
Log in to Oracle WebLogic Server Administration console (for example, http://.:/console)
Click on Lock & Edit.
Under Domain Structure > your Oracle E-Business Suite domain > Environment and Servers, select one of the managed servers. (Note that you will need to repeat this for all managed servers in your environment.)
Then under the Server Start tab in the Arguments section, add the following:
-DUseSunHttpHandler=true -Dhttps.protocols=TLSv1.2 |
Click on Save.
Repeat steps 3 and 4 for all remaining managed servers.
3.4 Configure Custom Hostname Verifier
For each of the managed servers and the AdminServer, under the SSL tab, click on Advanced, and set the Hostname Verification to Custom Hostname Verifier and the Custom Hostname Verifier field to
weblogic.security.utils.SSLWLSWildcardHostnameVerifier |
This may or may not already be set depending on your existing patch level.
Click on Activate Changes.

3.5 Update the Truststore with the CA Certificate
Get the EBS instance SSL certificate using the browser. Export it into the file. In the below commands it is referred to as EBS_CERTIFICATE.
Also it is required to do the same steps for the load balancer certificate if it is used and different from the EBS certificate.
Reference:
Exception in thread “main” java.lang.NullPointerException Getting Cookie To Invoke REST Services Using Token Base Authentication In ISG (Doc ID 2402157.1)
It is referred as LOAD_BALANCER_CERTIFICATE.
ls -l $ORACLE_HOME/sysman/config/b64InternetCertificate.txt
 cd $ORACLE_HOME/sysman/config/
 cp b64InternetCertificate.txt backup_b64InternetCertificate.txt
 cat ca.crt>>$ORACLE_HOME/sysman/config/b64InternetCertificate.txt
cd $COMMON_TOP/util/jdk64/jre/lib/security
cp cacerts backup_cacerts
keytool -import -alias Customer_dev -v -keystore cacerts -file ca.crt
cd $OA_JRE_TOP/lib/security
cp cacerts backup_cacerts
keytool -import -alias Customer_dev -v -keystore cacerts -file ca.crt
In case of self signed certificates:
cd $ORACLE_HOME/sysman/config/
 cp b64InternetCertificate.txt backup_b64InternetCertificate.txt
 cat EBS_CERTIFICATE>> $ORACLE_HOME/sysman/config/b64InternetCertificate.txt
 cat LOAD_BALANCER_CERTIFICATE>> $ORACLE_HOME/sysman/config/b64InternetCertificate.txt
cd $COMMON_TOP/util/jdk64/jre/lib/security
cp cacerts backup_cacerts
keytool -import -alias Customer_dev -v -keystore cacerts -file EBS_CERTIFICATE
keytool -import -alias Customer_Load_Balancer -v -keystore cacerts -file LOAD_BALANCER_CERTIFICATE
cd $OA_JRE_TOP/lib/security
cp cacerts backup_cacerts
keytool -import -alias Customer_dev -v -keystore cacerts -file EBS_CERTIFICATE
keytool -import -alias Customer_Load_Balancer -v -keystore cacerts -file LOAD_BALANCER_CERTIFICATE
Note: The default cacerts keystore password: changeit
3.6 Restart the Application Services
su - applmgr cd $ADMIN_SCRIPTS_HOME ./adstpall.sh apps/**** ./adstrtal.sh apps/**** |
3.7 Verify the WebLogic Server Startup Options
Login to the apps node and execute the following command
ps -ef|grep DUseSunHttpHandler |
Make sure it returns the all weblogic server processes (Admin and managed) using the above option.
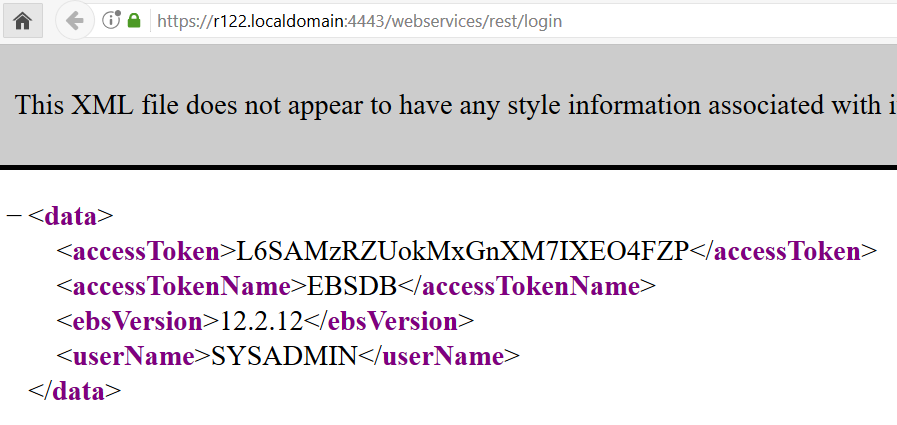
3.8 Test the Connection to the ISG REST Service
https://ebs_url/webservices/rest/login
If it is successful then the configuration complete.
The response should look like:
3.9 Run fs_clone
Run adop phase=fs_clone to propagate the changes to the patch filesystem.
adop phase=fs_clone |