1 References
2 Video Instructions
3 Check prerequisite patches
3.1 ISG consolidated patch
3.2 EBS release version
3.3 AD and TXK patchsets
3.4 XDK patch
3.5 Weblogic patch
4 Apply required patches
4.1 Start the new patching cycle
4.2 Upgrade AD and TXK
4.3 Apply patch 17428617
4.4 Patching WLS BSU
4.5 Applying the latest WLS PSU
4.6 Patching Oracle WebLogic Server (WLS)
4.7 Apply the EBS ISG consolidated patch
5 Configuring ISG
5.1 Change Signon% profile options values (conditional)
5.2 Create GLOBAL user
5.3 Increase the weblogic timeout (WLIOTimeoutSecs)
5.4 Increase OAFM servers Java Heap Size
5.5 Run the REST configuration ISGRestSetup.pl script
5.6 Configure the ISGDatasource connection parameters
5.7 Sync the run and patch filesystems
5.8 Change Signon% profile options values back
5.9 Verify that REST login service works
6 Configuring ISG in cloned instances
6.1 Change the Signon% profile option values (conditional)
6.2 Increase the weblogic timeout (WLIOTimeoutSecs)
6.3 Increase OAFM servers Java Heap Size
6.4 Run the ISG postclone steps
6.5 Blitz Report post clone instructions
6.6 Configure the ISGDatasource connection parameters
6.7 Sync the run and patch filesystems
6.8 Change the Signon% profile option values back
7 Troubleshooting
7.1 $❴patchContextFile❵ doesn’t exist
7.2 ISG Integration Repository Page Does Not Open
7.3 Additional password prompt when cloning EBS
7.4 Resolving possible issue accessing the weblogic admin console
7.5 Configure token authentication
7.6 Configure ISG for TLS
7.7 ERROR: Unable to connect to server using username
7.8 java.lang.SecurityException: User: ISGADMIN~~EBSDB, failed to be authenticated
7.9 ISG_SERVICE_EXECUTION_ERROR
7.10 ISG_SERVICE_AUTH_FAILURE
7.11 ISG_INVALID_ALIAS
7.12 FND_SOA_AUTHORIZATION_FAILURE
7.13 ISG_FILE_ACCESS_ERROR
7.14 504: Gateway Time-out
7.15 Could not authenticate user/token
7.16 Existing state of package body APPS.XXEN_REPORT has been invalidated
Introduction
Oracle E-Business Suite Integrated SOA Gateway provides interface for communicating between your custom applications and Oracle EBS. This component is already included in the Oracle E-Business installation but requires configuration to be enabled. This post is an attempt to share my experience enabling ISG and to provide clear step by step instructions.
1 References
1311068.1 – Installing Oracle E-Business Suite Integrated SOA Gateway, Release 12.2
1317697.1 – Oracle E-Business Suite Integrated SOA Gateway Troubleshooting Guide, Release 12.2
2 Video Instructions
3 Check prerequisite patches
Perform the required patches analysis as per the Doc 1311068.1.
3.1 ISG consolidated patch
To check if an ISG consolidated patch is already applied in your EBS, please run the following query as APPS:
  set linesize 250;
  set pagesize 300;
  col "ISG Patch" format a70;
  select
  decode(ab.bug_number,
  '31764501','31764501: ISG Consolidated Patch for 12.2 (20_3_5)',
  '33168402','33168402: ISG Consolidated Patch for 12.2 (21_4_3)',
  '34766982','34766982: ISG Consolidated Patch for 12.2 (23_1_1)',
  '35629149','35629149: ISG Consolidated Patch for 12.2 (23_4_5)',
  '36828728','36828728: ISG Consolidated Patch for 12.2 (24_3_5)',
  '37770767','37770767: ISG Consolidated Patch for 12.2 (25_4_1)'
  ) "ISG Patch"
  from ad_bugs ab
  where
  ab.bug_number in
  ('31764501','33168402','34766982','35629149','36828728','37770767') and
ab.language='US'; |
3.2 EBS release version
select fpg.release_name from fnd_product_groups fpg; |
3.3 AD and TXK patchsets
select ate.abbreviation, ate.name, ate.codelevel, ate.baseline
from ad_trackable_entities ate
where
ate.abbreviation in ('ad','txk')
order by ate.abbreviation; |
3.4 XDK patch
su - applmgr $FMW_HOME/oracle_common/OPatch/opatch lsinventory -oh $FMW_HOME/oracle_common|grep 17428617 |
3.5 Weblogic patch
su - applmgr cd $FMW_HOME/utils/bsu $FMW_HOME/utils/bsu/bsu.sh -prod_dir=$FMW_HOME/wlserver_10.3 -status=applied -verbose -view|grep ENUU |
4 Apply required patches
Here is the patch analysis example for my EBS 12.2.12:
[-]34766982: ISG Consolidated Patch for 12.2 (23_1_1) [+]12.2.3 [+]26834480 R12.AD.C.delta.11 [+]28840822 R12.TXK.C.delta.11 [-]17428617 - XDK patch (Opatch applicable for FMW versions 11.1.1.9.0 & 11.1.1.7.0) [-]34856303 - Weblogic Smart update patch [ENUU] |
4.1 Start the new patching cycle
. ~/EBSapps.env run adop phase=prepare workers=8 |
4.2 Upgrade AD and TXK
In case you need to upgrade AD and TXK please refer to the following MOS Doc:
Applying the Latest AD and TXK Release Update Packs to Oracle E-Business Suite Release 12.2 (Doc ID 1617461.1)
4.3 Apply patch 17428617
Download and unzip the patch 17428617 for FMW 11.1.1.9.0 or 11.1.1.7.0 depending on your FMW version.
. ~/EBSapps.env patch export ORACLE_HOME=$FMW_HOME/oracle_common export PATH=$ORACLE_HOME/OPatch:$PATH cd /stage/17428617 opatch apply |
4.4 Patching WLS BSU
If you need to apply weblogic patches and BSU utility runs slowly, follow the steps in the following MOS Doc to resolve this issue:
Enhancement for WLS BSU (Smart Update): Resolves Very Long Time to Apply Patches – Especially When Checking for Patch Conflicts (Doc ID 2271366.1)
Ensure that bsu is version 3.3.0
. ~/EBSapps.env patch cd $FMW_HOME/utils/bsu/ ./bsu.sh -version Oracle Smart Update. Version: 3.3.0.0 |
Download patch 31136426: SMART UPDATE TOOL ENHANCEMENT V4.
Copy content of this zip file to $FMW_HOME/utils/bsu/
unzip p31136426_1036_Generic.zip -d $FMW_HOME/utils/bsu |
Run the update script (with two dots):
cd $FMW_HOME/utils/bsu . ./bsu_update.sh install |
4.5 Applying the latest WLS PSU
If the current WLS PSU level is too old patch 34856303 (ENUU) may not be avaiable for it.
In such case, download the latest 37927515 WLS Patch Set Update 10.3.6.0.250715 (PG6B).
Apply the patch as follows:
unzip -o p38073442_R12_GENERIC.zip unzip -o p37927515_1036_Generic.zip cp PG6B.jar patch-catalog_28017.xml $FMW_HOME/utils/bsu/cache_dir/ cd $FMW_HOME/utils/bsu $FMW_HOME/utils/bsu/bsu.sh -install -patch_download_dir=$FMW_HOME/utils/bsu/cache_dir -patchlist=PG6B -prod_dir=$FMW_HOME/wlserver_10.3 |
If you face any conflicts, remove using this command:
$FMW_HOME/utils/bsu/bsu.sh -remove -patchlist=XXXX -prod_dir=$FMW_HOME/wlserver_10.3 |
4.6 Patching Oracle WebLogic Server (WLS)
For Patch 34856303 the instructions to be followed :
Download the latest Fusion Middleware consolidated zip file patch mentioned in
Document 2877607.1 : Oracle E-Business Suite Release 12.2: Consolidated List of Oracle Fusion Middleware Patches and Bug Fixes.
“Section 3: Application Tier Patching Guidance”
Example: 35710787: EBS RELEASE 12.2 CONSOLIDATED FMW FIXES FOR OCT 2025
Obtain this WebLogic Smart Update Patch 34856303 from the downloaded consolidated zip file through the following path:
etcc-bundle/[platform]/wls/10.3.6.0.*****/p34856303_1036_Generic.zip |
Per the following doc: Oracle E-Business Suite Release 12.2: Consolidated List of Oracle Fusion Middleware Patches and Bug Fixes (Doc ID 2877607.1)
If Patch 25333306 (SUY4) or Patch 17495356 (CIH8) or Patch 26795917 (DN1F) or Patch 33560682 (9UNH) is installed it must be manually rolled back before applying Patch 34856303 (ENUU).
Change memory allocation to prevent bsu fail
vi $FMW_HOME/utils/bsu/bsu.sh |
Change from
MEM_ARGS="-Xms512m -Xmx1024m -XX:+UseParallelGC" |
to
MEM_ARGS="-Xms1024m -Xmx4096m -XX:+UseParallelGC" |
. ~/EBSapps.env patch cp -v ENUU.jar patch-catalog_27940.xml $FMW_HOME/utils/bsu/cache_dir/ cd $FMW_HOME/utils/bsu $FMW_HOME/utils/bsu/bsu.sh -install -patchlist=ENUU -prod_dir=$FMW_HOME/wlserver_10.3 |
If you face any conflicts, remove using this command:
$FMW_HOME/utils/bsu/bsu.sh -remove -patchlist=XXXX -prod_dir=$FMW_HOME/wlserver_10.3 |
4.7 Apply the EBS ISG consolidated patch
Download and unzip the patch 34766982.
. ~/EBSapps.env run adop phase=apply patches=34766982 patchtop=/backup_bx10/patches/ISG_12.2 adop phase=finalize workers=4 adop phase=cutover adop phase=cleanup workers=4 |
5 Configuring ISG
5.1 Change Signon% profile options values (conditional)
This step applies only if the Signon% profile options values are set.
Upon execution ISGRestSetup.pl generates a new ISGADMIN password. This password contains 9 characters and there may be repeating characters. It may not work with password policies defined by the Signon% profile options. So before running ISGRestSetup.pl it is advised to temporarily change the following profile options:
Login to EBS as SYSADMIN. Go to System Administrator>Profile>System. Query the profile options starting with ‘Signon Password%’.
- Change the profile option ‘Signon Password Hard To Guess’ to ‘No’ at the ISGADMIN user level.
- Change the profile option ‘Signon Password Length’ to 8 at the ISGADMIN user level.
- Change the profile option ‘Signon Password Custom’ to an empty value at the Site level.
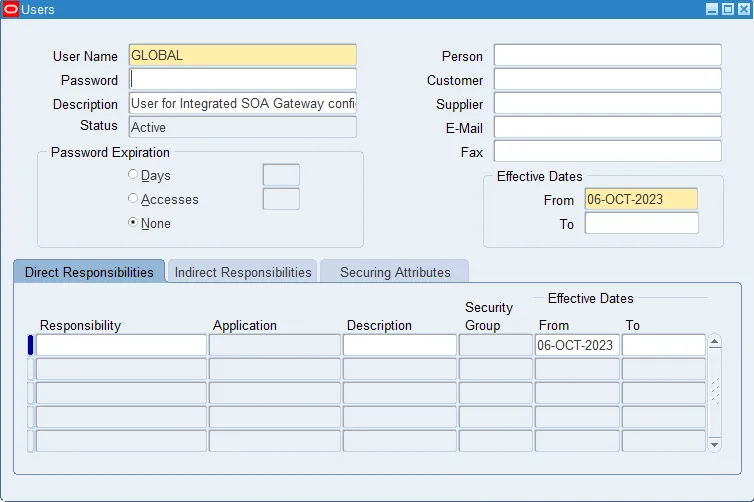
5.2 Create GLOBAL user
Create the GLOBAL user per MOS Doc 2287614.1 via the Security > User > Define form.
Description: User for Integrated SOA Gateway configuration
Check whether the GLOBAL user exists in Security > User > Define form.
If the user is not present, create the GLOBAL user via the Security > User > Define form.
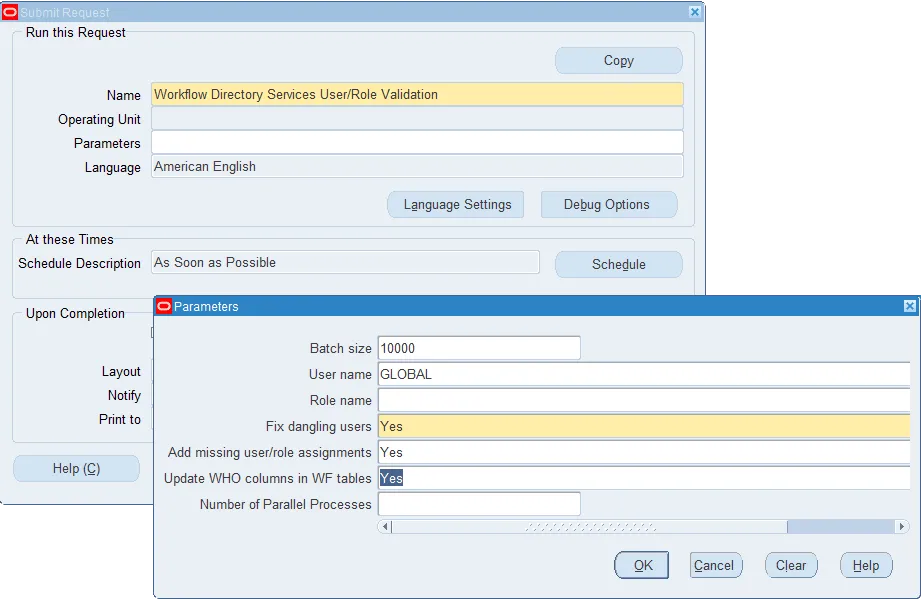
It is not required to assign any responsibility to the user.
Run the ‘Workflow Directory Services User/Role Validation’ concurrent request to propagate the changes. Specify the parameters as shown on the below screenshot:
5.3 Increase the weblogic timeout (WLIOTimeoutSecs)
Some ISG requests may take a long time to be processed. To make sure that they are not interrupted please edit or add the following setting to at least 900 seconds:
WLIOTimeoutSecs 900 |
In the configuration files returned by the following command
ls -l $FMW_HOME/webtier/instances/EBS_web_*OHS*/config/OHS/EBS_web*/mod_wl_ohs.conf |
The setting should be added to the <Location /webservices> section.
This configuration file is not overwritten by autoconfig.
If this setting is performed in the production it will be transferred to the cloned instances.
The example of the modified configuration file is presented on the below screenshot:

5.4 Increase OAFM servers Java Heap Size
How To Increase The Java Heap Size For EBS Applications Release 12.2.10 and above ? (Doc ID 2990462.1)
Increasing Java Heap Size may be required to increase the OAFM servers performance. If the Integrated SOA Gateway services are accessed by a large number of users in your EBS instance the default heap size may not be enough. Please perform the following steps:
The Weblogic admin server URL can be found by running grep wls_admin $CONTEXT_FILE on the application tier:

The URL is then formed as http(s)://<wls_admin_host>.<wls_admin_domain>:<wls_adminport>/console (use https if s_wls_admin_sslEnabled is true).
1) Login into Weblogic admin server and click on Environment > Servers and then click on the “Lock & Edit” button.
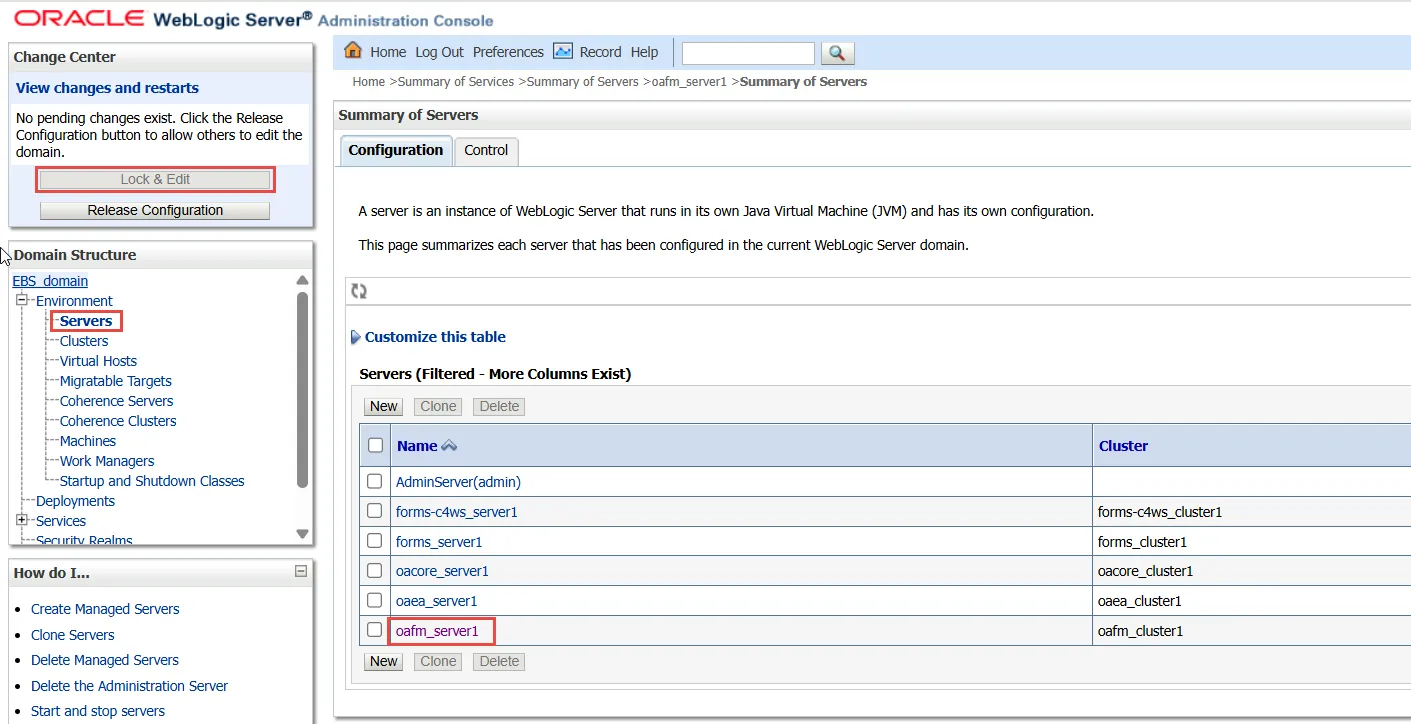
2) Click on oafm_server1 and navigate to Server Start > Arguments
Configure the oafm heap size between 2G and 4G. If you have sufficient memory, we recommend 4G.
For example: To change –Xms and –Xmx parameter values to 4096m use:
-Xms4096m -Xmx4096m
Click on the Save button.
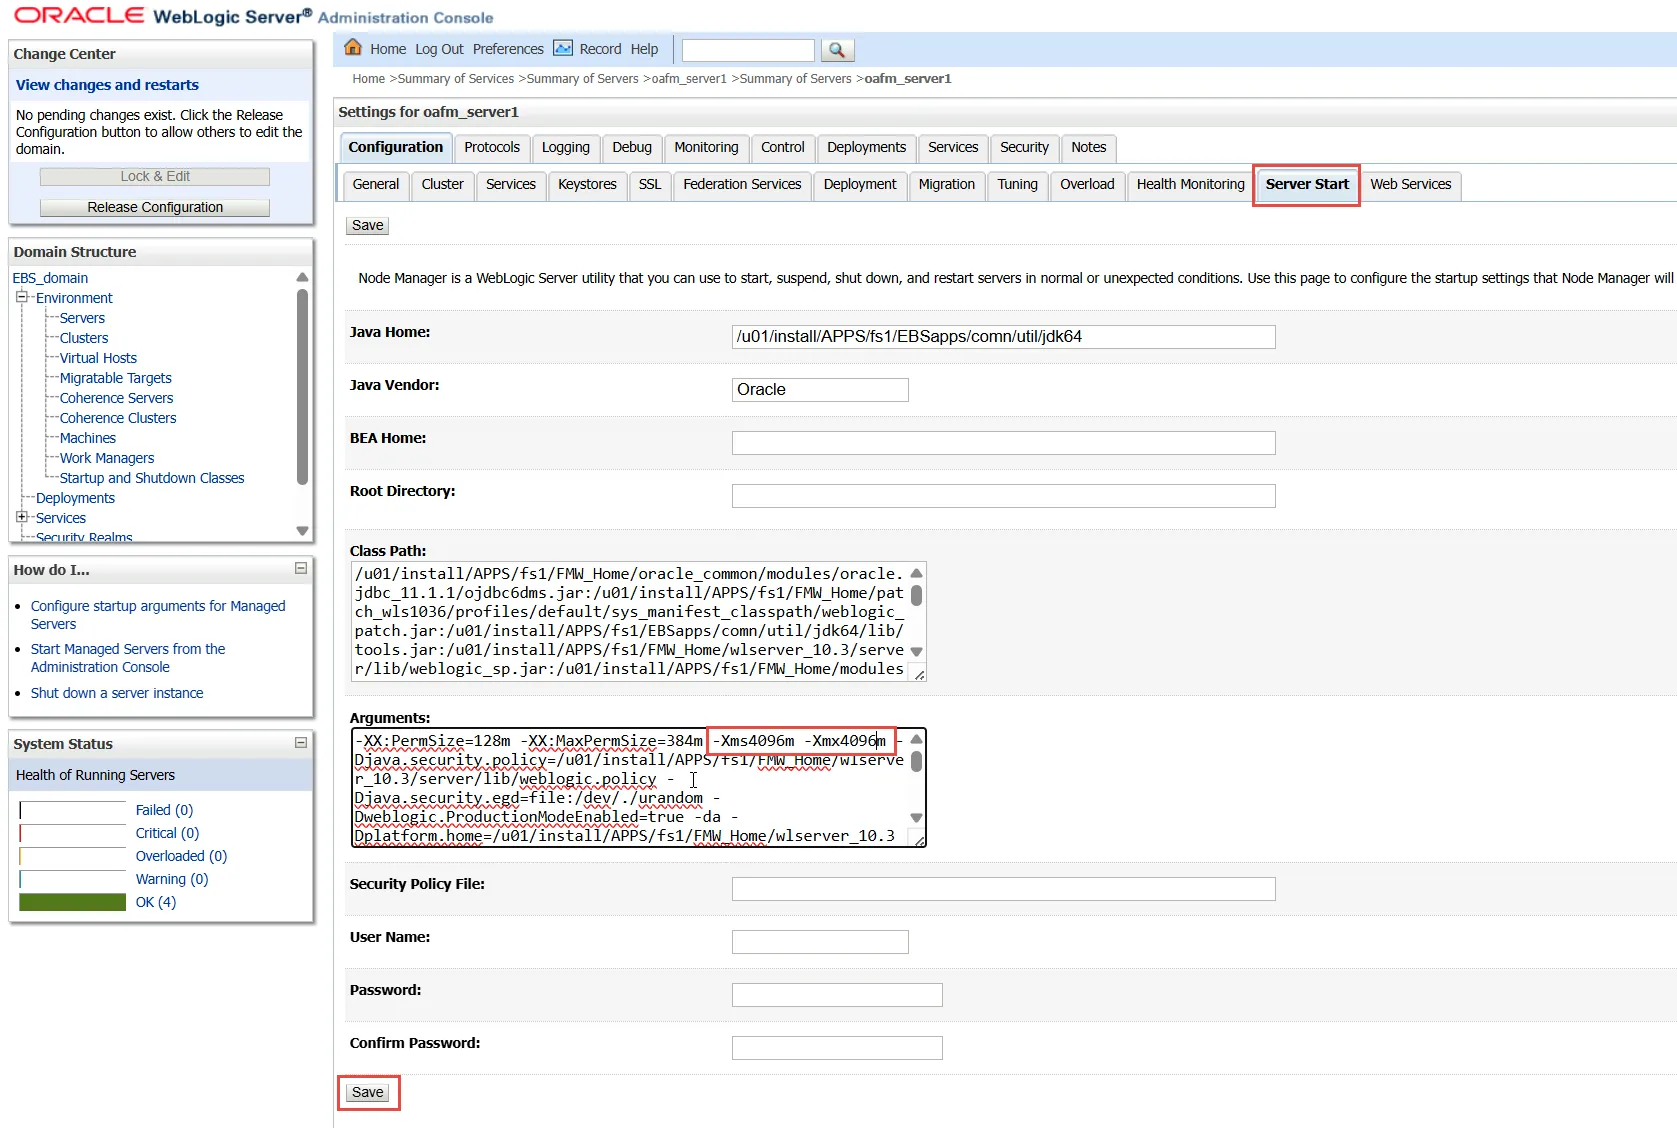
4) If you have more oafm servers, redo the steps to change the heap size for each server.
5) Click on the “Activate Changes” button.
6) Restart the oafm managed servers (skip this step if you continue with section 5.5 below — the ISGRestSetup.pl script will restart the oafm servers automatically).
5.5 Run the REST configuration ISGRestSetup.pl script
Run the script on the primary EBS node where the Weblogic Admin server is running (ps -ef | grep -i Admin).
There is no need to rerun the script on the other nodes in a multi-node installation.
The script does not run autoconfig but restarts the applications.
The script restarts the application services on all the apps nodes.
You may want to stop the concurrent managers before running ISGRestSetup.pl to make the services restart quicker.
But the Weblogic servers have to be up and running.
. ~/EBSapps.env run cd $ADMIN_SCRIPTS_HOME ./adcmctl.sh abort apps/**** |
Please wait until all concurrent manager (FNDLIBR) processes have exited. Some may not exit on their own — kill them with kill -9. Otherwise ISGRestSetup.pl will continue but the concurrent managers may not start back up normally, as the shutdown request will still be running.
cd /tmp perl $FND_TOP/patch/115/bin/ISGRestSetup.pl |
Provide the following parameters:
- APPS password
- Weblogic username
- Weblogic password
Review the script log file txkScript.log and make sure that no errors occurred.
Then please run the following command:
ant -f $JAVA_TOP/oracle/apps/fnd/isg/ant/isgDesigner.xml -Dfile=$JAVA_TOP/oracle/apps/fnd/isg/ant/isg_service.xml -Dverbose=OFF |
And then the command:
ant -f $JAVA_TOP/oracle/apps/fnd/isg/ant/isgDesigner.xml -Dactions="postclone" -Dverbose=ON -DserviceType=REST |
Review the script results file and ensure that all the webservices got redeployed successfully:
cat $NE_BASE/inst/$CONTEXT_NAME/soa/RESTPostCloneResults.txt |
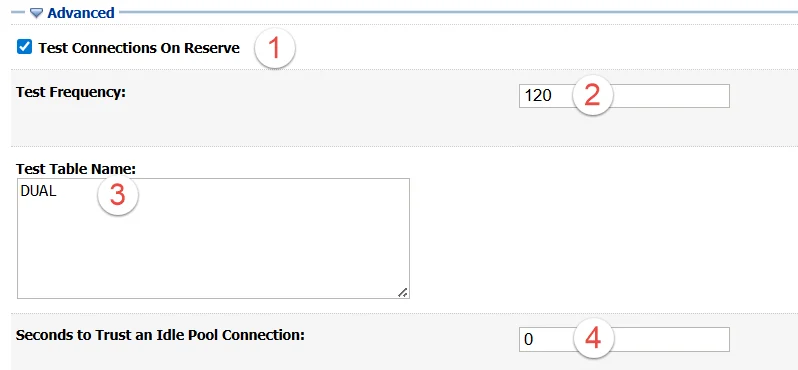
5.6 Configure the ISGDatasource connection parameters
These settings will ensure that connections are tested and the following error does not happen:
Internal Exception: java.sql.SQLException: Failed to setAutoCommit to true for pool connection: First we got Closed Connection |
Login to the Weblogic console
Go to Services>Data Sources>ISGDatasource>Connection Pool>Advanced
1) Check ‘Test Connections On Reserve’
2) Test Frequency: 120
3) TestTableName: DUAL
4) Seconds to Trust an Idle Pool Connection: 0
5) Click on the “Activate Changes” button.
5.7 Sync the run and patch filesystems
It is required to run the adop fs_clone phase to make sure that the ISG configuration persists a cutover.
adop phase=fs_clone workers=4 |
5.8 Change Signon% profile options values back
After running ISGRestSetup.pl change the Signon% profile options values back. It is recommended to leave them on the ISGADMIN user level though. As it will be required to run ISGRestSetup.pl in the future in the cloned instances.
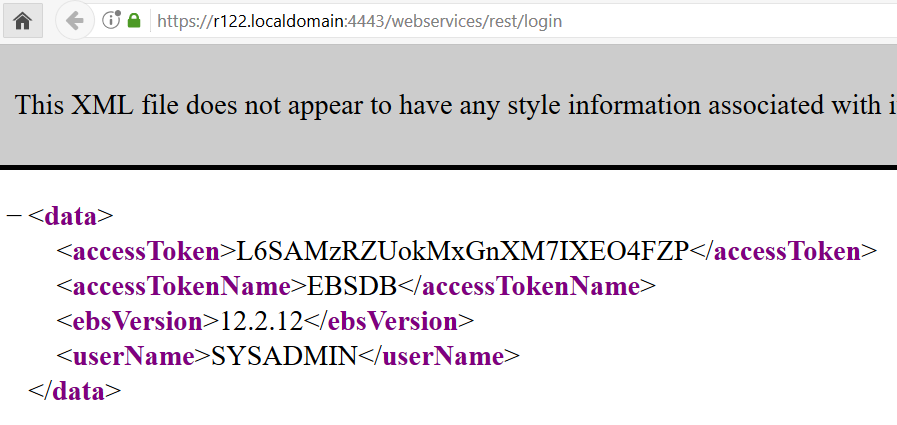
5.9 Verify that REST login service works
Set the profile option ‘FND: Authn Service Token Scope’ to ‘Header and Body’ at the site level per the Doc ID 2938671.1
Then access the following URL:
http://ebshost.ebsdomain:port/webservices/rest/login
E.g:
https://r122.localdomain:4443/webservices/rest/login
When prompted, provide Oracle E-Business Suite System Administration user credentials. You should see a response, similar to the following in the browser:
6 Configuring ISG in cloned instances
6.1 Change the Signon% profile option values (conditional)
This step applies only if the Signon% profile options values are set.
Upon execution ISGRestSetup.pl generates a new ISGADMIN password. This password contains 9 characters and there may be repeating characters. It may not work with password policies defined by the Signon% profile options. So before running ISGRestSetup.pl it is advised to temporarily change the following profile options:
Login to EBS as SYSADMIN. Go to System Administrator>Profile>System. Query the profile options starting with ‘Signon Password%’.
- Change the profile option ‘Signon Password Hard To Guess’ to ‘No’ at the ISGADMIN user level.
- Change the profile option ‘Signon Password Length’ to 8 at the ISGADMIN user level.
- Change the profile option ‘Signon Password Custom’ to an empty value at the Site level.
6.2 Increase the weblogic timeout (WLIOTimeoutSecs)
Some ISG requests may take a long time to be processed. To make sure that they are not interrupted please edit or add the following setting to at least 900 seconds:
WLIOTimeoutSecs 900 |
In the configuration files returned by the following command
ls -l $FMW_HOME/webtier/instances/EBS_web_*OHS*/config/OHS/EBS_web*/mod_wl_ohs.conf |
The setting should be added to the <Location /webservices> section.
This configuration file is not overwritten by autoconfig.
If this setting is performed in the production it will be transferred to the cloned instances.
The example of the modified configuration file is presented on the below screenshot:
6.3 Increase OAFM servers Java Heap Size
Increasing Java Heap Size may be required to increase the OAFM servers performance. If the Integrated SOA Gateway services are accessed by a large number of users in your cloned EBS instance the default heap size may not be enough. Please perform the following steps:
How To Increase The Java Heap Size For EBS Applications Release 12.2.10 and above? (Doc ID 2990462.1)
6.4 Run the ISG postclone steps
Please refer to the document:
Installing Oracle E-Business Suite Integrated SOA Gateway, Release 12.2 (Doc ID 1311068.1)
Section 7: Configuring Oracle E-Business Suite Integrated SOA Gateway on Release 12.2.x Cloned From an Existing 12.2.x Environment
Run the script on the primary EBS node where the Weblogic Admin server is running.
There is no need to rerun the script on the other nodes in a multi-node installation.
The script does not run autoconfig but restarts the applications.
You may want to stop the concurrent managers before running ISGRestSetup.pl to make the services restart quicker.
But the Weblogic servers have to be up and running.
. ~/EBSapps.env run cd $ADMIN_SCRIPTS_HOME ./adcmctl.sh abort apps/**** |
Please wait until all concurrent manager (FNDLIBR) processes have exited. Some may not exit on their own — kill them with kill -9. Otherwise ISGRestSetup.pl will continue but the concurrent managers may not start back up normally, as the shutdown request will still be running.
cd /tmp perl $FND_TOP/patch/115/bin/ISGRestSetup.pl |
Provide the following parameters:
- APPS password
- Weblogic username
- Weblogic password
Review the script log file txkScript.log and make sure that no errors occurred.
Then please run the following command:
ant -f $JAVA_TOP/oracle/apps/fnd/isg/ant/isgDesigner.xml -Dfile=$JAVA_TOP/oracle/apps/fnd/isg/ant/isg_service.xml -Dverbose=OFF |
Then please run the following mandatory command to redeploy the webservices in the cloned instance:
ant -f $JAVA_TOP/oracle/apps/fnd/isg/ant/isgDesigner.xml -Dactions="postclone" -Dverbose=ON -DserviceType=REST |
Review the script results file and ensure that all the webservices got redeployed successfully:
$NE_BASE/inst/$CONTEXT_NAME/soa/RESTPostCloneResults.txt |
6.5 Blitz Report post clone instructions
If Blitz Report is installed in your instance, please run the following commands to redeploy the custom webservice.
ant -f $COMMON_TOP/java/classes/oracle/apps/fnd/isg/ant/isgDesigner.xml -Dactions="undeploy" -DirepNames="XXEN_WEBSERVICES" -DserviceType=REST -Dverbose=ON ant -f $COMMON_TOP/java/classes/oracle/apps/fnd/isg/ant/isgDesigner.xml -Dactions="deploy" -DirepNames="XXEN_WEBSERVICES" -Dalias="xxen_webservices" -DserviceType=REST -Dverbose=ON -DauthType=BOTH |
For multi node EBS instances run the following script in all the oafm server nodes:
blitz_report_r12_v******/etc/generate_webservice_artifacts.sh |
The above script is not required for single node EBS instances.
6.6 Configure the ISGDatasource connection parameters
These settings will ensure that connections are tested and the following error does not happen:
Internal Exception: java.sql.SQLException: Failed to setAutoCommit to true for pool connection: First we got Closed Connection |
Login to the Weblogic console
Go to Services>Data Sources>ISGDatasource>Connection Pool>Advanced
1) Check ‘Test Connections On Reserve’
2) Test Frequency: 120
3) TestTableName: DUAL
4) Seconds to Trust an Idle Pool Connection: 0
6.7 Sync the run and patch filesystems
Run fs_clone to copy the ISG configuration to the patch fs. It is required to ensure that it persists a patching and a cutover.
adop phase=fs_clone |
6.8 Change the Signon% profile option values back
After running ISGRestSetup.pl change the Signon% profile options values back. It is recommended to leave them on the ISGADMIN user level though. As it will be required to run ISGRestSetup.pl in the future in the cloned instances.
7 Troubleshooting
7.1 $❴patchContextFile❵ doesn’t exist
The following errors may occurr when running ISGRestSetup.pl
BUILD FAILED
/u01/install/APPS/fs1/EBSapps/comn/java/classes/oracle/apps/fnd/txk/util/txkISGConfigurator.xml:1892: ${patchContextFile} doesn't exist ! |
The following query returns only one row for the run file system:
source EBSapps.env run

sqlplus apps/*****

set linesize 250
col name format a20
col path format a100
col status format a5
select
focf.name,
focf.path,
focf.status
from
fnd_oam_context_files focf
where
focf.ctx_type='A' and
focf.name not in ('TEMPLATE','METADATA') and
(focf.status is null or focf.status!='H'); |
Solution
Please follow the action plan from the following document to run autoconfig on the patch filesystem:
txkISGConfigurator.xml Fails with Error PatchContextFile Doesn’t Exist (Doc ID 2227168.1)
1) Disable the ebs_login trigger. Connect to the ebs_system user. If your EBS patch level is too low and ebs_system user does not exist yet, connect to the system user.
sqlplus ebs_system/****** alter trigger ebs_logon disable; |
2) Apply the patch env file
source EBSapps.env patch |
3) Run autoconfig for the patch fs
cd $ADMIN_SCRIPTS_HOME ./adautocfg.sh |
4) Enable ebs_login trigger
source EBSapps.env run sqlplus ebs_system/****** alter trigger ebs_logon enable; |
5) Run autoconfig for the run fs
cd $ADMIN_SCRIPTS_HOME ./adautocfg.sh |
6) Execute the following query and make sure two rows are returned
sqlplus apps/*****

set linesize 250
col name format a20
col path format a100
col status format a5
select
focf.name,
focf.path,
focf.status
from
fnd_oam_context_files focf
where
focf.ctx_type='A' and
focf.name not in ('TEMPLATE','METADATA') and
(focf.status is null or focf.status!='H'); |
Workaround
Some users have only one filesystem in their test EBS environments, so it is not possible to use the above solution.
The following workaround may be used:
Take a backup of $JAVA_TOP/oracle/apps/fnd/txk/util/txkISGConfigurator.xml
cp -v $JAVA_TOP/oracle/apps/fnd/txk/util/txkISGConfigurator.xml $JAVA_TOP/oracle/apps/fnd/txk/util/txkISGConfigurator.xml_`date +%F` |
Execute the following commands to edit the file.
sed -i '/otherFSFWM_HOME/d' $JAVA_TOP/oracle/apps/fnd/txk/util/txkISGConfigurator.xml sed -i '/fail unless="present.patchcontextfile"/d' $JAVA_TOP/oracle/apps/fnd/txk/util/txkISGConfigurator.xml |
Rerun ISGRestSetup.pl
7.2 ISG Integration Repository Page Does Not Open
This issue is described in the following MOS doc:
Unable to Open the Page after Clicking on Integration Repository “504 Gateway Time-out” or “Failure of Web Server bridge” (Doc ID 1937511.1)
Solution
Gather statistics on the following tables:
exec fnd_stats.gather_table_stats('APPLSYS','AD_PM_PRODUCT_INFO');
exec fnd_stats.gather_table_stats('APPLSYS','AD_PM_PROD_FAMILY_MAP');
exec fnd_stats.gather_table_stats('APPLSYS','FND_LOOKUP_ASSIGNMENTS');
exec fnd_stats.gather_table_stats('APPLSYS','FND_IREP_CLASSES');
exec fnd_stats.gather_table_stats('APPLSYS','FND_OBJECTS'); |
7.3 Additional password prompt when cloning EBS
After configuring Integrated SOA Gateway when cloning production and running adcfgclone.pl script a new password prompt appears:
Enter the password for DataSource ISGDatasource : |
Solution
The issue is described in the following Doc:
After REST configuration, when running adcfgclone.sh script is asking to provide password for DataSouce ISGDatasource (Doc ID 2794581.1)
Please run the following query to get the ISGADMIN password and provide it:
select fnd_vault.get('ISG','ISGADMIN') from dual; |
7.4 Resolving possible issue accessing the weblogic admin console
While trying to login to the weblogic admin console to set the oafm heap size you may face the following error in the browser:
The Server is not able to service this request: [Socket:000445]Connection rejected, filter blocked Socket, weblogic.security.net.FilterException: [Security:090220]rule 2 |
To solve this issue you need to update s_wls_admin_console_access_nodes variable in the apps context file as per Doc ID 2542826.1. But it may not be easily possible.
To work this issue around you may use the SSH port forwarding.
Open your SSH client, e.g. KiTTY or PuTTY. Provide the Weblogic Admin server Host Name, but do not login yet. Go to Connection>SSH>Tunnels
Fill the following fields:
Source port – the port on your laptop that you will access in your browser, e.g. 12345
Destination – the EBS admin server host name and port.
Click on the Add button.
Then start the session by clicking on Open or Start buttons.
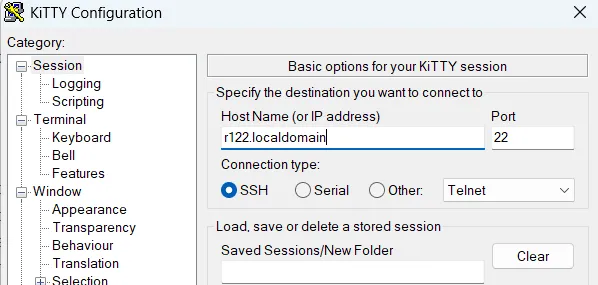

Now open your browser and access the following url:
http://localhost:12345/console
While the SSH session is running it will forward your workstation port 12345 to the Weblogic server admin port 7051.

7.5 Configure token authentication
To make sure that token authentication works perform the following checks:
Check the value of the profile option “Applications Database ID” at the site level:
sqlplus apps/****
select fnd_profile.value('APPS_DATABASE_ID') from dual; |
This profile option inherits its value from the context file parameter s_dbc_file_name. So you may also check the value of that parameter as applmgr:
[applmgr@master ~]$ grep s_dbc_file_name $CONTEXT_FILE |
Then execute the following query:
select ip.session_cookie_name from icx_parameters ip; |
This should return a NULL. If it does not return NULL, run the following update per Doc ID 1159313.1:
update icx_parameters ip set ip.session_cookie_name=null; commit; |
Then execute the following query and make sure the cookie name matches the APPS_DATABASE_ID profile value above.
sqlplus apps/**** select icx_sec.getsessioncookiename cookie_name from dual; |
Open the following configuration file:
$INST_TOP/soa/isgagent.properties |
Make sure that ISG_AGENT_JNDI_NAMES is set to the same value as the APPS_DATABASE_ID profile option. Example:
ISG_AGENT_JNDI_NAMES=EBSDB |
Note: If you change the parameter value, it is also required to change the prefix of the following parameters:
EBSDB.ISG_RUNTIME_CONTEXT EBSDB.ISG_TEMP_DIRECTORY_LOCATION EBSDB.ISG_EBS_EXTERNAL_URL EBSDB.ISG_EBS_INTERNAL_URL EBSDB.ISG_EBS_ADMIN_SERVER_URL |
If you performed any changes, restart the oafm managed server.
[applmgr@demo ~]$ cd $ADMIN_SCRIPTS_HOME [applmgr@demo scripts]$ ./admanagedsrvctl.sh stop oafm_server1 [applmgr@demo scripts]$ ./admanagedsrvctl.sh start oafm_server1 |
7.6 Configure ISG for TLS
If your EBS instance is TLS enabled and you do not use a load balancer then check if the required ISG TLS configuration steps are performed.
7.7 ERROR: Unable to connect to server using username
ISGRestSetup.pl may fail with the following message in txkScript.log:
createEBSDataSource:
     [echo] ********************************************************************
     [echo] CREATING DATA SOURCE
     [echo] ********************************************************************
     [wlst]
     [wlst] Connecting to server using username:weblogic url:wlsserver.com:7001
     [wlst]
     [wlst] Connecting to t3://wlsserver.com:7001 with userid weblogic ...
     [wlst] ************************************************************************
     [wlst] ERROR: Unable to connect to server using username:weblogic url:wlsserver.com:7001
BUILD FAILED
/u01/app/oracle/fs2/EBSapps/comn/java/classes/oracle/apps/fnd/txk/util/txkISGConfigurator.xml:1851: Error Creating DataSource
Total time: 3 minutes 53 seconds |
The issue may happen on environments where weblogic servers take a long time to start.
Please use delaytime parameter, which makes ISGRestSetup.pl wait longer after the Weblogic Admin server and EBS apps restarts before checking the status:
perl $FND_TOP/patch/115/bin/ISGRestSetup.pl 300 |
It makes ISGRestSetup.pl wait for additional 300 seconds, which should be sufficient in most environments.
7.8 java.lang.SecurityException: User: ISGADMIN~~EBSDB, failed to be authenticated
When running the installation script, the following error message is displayed:
java.lang.SecurityException: User: ISGADMIN~~EBSDB, failed to be authenticated. |
The following query returns N, which means that the password from the FND vault does not work in EBS:
select fnd_web_sec.validate_login('ISGADMIN',fnd_vault.get('ISG','ISGADMIN')) login_successful from dual; |
Solution: Change the EBS ISGADMIN password.
1. Query the password for the ISGADMIN user with the following query as APPS:
select fnd_vault.get('ISG','ISGADMIN') from dual; |
2. Login to EBS as SYSADMIN. Go to System Administrator > Profile > System. Query the profile options starting with ‘Signon Password%’ for ISGADMIN user.
3. Change the profile option ‘Signon Password Hard To Guess’ to ‘No’ for ISGADMIN user.
4. Change the profile option ‘Signon Password Length’ to 8 for ISGADMIN user.
5. Change the profile option ‘Signon Password Custom’ to an empty value at the Site level.
6. Go to System Administrator > Security > User > Define and update the ISGADMIN password to the one retrieved by the above query as per Doc ID 2708647.1.
7. Revert the ‘Signon Password Custom’ profile options value back at the Site level. It is recommended to leave the changed profiles at the ISGADMIN user level.
8. Rerun the Blitz install.sh script.
9. Review the logfiles to ensure that the xxen_webservices webservice has been deployed successfully.
7.9 ISG_SERVICE_EXECUTION_ERROR
When clicking on the Blitz Upload Excel output LOV, the following error message is displayed:
ISG_SERVICE_EXECUTION_ERROR |
Investigation
Run “FND SOA Runtime Error” report and review the output. You may also share the output with our support for the investigation
There are several possible solutions depending on the error messages.
Error 1
Error while retrieving artifacts for classID : XXXX
Solution 1.1
Restart the weblogic managed oafm servers.
Solution 1.2
If restarting oafm servers does not help and the EBS instance is multi-node, you may need to run the following script on all the oafm nodes: $APPLTMP/generate_webservice_artifacts.sh
Generic solutions
Clear the middle tier cache using the Functional Administrator responsibility.
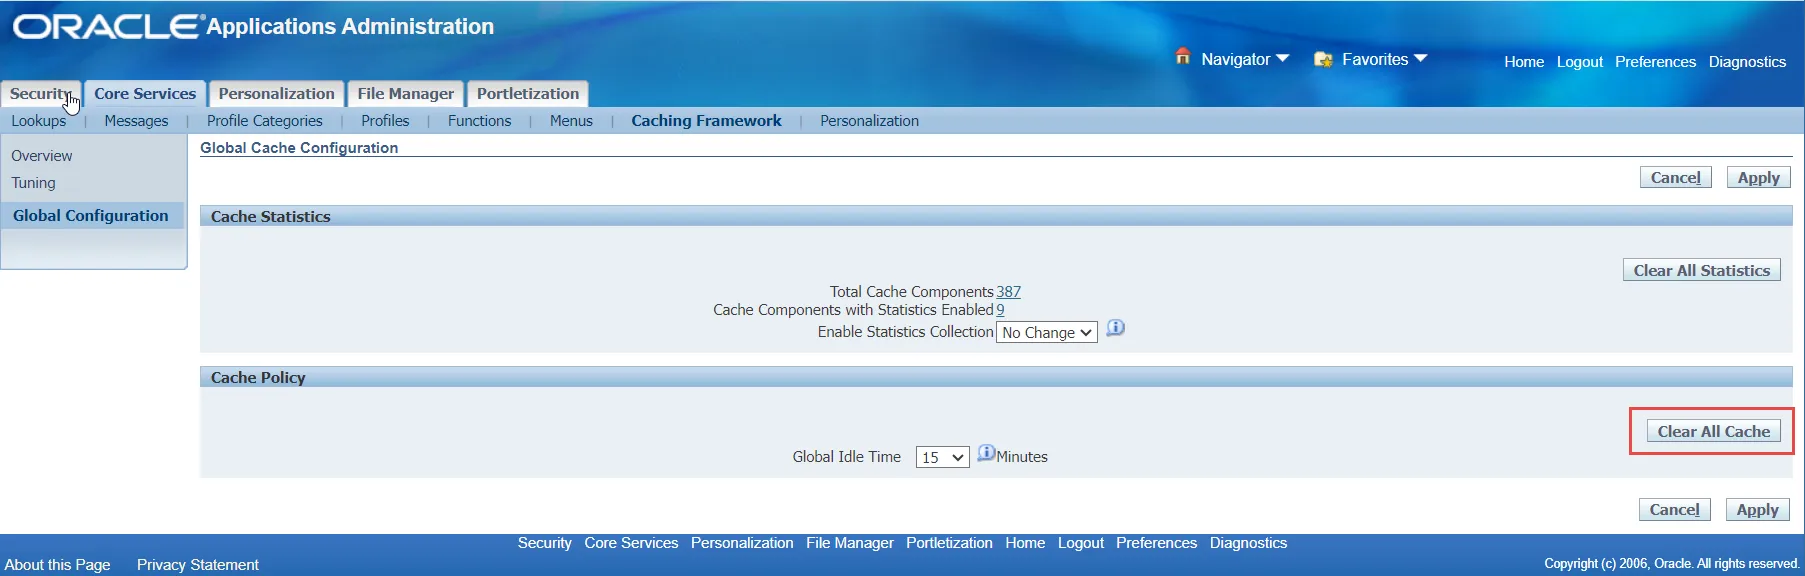
If clearing the cache does not help please try to reset the ISGDatasource from the weblogic admin console:
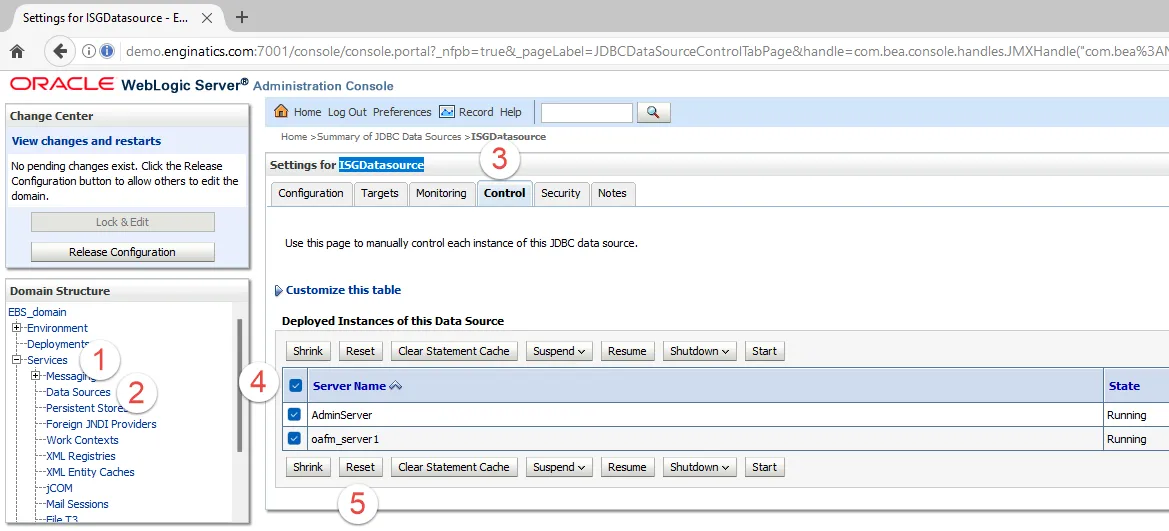
If you do not find ISGDatasource in Weblogic console and it is a cloned instance, then you need to run ISG post clone steps.
7.10 ISG_SERVICE_AUTH_FAILURE
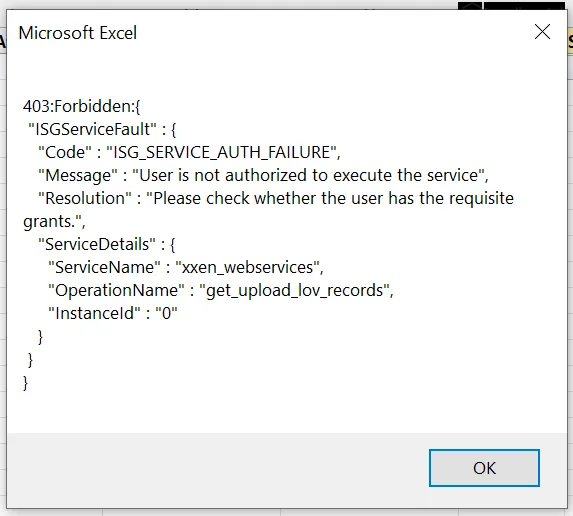
When clicking on the Blitz Upload Excel output LOV, the following error message is displayed:
ISGServiceFault ISG_SERVICE_AUTH_FAILURE User is not authorized to execute the service Please check whether the user has the requisite grants |
Solution:
The issue can be resolved by one of the below options:
1. Check the Blitz Report installation log file if it contains a warning about missing GLOBAL user. If it does, then create the GLOBAL user per MOS Doc 2287614.1 via the Security > User > Define form.
2. Clear the cache using Functional Administrator responsibility.
3. Execute the steps according to the following MOS Doc:
12.2.5 Cannot Invoke a Service due to “User is not authorized to execute the service” Error (KB492961)
1. Go into the responsibility: System Administrator Responsibility
2. Navigate to Request> Run
3. Select “Compile Security” concurrent program with the parameter Everything=”Yes”
4. Restart all oafm servers.
7.11 ISG_INVALID_ALIAS
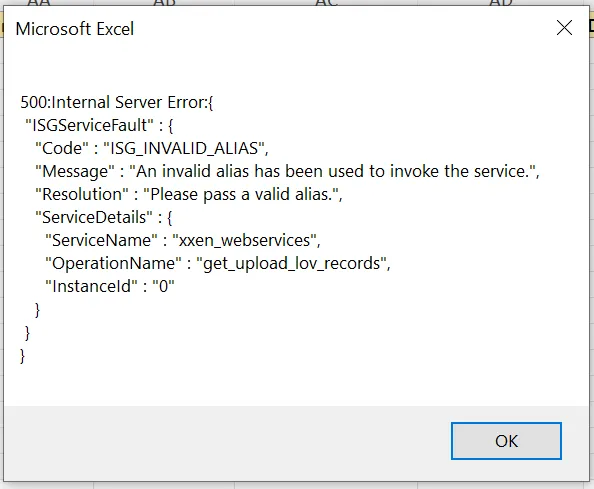
When clicking on the Blitz Upload Excel output LOV, the following error message is displayed:
ISGServiceFault ISG_INVALID_ALIAS An invalid alias has been used to invoke the service Please pass a valid alias |
The following error may be observed in the Blitz Report installation logfile if you try to run install.sh:
[java] Exception occurred. [java] Exception message is : Password for user:ASADMIN is not configured. |
Solution:
Please configure the Integrated SOA Gateway (ISG) and rerun Blitz Report install/upgrade script install.sh. If the issue happens only in a cloned instance, please execute the ISG post clone steps.
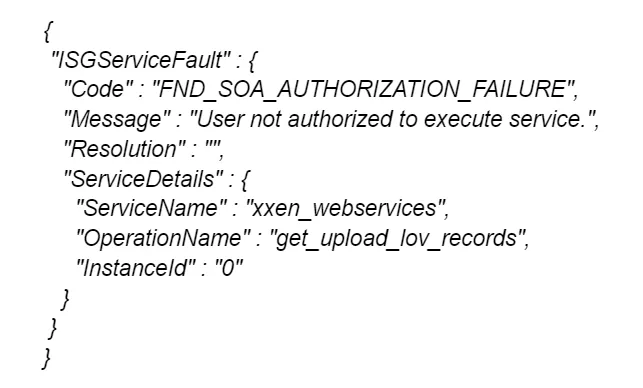
7.12 FND_SOA_AUTHORIZATION_FAILURE
When clicking on the Blitz Upload Excel output LOV, the following error message is displayed:
ISGServiceFault FND_SOA_AUTHORIZATION_FAILURE User not authorized to execute service |
Cause:
This error may occur after Blitz Report upgrade and webservice redeployment.
Solution:
1. Clear the cache using Functional administrator responsibility.
2. If the above does not help, reboot the OC4J containers for r12.1.3 and Weblogic servers for EBS 12.2.
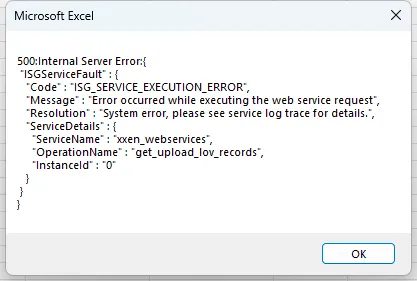
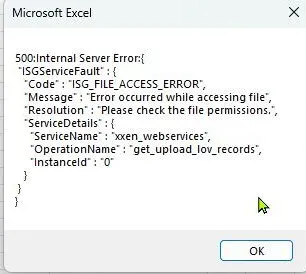
7.13 ISG_FILE_ACCESS_ERROR
When clicking on the Blitz Upload Excel output LOV, the following error message is displayed:
500:Internal Server Error ISGServiceFault ISG_FILE_ACCESS_ERROR Error occurred while accessing file Please check the file permissions |
Solutions:
1. Redeploy the Blitz custom webservice on the application server:
ant -f $COMMON_TOP/java/classes/oracle/apps/fnd/isg/ant/isgDesigner.xml -Dactions="undeploy" -DirepNames="XXEN_WEBSERVICES" -DserviceType=REST -Dverbose=ON ant -f $COMMON_TOP/java/classes/oracle/apps/fnd/isg/ant/isgDesigner.xml -Dactions="deploy" -DirepNames="XXEN_WEBSERVICES" -Dalias="xxen_webservices" -DserviceType=REST -Dverbose=ON -DauthType=BOTH |
Restart the weblogic oafm managed servers.
2. The following error may be observed when redeploying the webservice according the the solution 1:
[java] Exception occurred. [java] Exception message is : Password for user:ASADMIN is not configured. |
Please configure the Integrated SOA Gateway (ISG) and rerun Blitz Report install/upgrade script install.sh. If the issue happens only in a cloned instance, please execute the ISG post clone steps.
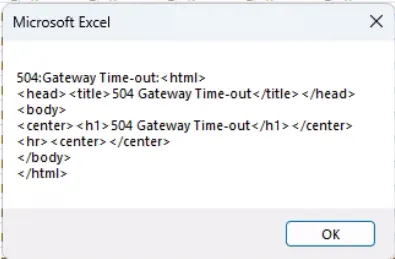
7.14 504: Gateway Time-out
When querying general ledger balance data in Blitz FSG, the following error message may be shown:
Solution:
7.15 Could not authenticate user/token
When using Blitz Uploads or GL Financial Statement and Drilldown (FSG) report the following error pops up in Excel:
401:Unauthorized:Could not authenticate user/token |
Solution
Please check if the value of the profile option “Apps Servlet Agent” at the Site level points to the correct EBS instance. It may not be updated after cloning. It may also point to an incorrect URL after running autoconfig in case of multi-node EBS installation with external nodes (e.g. iSupplier nodes). The last autoconfig execution should be performed on the Admin node.
7.16 Existing state of package body APPS.XXEN_REPORT has been invalidated
When using Blitz Uploads or GL Financial Statement and Drilldown (FSG) report the following error pops up in Excel:
ORA-06512: at APPS.XXEN_WEBSERVICES, line 593 ORA-04061: existing state of package body APPS.XXEN_REPORT has been invalidated ORA-04065: not executed, altered or dropped package body APPS.XXEN_REPORT ORA-06508: PL/SQL: could not find program unit being called: APPS.XXEN_REPORT |
Solution
Please reset the ISGDatasource from the weblogic admin console