Blitz Report™ for Oracle APEX User Guide
Introduction
Blitz Report for Oracle APEX runs reports against an Oracle database and delivers the result as a formatted Excel workbook, a CSV or TSV file or, where the administrator has set it up, a PDF. One application serves two kinds of installation: a standalone database, which users open with an APEX account, and an Oracle Fusion Cloud installation, which users open from Fusion and which also runs reports on Fusion data.
This guide is for users who run reports. It covers finding and running reports, templates, the run history, schedules, the Excel add-in and the Fusion specifics. Installation and configuration are in the installation guide, report development and administration in the developer guide.
The application links to this guide: the Options card of a report links to Options, the Details card to Running reports and Templates, and the sign-in page to the top of the guide.
1 Getting started
To run your first report: open Reports, pick a report from the list or search it by name, enter restrictive parameter values, for example one period or one customer, and click Run. The output is downloaded when the run completes.
1.1 Signing in
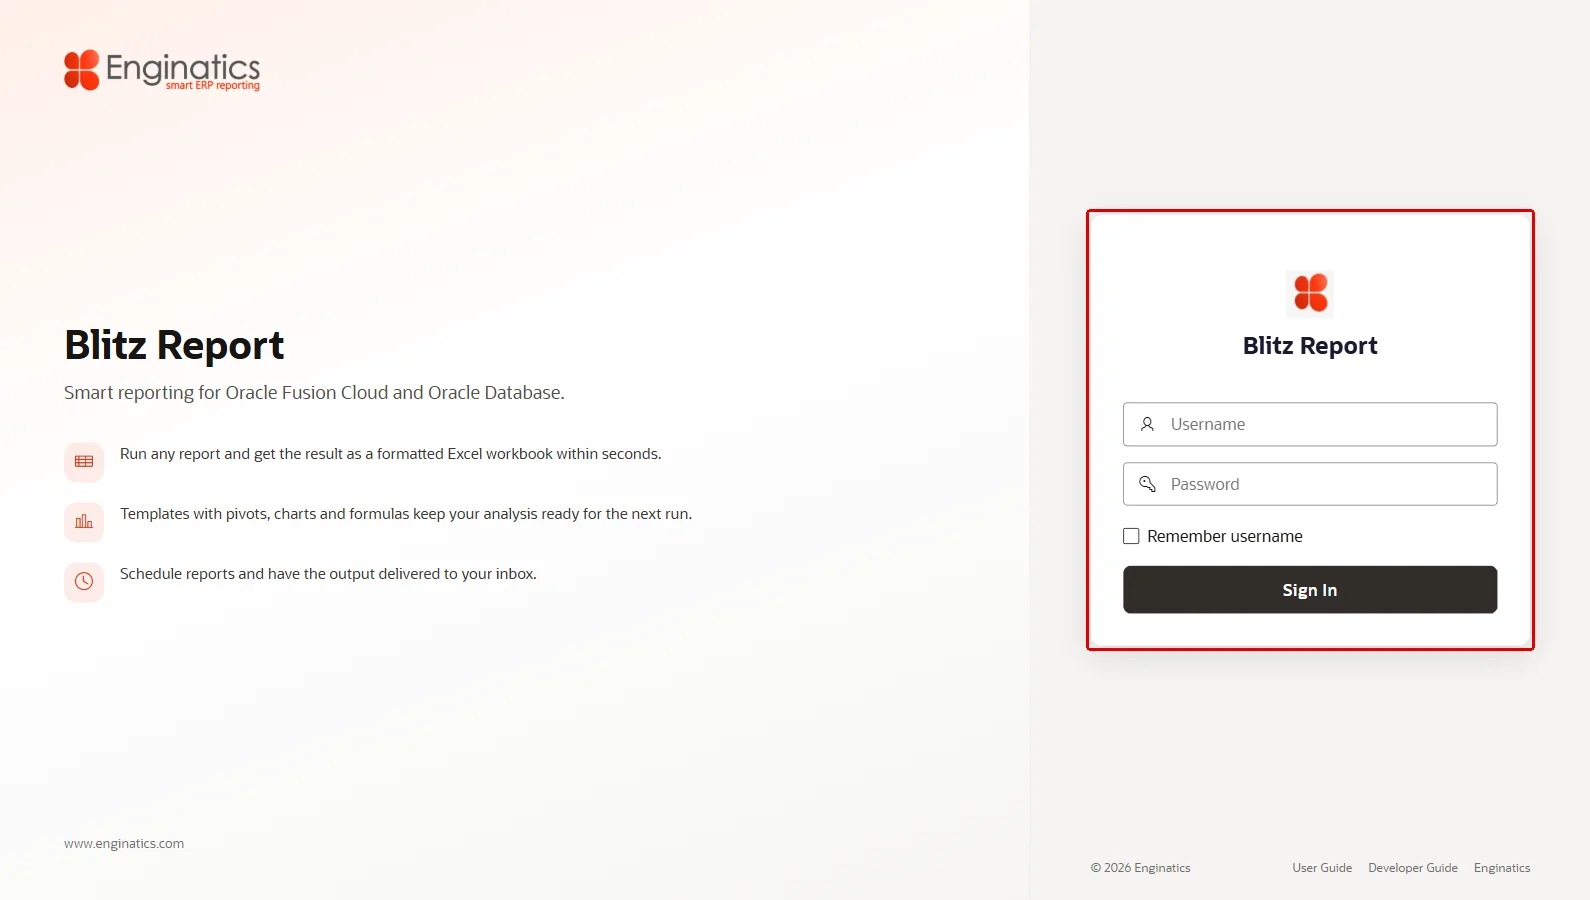
Open the address your administrator gave you, enter the Username and Password of your APEX account and click Sign In. Remember username keeps your user name in the browser for the next sign-in; where the APEX instance allows staying signed in, Remember me shows in its place. Installations that authenticate against database accounts show that sign-in instead.
Your administrator assigns your access level. A user whose access is not set up is refused with a message to contact the administrator. Users of an Oracle Fusion installation sign in through Fusion, see Opening Blitz Report from Fusion.
The sign-in page:
1.2 The page header
The header carries the pages of the application:
- Reports: the Reports page and the report browser, where reports are found and run.
- Runs: the run history with the online viewer.
- Schedules: the schedules of reports.
- Setup: report development, shown to users with Blitz Report Access User Admin, Developer or System. It is described in the developer guide.
- Administration: users, profile options, lookups, housekeeping and the Excel add-in environments, shown to users with System access and, as long as the site-level Blitz Report Access is not set, to the APEX workspace administrator. It is described in the developer guide.
The page header of a user with System access:

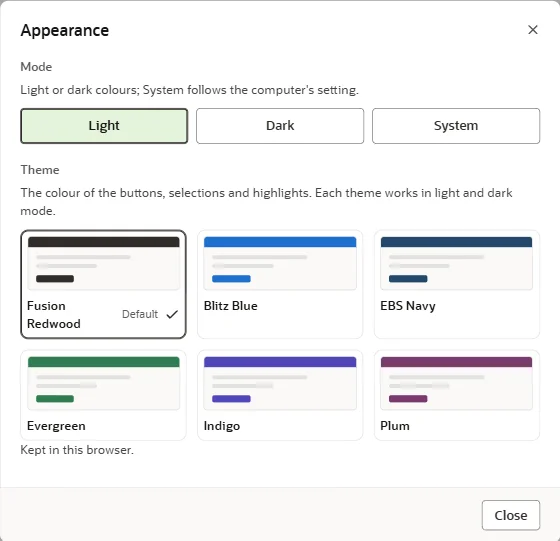
On the right, the header shows your user name, a gear that opens the Appearance settings and Sign Out. Appearance sets the Mode (Light, Dark or System, which follows the computer’s setting) and the colour Theme. The choice is kept in the browser you make it in.
The Appearance settings, opened with the gear in the header:
The browser’s Back button returns to the previous screen, and every screen has its own address, so a report, a run or a schedule can be bookmarked.
1.3 The Reports page
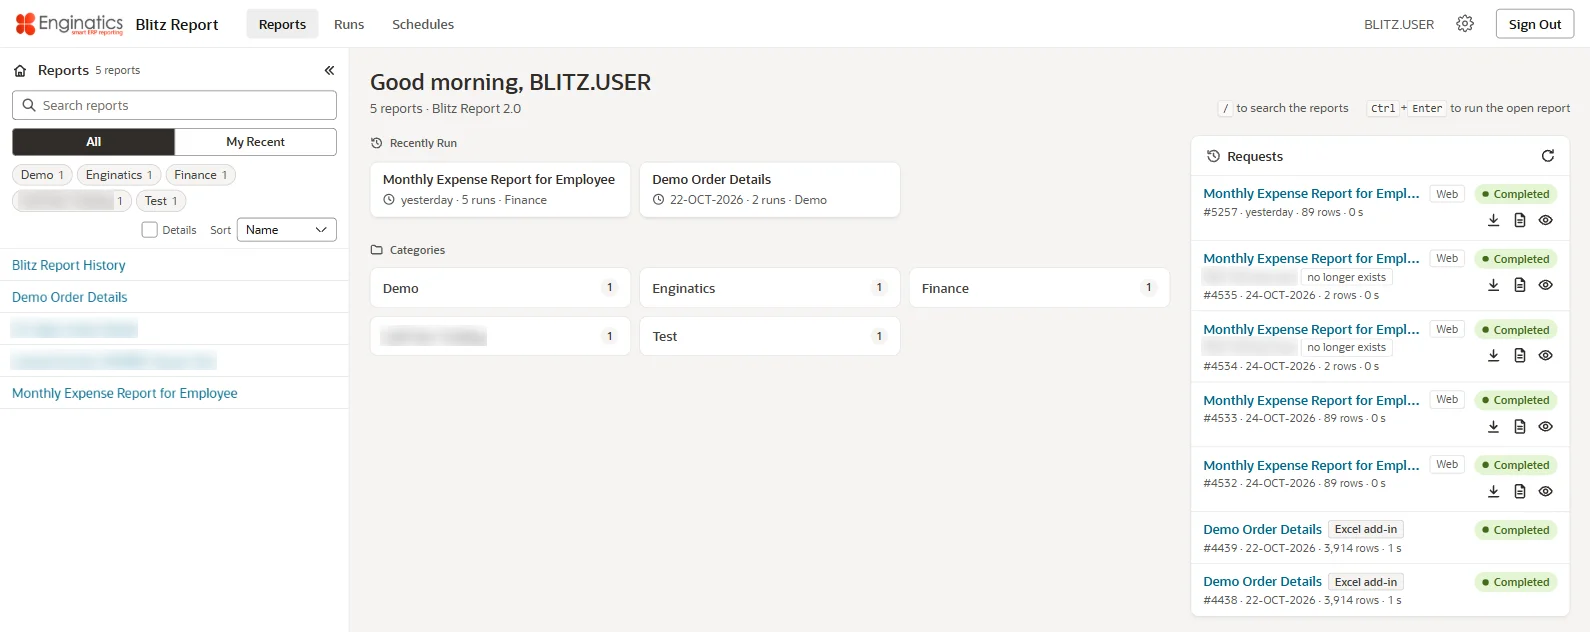
Reports opens the Reports page, the home of the application. It greets you, states the number of reports you can run and the version of Blitz Report, and offers:
- the report browser on the left, with the search field (/ moves to it), see Finding a report;
- Recently Run: the reports you ran last, as cards that open the report;
- Categories: one card per category with the number of its reports; a card restricts the report browser to that category;
- Requests: your latest requests across all reports, with their status and the output, see Requests.
The / and Ctrl+Enter hints on the Reports page are the two keys used most: search the reports, and run the open report.
The Reports page, the home of the application:
2 Running reports
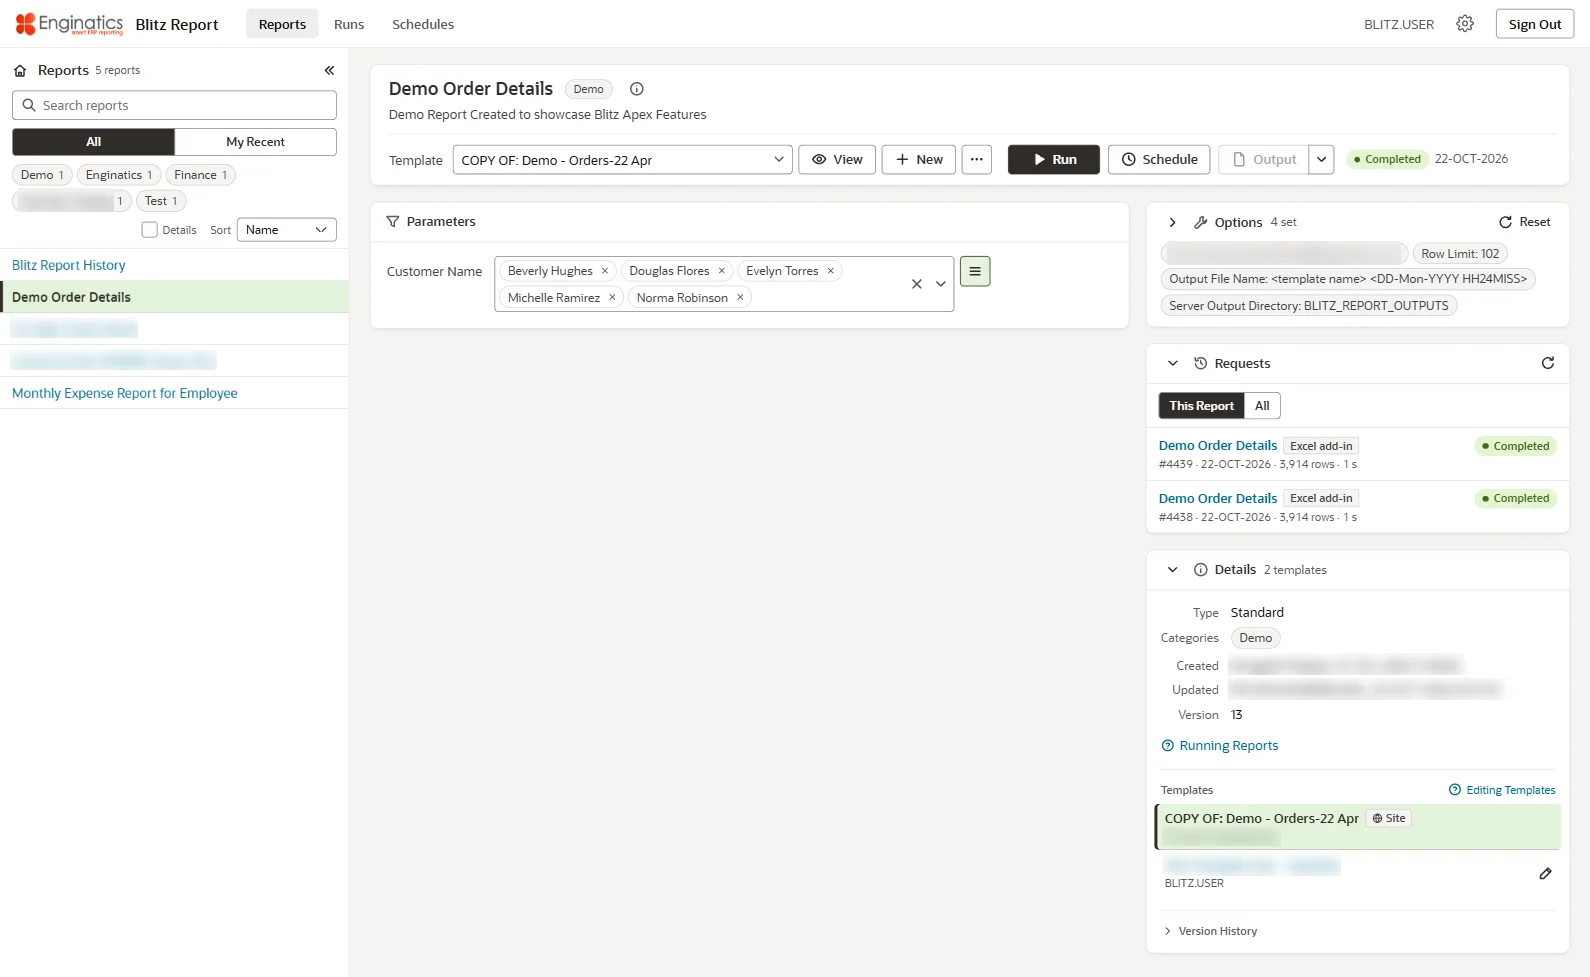
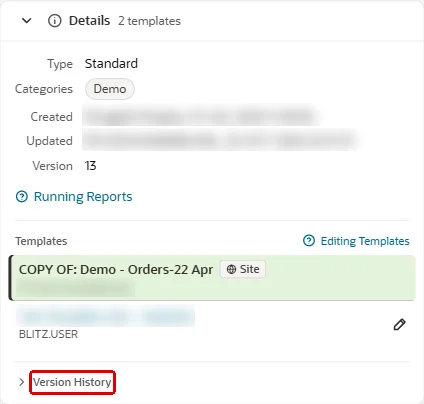
A report opens on its run screen: the parameters at the top, Run and Schedule, the Options card, the Requests card and the Details card. The info button next to the report name reveals the Details card, and Show More expands a long description. The Details card links to this chapter and to Templates; for a report of the Enginatics library, About This Report opens its page in the online report library. Version History at the end of the card lists the versions of the report SQL with their date, user and comment.
A report on its run screen:
The Details card, revealed by the info button next to the report name:
2.1 Finding a report
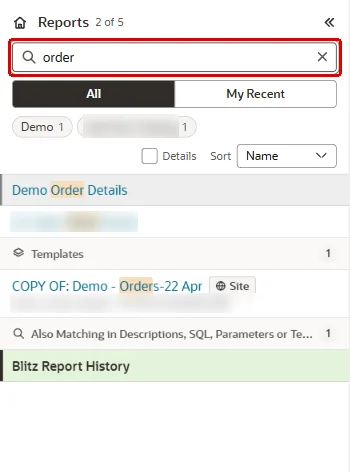
Words typed into the search field above the report list, which the / key moves to, filter the report names; Enter opens the highlighted report and Down moves into the list. After a short pause, a search text of three or more characters is also looked up in report descriptions, parameters, templates and SQL: matching templates are listed under Templates and open their report with that template, and further matching reports follow under Also Matching in Descriptions, SQL, Parameters or Templates. The search for any text within the report SQL, such as part of a column name, follows while the focus stays in the search field or the list, or starts with Search the Report SQL.
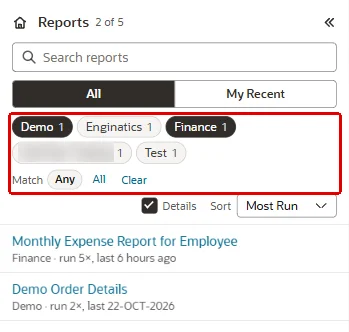
The list shows either All reports you can run or My Recent, the reports you ran, and is sorted by Name, Last Run or Most Run; Details shows under each report its categories and how often and when you ran it. The category buttons restrict the list to the selected categories, with Match Any or All of them; More Categories lists the rest, and Clear shows every category again. A category card on the Reports page or a category in a report’s Details card restricts the list the same way. Your category selection, view and sort are kept in the browser you use.
The report browser restricted to two categories:
Hide the report list folds the browser into a rail with the search and the home button; the rail opens it again.
A search for part of a name, with the matching templates and reports listed:
Converted Discoverer workbooks. Where the administrator has set the profile option Blitz Report Discoverer Mode to a category, the report browser opens on that category and lists its Templates instead of its reports: one row per template, each the sheet of a converted workbook, under the report it belongs to. The search field reads Search templates and searches template names, descriptions and report names; a template opens its report with the template applied. For a user with User access, the Reports page’s Recently Run cards and the Requests lists lead with the template as well. Picking another category, or Clear Category, shows the report list again.
2.2 Selecting a template
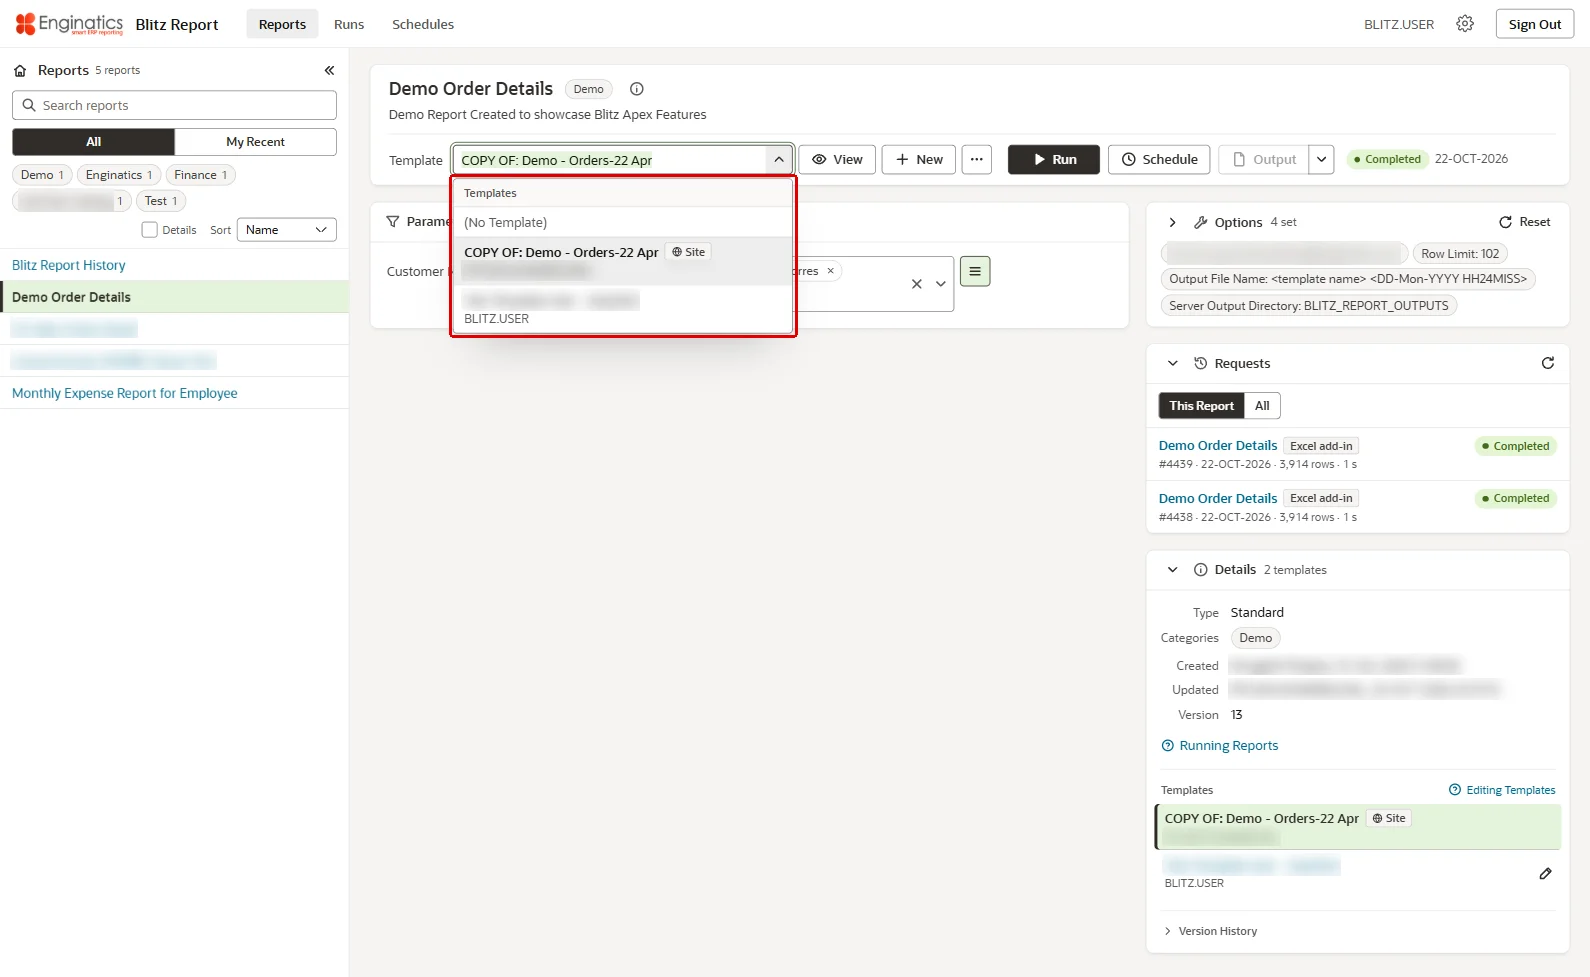
The Template field lists the templates of the report after the entry (no template), which runs the report without a template. Picking one applies its parameter defaults and excluded parameters and its conditions, and the report opens with it the next time. The list marks the Default template of the report, a template shared with the Site, one shared with you or your database role (Shared) and a Restricted one. The pencil (Edit) and the plus (New) next to the Template field open the template editor; for a template you may not change, the pencil reads View. The Details card lists the same templates with their owner and description, and the pencil next to a template opens it in the editor.
The Template field lists the templates of the report:
2.3 Parameters
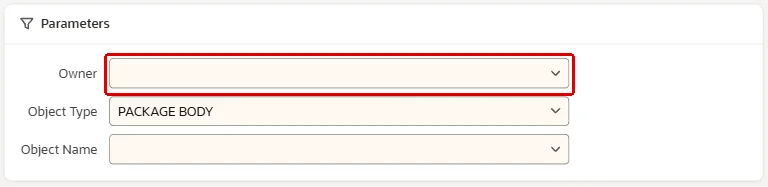
Report parameters filter, limit or define the extracted data. A parameter can have a list of values that either enforces the selection of one value or allows matching by wildcards such as % or _. A required parameter is marked by the pale yellow background of its field. Up and Down move to the previous or next parameter as Tab does, skipping greyed parameters. A greyed parameter either depends on another one whose value is not entered yet, or takes its value from the template.
A required parameter has a pale yellow background:
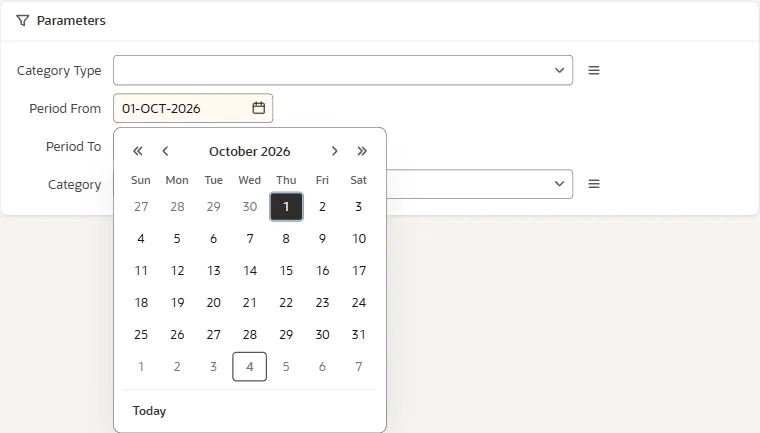
Enter opens a parameter’s list of values filtered by the typed text, where Up and Down move and a second Enter picks the highlighted value. In a date or date-time parameter, Enter opens the calendar on the typed date, where the arrow keys move between days and Enter picks one. Escape closes a list or calendar, and F9 or Alt+Down also opens it. A large list asks you to type before it searches.
Enter in a date parameter opens the calendar:
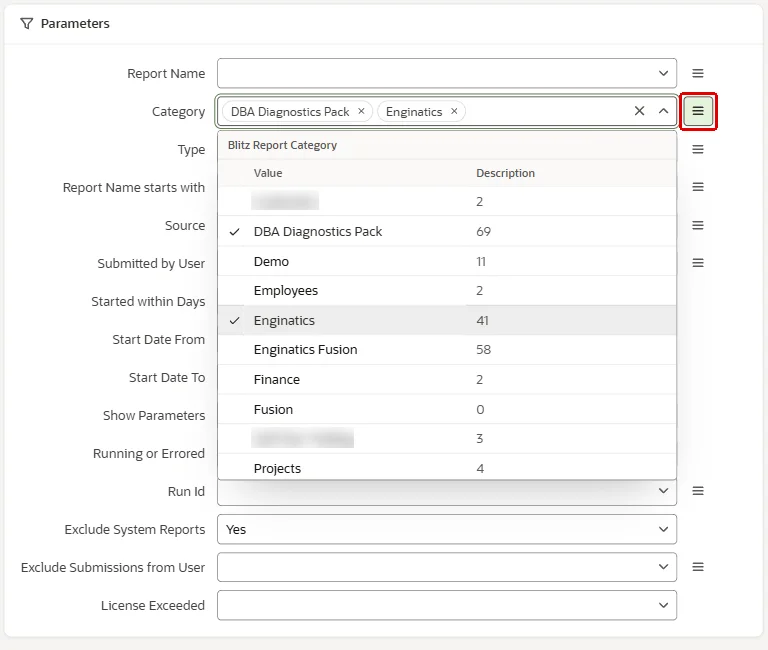
The list icon next to a parameter (Switch to multiple values) switches it to multiple values, and so does pasting several values, for example from Excel cells. Enter then ticks or unticks the highlighted value of the list, and closing the list applies the selection; a parameter without a list takes each typed value with Enter. Backspace removes the last value, and the x of the field removes all of them.
The prompted conditions of the selected template follow the parameters under Template Conditions.
Your own default values for a report, and the defaults of a template, are saved from the Actions menu.
A parameter switched to multiple values, with its list of values open:
2.4 Running and output
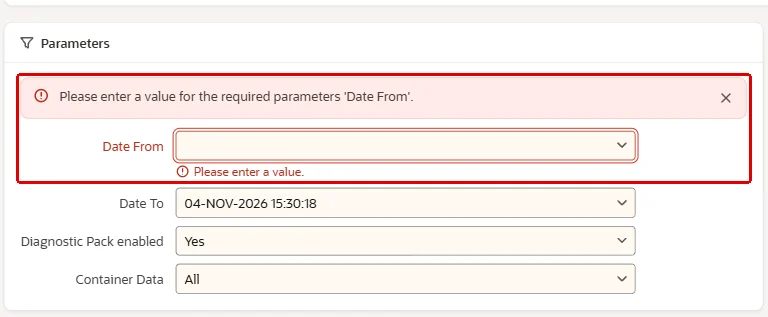
Run, or Ctrl+Enter in any field, submits the report as a background process of the database. A value that does not pass its validation is highlighted, with the message Please correct the highlighted values, and an empty required parameter with Please enter a value for the required parameters <name>. While a request of the report is still running, Run stays available: the message Request <id> of this report is still running. Change a value to submit it again. prevents the same request from being submitted twice by accident.
An empty required parameter is highlighted when you click Run:
When a request submitted on the page completes, its output is downloaded. A PDF opens in a new browser tab; where the browser blocks pop-ups, a notification offers Open instead. A failed request shows its message in the Requests card. While the page is in a background browser tab, the download waits until you return to it.
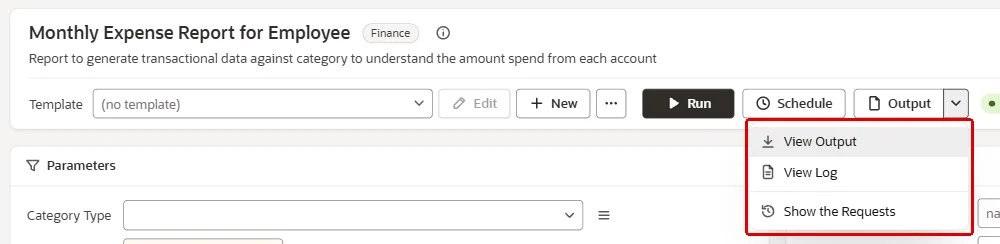
Output re-opens the last output of the report; its menu Output and log offers View Output, View Log and Show the Requests, which brings the Requests card into view. The log opens in the online viewer.
The Output button re-opens the last output; its menu offers View Output, View Log and Show the Requests:
2.5 Requests
The Requests card lists the requests of This Report or All your requests, newest first: the report and template, the request number, when it was submitted, the number of rows and the duration of a completed request, its status, and where it was started (the web page, the Excel add-in, the desktop app or a schedule). The status of a request submitted on the page refreshes automatically (Auto-Refresh), and its output opens on completion; the refresh button reloads the list. The card shows your 8 latest requests; Show More extends the list to 30 and then by 30 at a time, and Show Fewer returns to 8.
Each request offers its actions: View output downloads the output, View log opens the log, View the output online opens the output in the viewer, and Cancel this run stops a running request after a confirmation. The report name opens the report; the message of a failed request shows under it. A request whose template was deleted or is not usable by you carries the marker no longer exists next to the template name, and its report name opens the report without a template.
The Requests card lists the requests of the report, newest first:
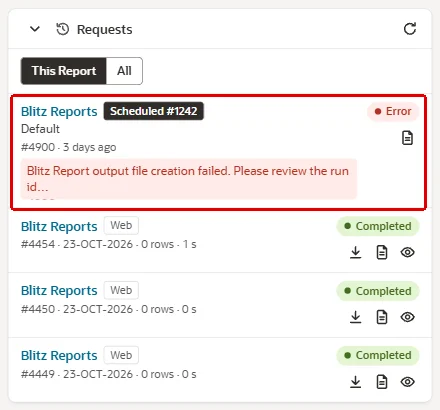
Each request offers its actions:

2.6 Actions menu
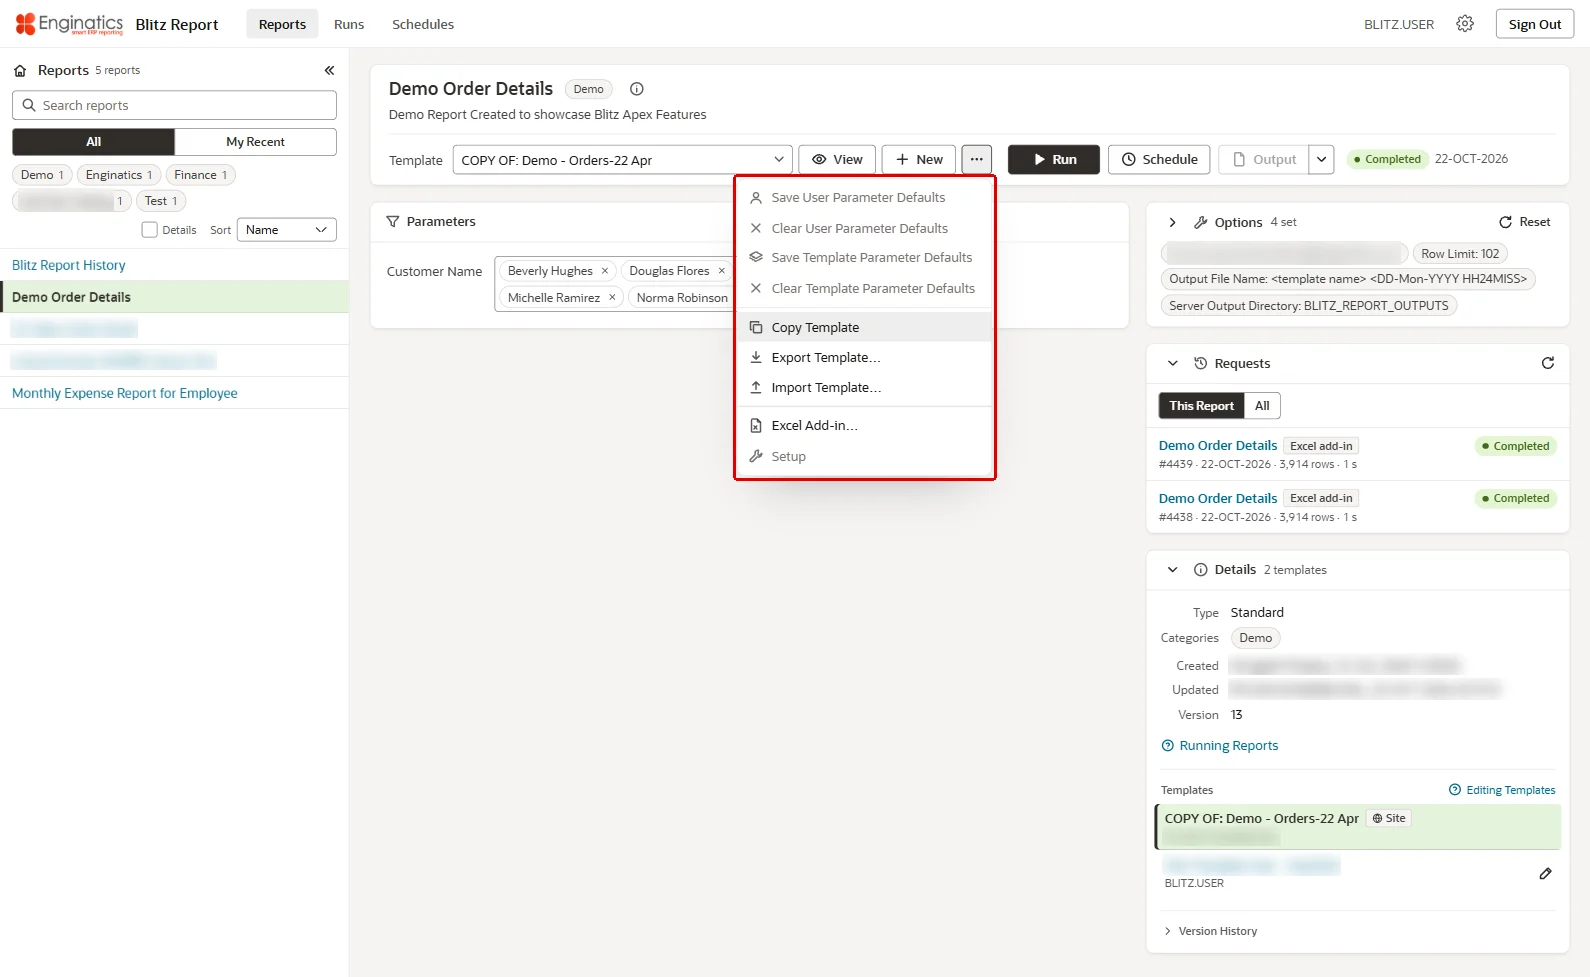
The Actions button (…) next to the Template field holds the following entries. An entry that does not apply in the current context is disabled, and its tooltip says why.
Save User Parameter Defaults
Saves the currently entered parameter values as your own defaults for the report, so that the run screen shows them the next time you open it. Enabled when the entered values differ from the current defaults.
Clear User Parameter Defaults
Removes your saved defaults for the report, so that the report’s own defaults apply again.
Save Template Parameter Defaults
Saves the entered parameter values as defaults of the selected template, together with the values entered for the template’s prompted conditions. Only the values that differ from the report’s defaults are stored. Enabled if you are allowed to change the template. A template parameter default can be marked as Locked in the template editor, so that it cannot be changed on the run screen.
Clear Template Parameter Defaults
Removes the parameter defaults saved for the selected template.
Copy Template
Creates a copy of the selected template. You become the owner of the copy and can change it freely, while the original stays untouched.
Export Template…
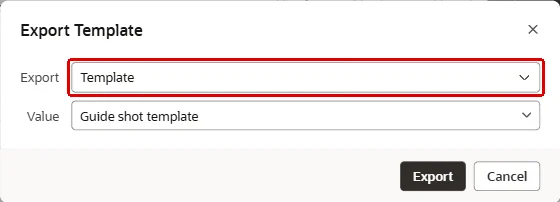
Downloads templates as an XML file, for example to move them to another instance: the selected Template, or all Templates from Report, Templates from Owner or Templates from Category. Only templates you are allowed to change are offered.
Export Template offers the selected template or all templates of a report, owner or category:
Import Template…
Uploads a template XML file created by Export Template. Copy Template, Export Template and Import Template are available to users allowed to create templates.
Excel Add-in…
Opens the download of the Excel add-in and of its connection file, see Downloading the add-in and the connection file.
Setup
Opens the report on the Setup page, for users with Blitz Report Access User Admin, Developer or System.
There is no Preferences window on this edition: your own defaults, such as the email address and the number and date formats of the Excel output, are profile options the administrator sets for your user, see the developer guide.
The Actions menu holds the following entries:
2.7 Options
The Options card controls the report generation and the output format at run time, for example email delivery and the output format. Its header shows how many options are set. The options inherit their default values from the report’s own setup. About the Options links here.
The Options card:
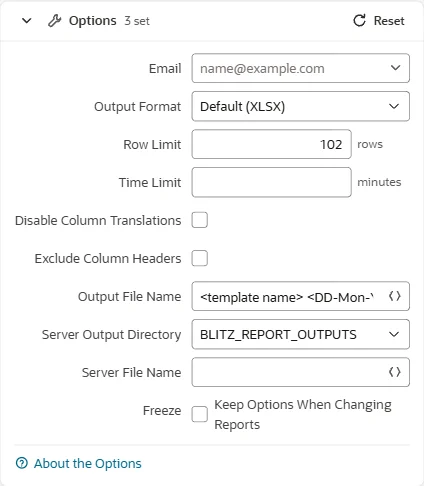
Enter an email address that you wish to send the report output to; the list proposes the email addresses of the Blitz Report users. Several addresses are entered as a comma-separated list. Developers can define a default email address for individual reports; for a report without one, the field takes your default address, the profile option Blitz Report Default Email Address, which the administrator sets. The email’s subject names the report, the number of rows and who sent it, and the output is attached.
Output Format
Output file format: Default (XLSX), CSV, PDF or TSV. PDF creates the Excel output first and converts it to a PDF file on the database server with the PDF converter the administrator installs, see the installation guide; without the converter a PDF run fails and its log names the missing component.
Row Limit
Restricts the number of rows in the output file.
Time Limit
Timeout in minutes. The Blitz Report Monitor terminates the run after that time, which avoids excessive server loads when a report is submitted with insufficient parameter restrictions. A time limit can also be set on the report or through the profile option Blitz Report Time Limit in minutes. If values are set on different levels, the order of precedence is:
- Time limit in the Options card
- Time limit on report level
- Profile option on user level
- Profile option on site level
Disable Column Translations
Turns off the translation of the report’s column headers where a multi-language setup is in place, for example for interface requirements.
Exclude Column Headers
Removes the column headers from the output file, for example for interface requirements.
Output File Name
Defines the name of the output file, downloaded to your desktop and used as the name of the email attachment. Tokens create the name dynamically, for example from report parameter values.
Server Output Directory
Stores an additional copy of the report output file in a database directory, which is how scheduled reports deliver their output to a folder on the database server. The list offers the database directories Blitz Report may write to, which the database administrator sets up, see the installation guide.
Server File Name
Naming convention for the copy written to the server output directory. Tokens create a file name dynamically, for example from report parameter values or from the run date, so that a scheduled report writes a new date-stamped file on every run. Without a server file name, the copy carries the name of the output.
Reset
Sets the template and the options back to their defaults from the profile options and the report.
Freeze
With Keep Options When Changing Reports ticked, the option values are kept when you open a different report instead of being reset to that report’s defaults.
Tokens
Tokens generate the values of Output File Name and Server File Name dynamically. In these fields, the token button (Insert a token), F9 or Alt+Down lists the tokens, filtered by the typed text. A token typed by hand is validated against the list, and an error message names an invalid one.
The token button lists the tokens, filtered by what you type:
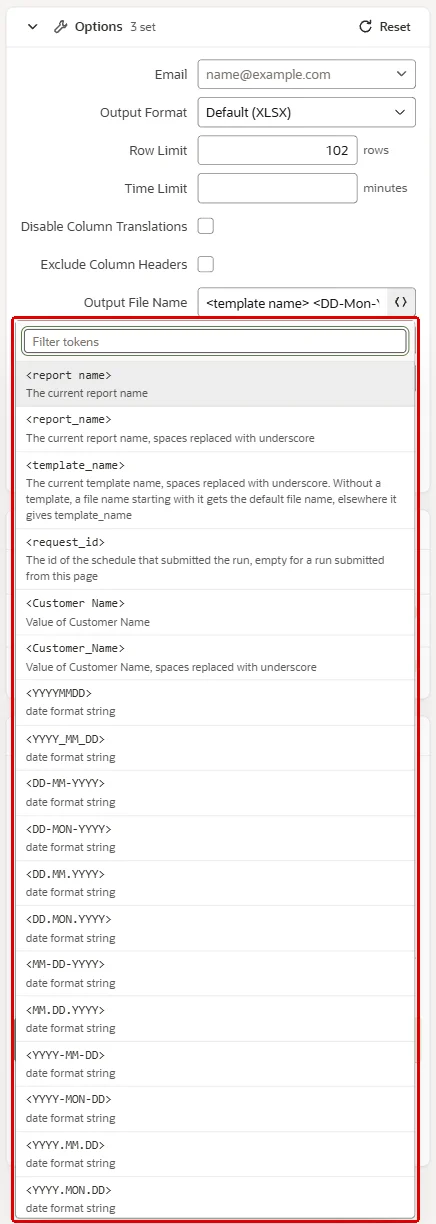
- <report name> – report name
- <report_name> – report name, all spaces replaced by underscores
- <template name> – template name
- <template_name> – template name, all spaces replaced by underscores
- <request_id> – the number of the schedule that submitted the run, empty for a run submitted from the run screen
- <parameter name> – value of the named parameter
- <parameter_name> – value of the named parameter, all spaces replaced by underscores
- <date format string> – the run date in your time zone, in any Oracle date format, such as <DD-MM-YYYY> or <YYYYMMDD>
An example of a file name using the tokens, with spaces replaced by underscores:
<report_name>–<template_name>-for-<Operating_Unit>-on-<DD-MM-YYYY>
AP_Suppliers-Operating_unit_only-for-Vision_Operations-on-06-10-2026.xlsx |
The same without replacing the spaces:
<report name>–<template name> for <Operating Unit> on <DD-MM-YYYY>
AP Suppliers-Operating unit only for Vision Operations on 06-10-2026.xlsx |
3 Templates
A template defines the layout of a report’s output: which columns are shown and in which order, how rows are aggregated and sorted, a pivot table, an Excel workbook with further sheets, charts or macros, and the parameter defaults, excluded parameters and conditions the report runs with. Templates are shared with other users, and a report can have a default template for everyone.
3.1 The template editor
Edit, the pencil next to the Template field, or the pencil next to a template in the Details card, opens the template in the editor; New, the plus, creates a new one. For a template you may not change, Edit reads View and opens it read-only; Copy makes your own copy and the editor continues with it, see Template owner. The editor saves every change at once. Close returns to the report with the template selected, as does the browser’s Back button. A new template is a Draft until it differs from the report, and Remove + Close deletes a draft you leave unchanged. Export downloads the template as an XML file, and Delete removes it after a confirmation. The header of the editor shows the name, description and owner of the template with the badges Global Default, Shared with Site and Excel File where they apply.
Double-click, F9 or Alt+Down in the Name field, and the Templates button beside it, list the templates of the report; picking one closes the open template and opens the picked one.
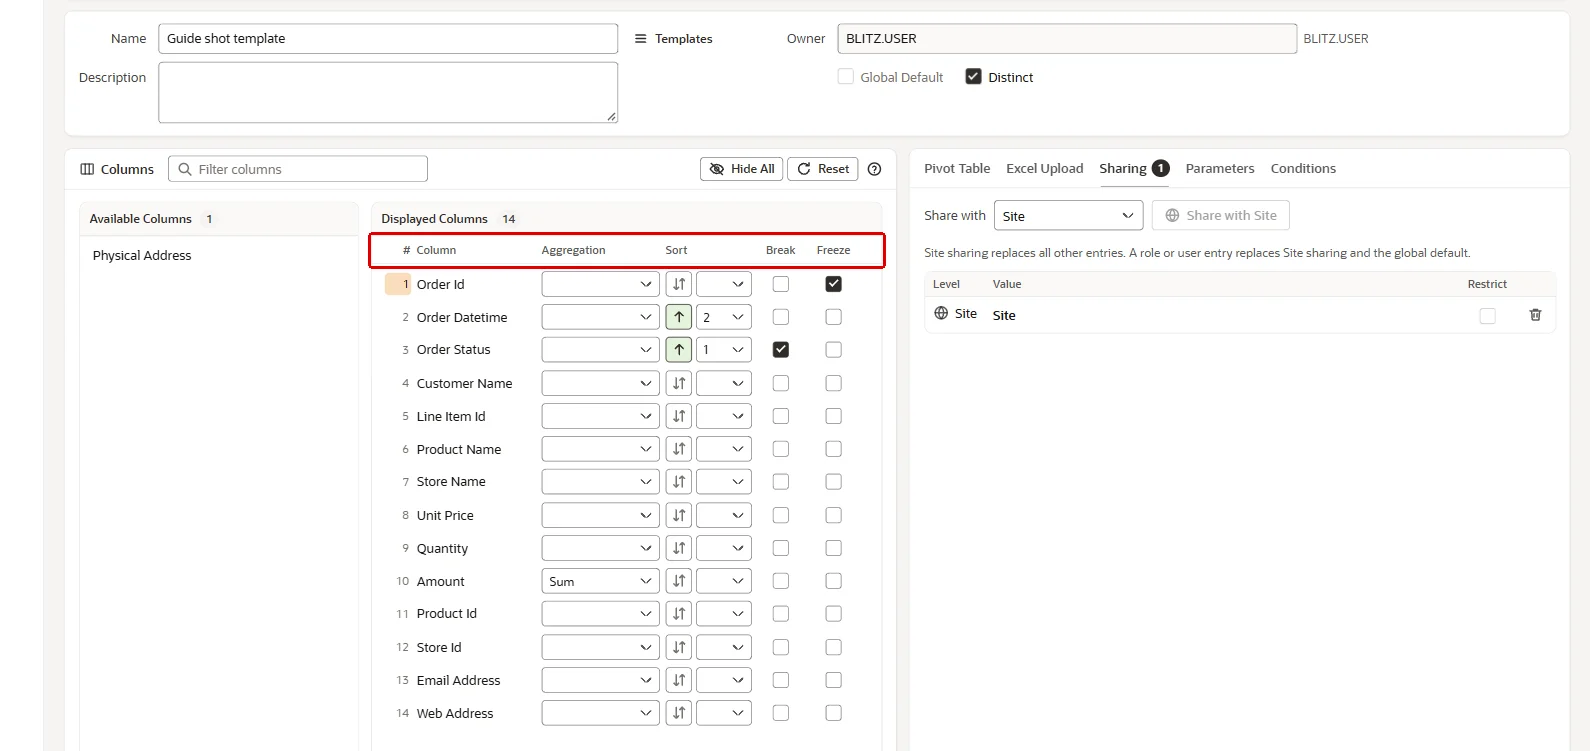
The template editor with the Columns board:
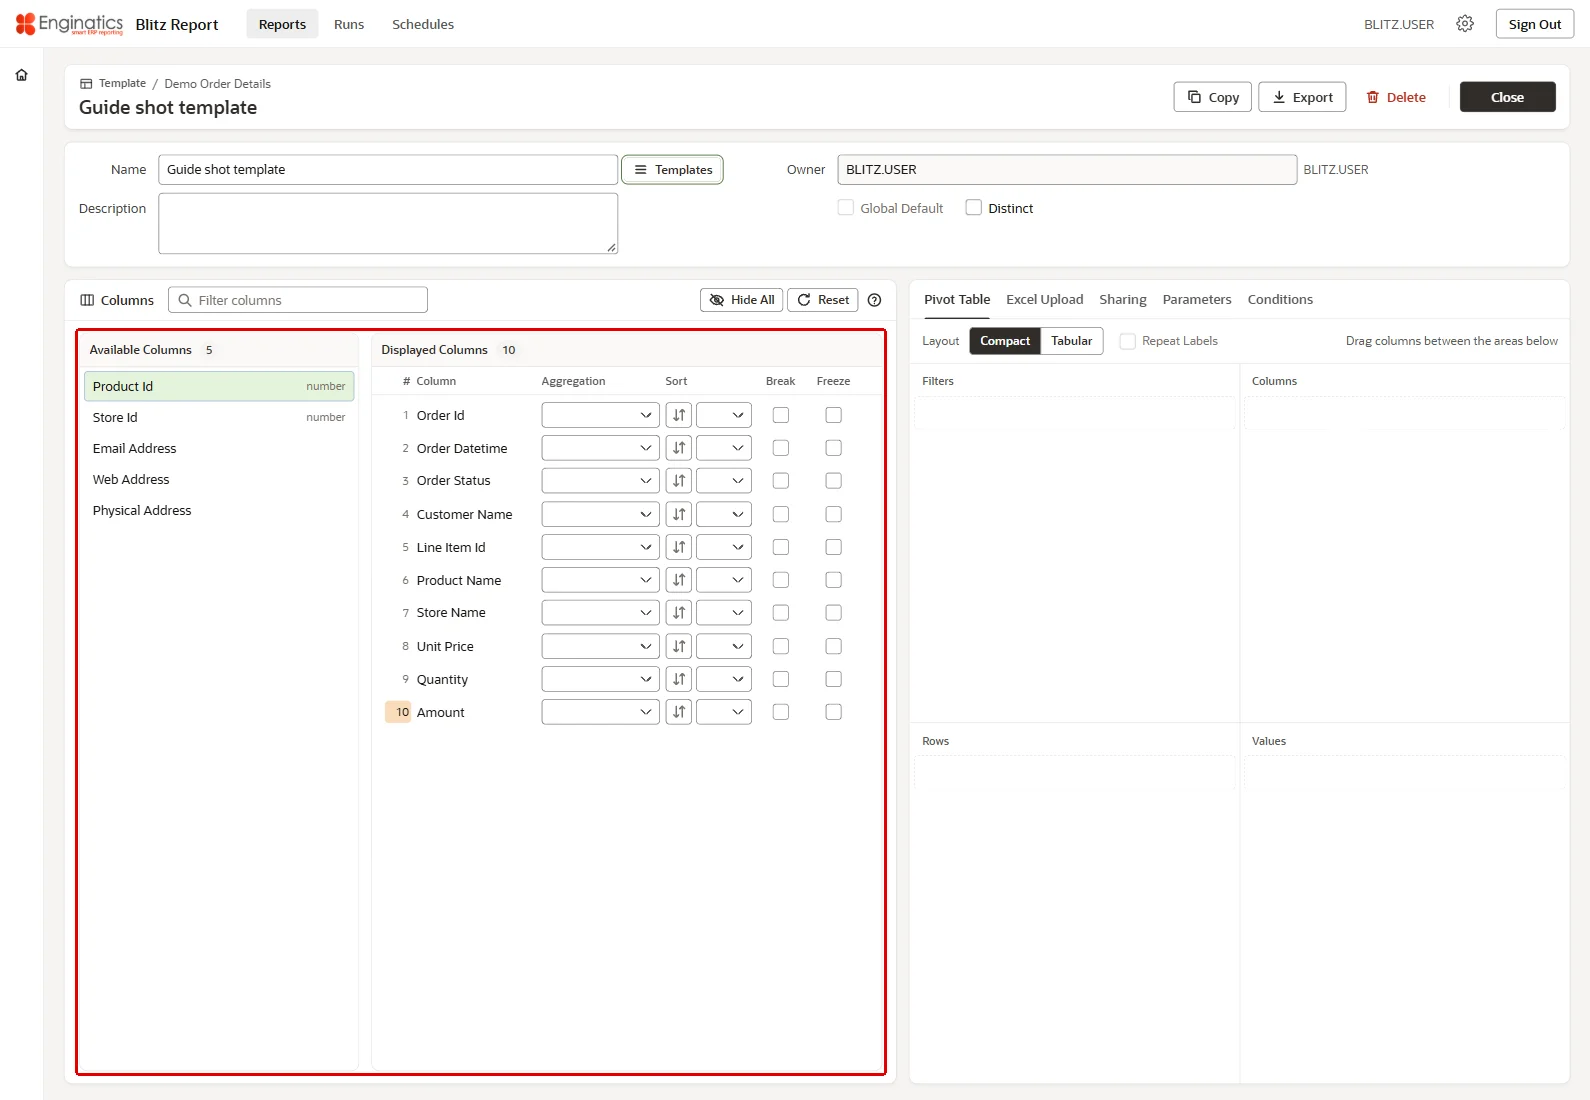
Columns. The help button of the Columns card explains how to show, hide and move columns: drag columns between Available Columns and Displayed Columns, Ctrl+click or Shift+click selects several, double-click shows or hides a column, Delete hides the selection and Alt+Up and Alt+Down move it. A column shown by double-click is inserted after the selected displayed column, a click on a column’s number moves it to a position you enter (Move to Position), and the / key moves to the filter field. The column properties are described in Template layout.
Tabs. The tabs Pivot Table, Excel Upload, Sharing, Parameters and Conditions work as described in Pivot table, Excel file, Template sharing, Excluded parameters and parameter defaults and Template conditions. In the Pivot Table tab, an available column added to an area is displayed as well, and double-click or Delete removes a field from its area.
3.2 Template layout
A template allows users to select the data columns, the level of reporting (detail transactional or summarized), aggregation calculations, and to define a pivot table output. Using templates, report columns can be selected and deselected, summarized, sorted and pivoted.
The following elements are available:
- Name – the name of the template.
- Description – the description of the template.
- Global Default – sets the template as the default for all report users; available to users with Blitz Report Access User Admin, Developer or System and to users whose template access is Super User.
- Owner – shows who owns the template. Initially, this is the user who created it, see Template owner.
- Available Columns – the columns of the report SQL that are not displayed.
- Displayed Columns – the columns included in the report output, in their order.
- Filter columns – finds specific available or displayed columns.
- # – the position of a displayed column; a click moves the column to a position you enter.
- Aggregation – for summary reports, how the column values are aggregated (average, count, min, max, sum); the rows are grouped by the displayed columns without aggregation.
- Sort – a click sorts the column ascending, a second click descending, a third removes the sort; the sort priority is shown with it.
- Break – starts a new Excel sheet for each change of the column value.
- Freeze – marks the column at which the panes of the generated Excel file are frozen: this column becomes the first scrollable column. Only one column can be ticked.
- Distinct – suppresses duplicate rows in the report.
- Dynamic Columns – adds new SQL columns of the report to the template automatically.
- Reset – recovers the initial column layout, with every column shown.
- Hide All – moves every displayed column back to the available columns.
The properties of the displayed columns:
3.3 Pivot table
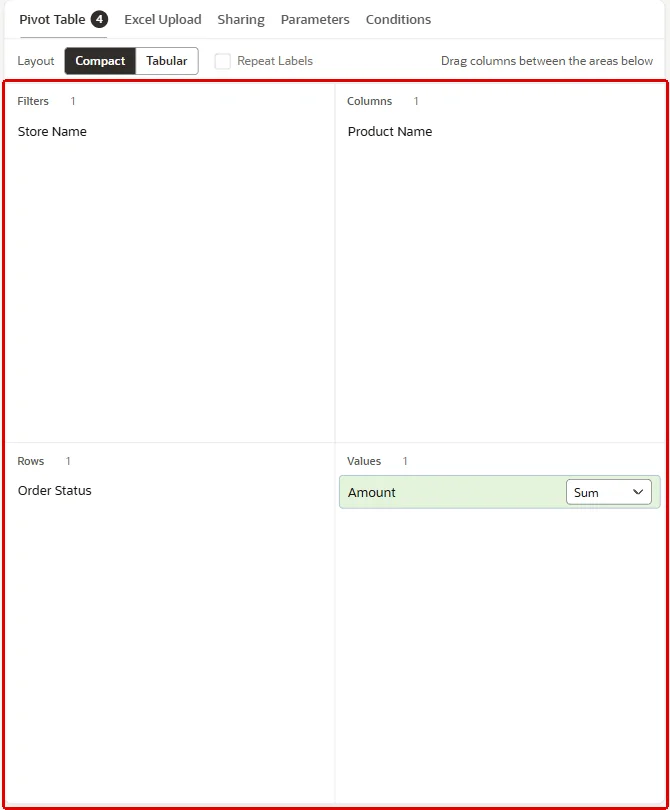
The Filters, Columns, Rows and Values fields are used to create and deliver the data in pivot table format with full drill down to details. The data must be selected to print on the report in order to be used in the pivot table. The Pivot Table tab is divided into four areas:
- Filters – the columns you will use to filter the data. Filters are things like GL account, Department, Subaccount, Customer, Vendor, Project or Product, to name a few popular choices.
- Columns – defines which data should appear in separate columns. Period, Project, Subaccount, to name a few popular choices.
- Rows – defines the data summary level for each row in the pivot table.
- Values – defines the numeric data that is summarized to provide the totals for the level defined in the Rows columns.
- Aggregation – for the information selected in the Values area, how to aggregate the data (average, count, min, max, sum).
Layout chooses Compact, the Excel default, or Tabular, which shows each row field in its own column; Repeat Labels repeats the item labels in every row of the tabular layout. A pivot table needs at least one Rows or Values field.
A pivot table is only created when the data fits on one sheet. For output exceeding the sheet row limit or split by a Break, upload an Excel file with a pivot based on the workbook data model (Power Pivot). The sheet row limit is 1,048,576 rows unless the administrator sets a lower one with the profile option Blitz Report XLSX Sheet Row Limit.
The Pivot Table tab with its four areas:
3.4 Excel file
The Excel Upload tab allows the creation of additional sheets with graphs, pie charts, macros or any other Excel functionality. To use this feature:
- Run a report and open the output.
- Create sheets with additional pivots, graphs and pie charts or include macros. Place the data sheet as the first sheet in the workbook.
- Upload the saved Excel file including the additional sheets or macros to the template, with Upload… or by dropping the file on the tab.
- Run the report again with parameters as required: the output is generated with the additional sheets and refreshed with new data.
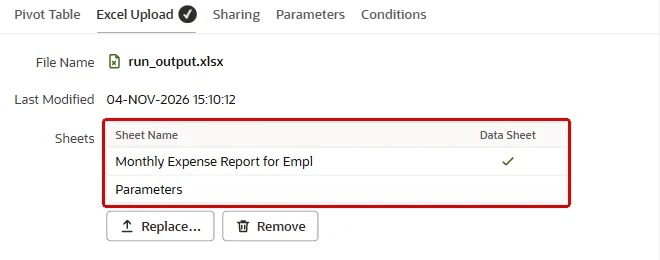
While a file is uploaded, the columns and the pivot table are defined by it and cannot be changed in the editor. Replace… uploads a new file and Remove takes it off the template. The tab lists the sheets of the workbook and the Data Sheet the report data goes to.
The Excel Upload tab shows the sheets of the uploaded workbook and the sheet that takes the report data:
Datasheet
The uploaded workbook can also define the layout of the data sheet itself: Excel functions, pictures, charts, header and footer texts, comments, notes, cell formats such as fonts and fill colours, additional rows above the column header, and freeze panes. Freeze panes can also be defined without an uploaded file, by ticking Freeze on the relevant template column. Run a report, open the output, modify the data sheet as required, upload the saved file to the template and run the report again: the output is generated with the modified data sheet, refreshed with new data.
3.5 Template owner
Every template has an Owner, shown next to the template name: the user who created it. Only the owner can change a template’s content: its column selection, layout, sharing and default values. Users with Blitz Report Access User Admin, Developer or System can change any template and can transfer a template to another owner.
If a template belongs to someone else, it opens as View Only: its fields are shown but cannot be changed. To adapt such a template, use Copy to take your own copy: you become the owner of the copy and can change it freely, while the original stays untouched. This is the normal route for a user who wants a variation of a shared template.
A template of another owner opens as View Only; Copy makes your own copy:

What the new owner of a transferred template may not change are the template’s restrictions, see Template security in the developer guide.
3.6 Template sharing and restricted templates
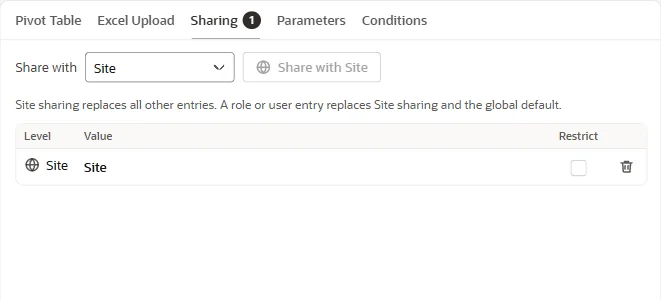
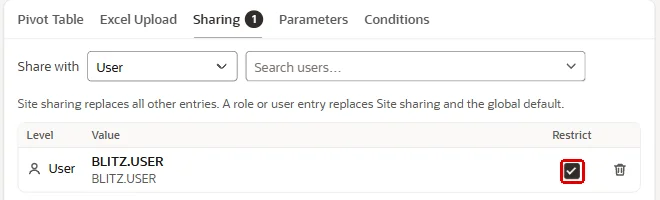
The Sharing tab shares a template at the following levels:
- Site: all users of the installation (Share with Site)
- DBA Role: the users whose user name is a database account holding the database role
- User: an individual user
Site sharing replaces all other entries, and a role or user entry replaces Site sharing and the global default. Sharing gives other users access to run a template, but not to modify it.
The Sharing tab:
Restricted templates
A template shared with a user or a role can additionally be marked with Restrict. A user who is restricted for a report can only see and run the restricted templates of that report: the default layout and all other templates are not offered, so the report is always run with the controlled column layout and parameter values. If more than one restricted template is shared with a user, all of them remain available for selection. This is useful where a report should only ever be used in a particular way.
A template shared with a user or a role can be marked Restrict:
3.7 Excluded parameters and parameter defaults
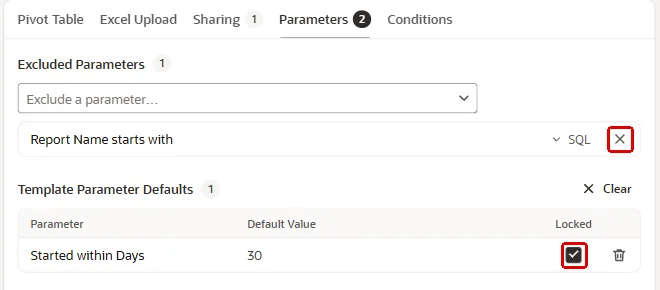
The Parameters tab holds the template’s Excluded Parameters and its Template Parameter Defaults.
Exclude a parameter… hides a parameter on the run screen for this template; only optional parameters shown on the run screen can be excluded. A template parameter default of an excluded parameter is still applied, and without one the report’s own default applies. SQL on an excluded parameter shows the text the parameter inserts into the report SQL at run time, and the x shows the parameter on the run screen again.
The template parameter defaults are the values saved with Save Template Parameter Defaults: only the values that differ from the report’s defaults are stored. Each default can be changed here, removed, or marked as Locked, so that template users cannot change it on the run screen. Clear removes every default of the template; a locked one stays unless you may change restrictions.
The Parameters tab holds the excluded parameters and the template parameter defaults:
3.8 Template conditions
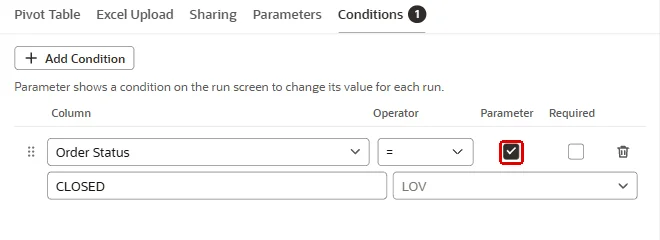
The Conditions tab restricts the rows a template returns. Each condition compares a report column with a value: select the Column and the Operator, then type the Value, pick it from the list of values or, for a date, from the calendar. With =, <>, like and not like, a semicolon-separated list matches any of its values (=, like) or none of them (<>, not like). Dates compare whole days. The LOV field proposes a list of values for the column, which you can change. Without developer access, you can choose from the lists of values used by the reports you can run.
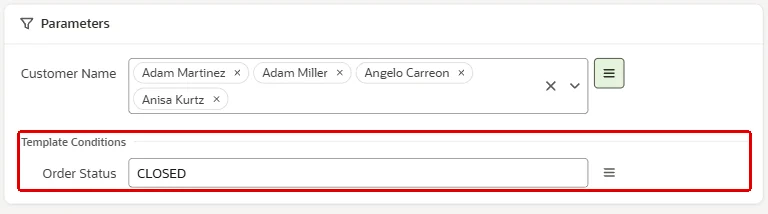
A condition without Parameter applies to every run. With Parameter ticked, it appears on the run screen after the report parameters under Template Conditions, labelled with the column and operator, for example Days Past Due >=. Its value on the Conditions tab is the default, and an empty value does not restrict the data. Required makes a value mandatory. The output’s Parameters sheet lists the conditions applied to the run. Conditions are dragged to change their order.
The Conditions tab:
A condition with Parameter ticked is prompted on the run screen under Template Conditions:
3.9 Delivered templates
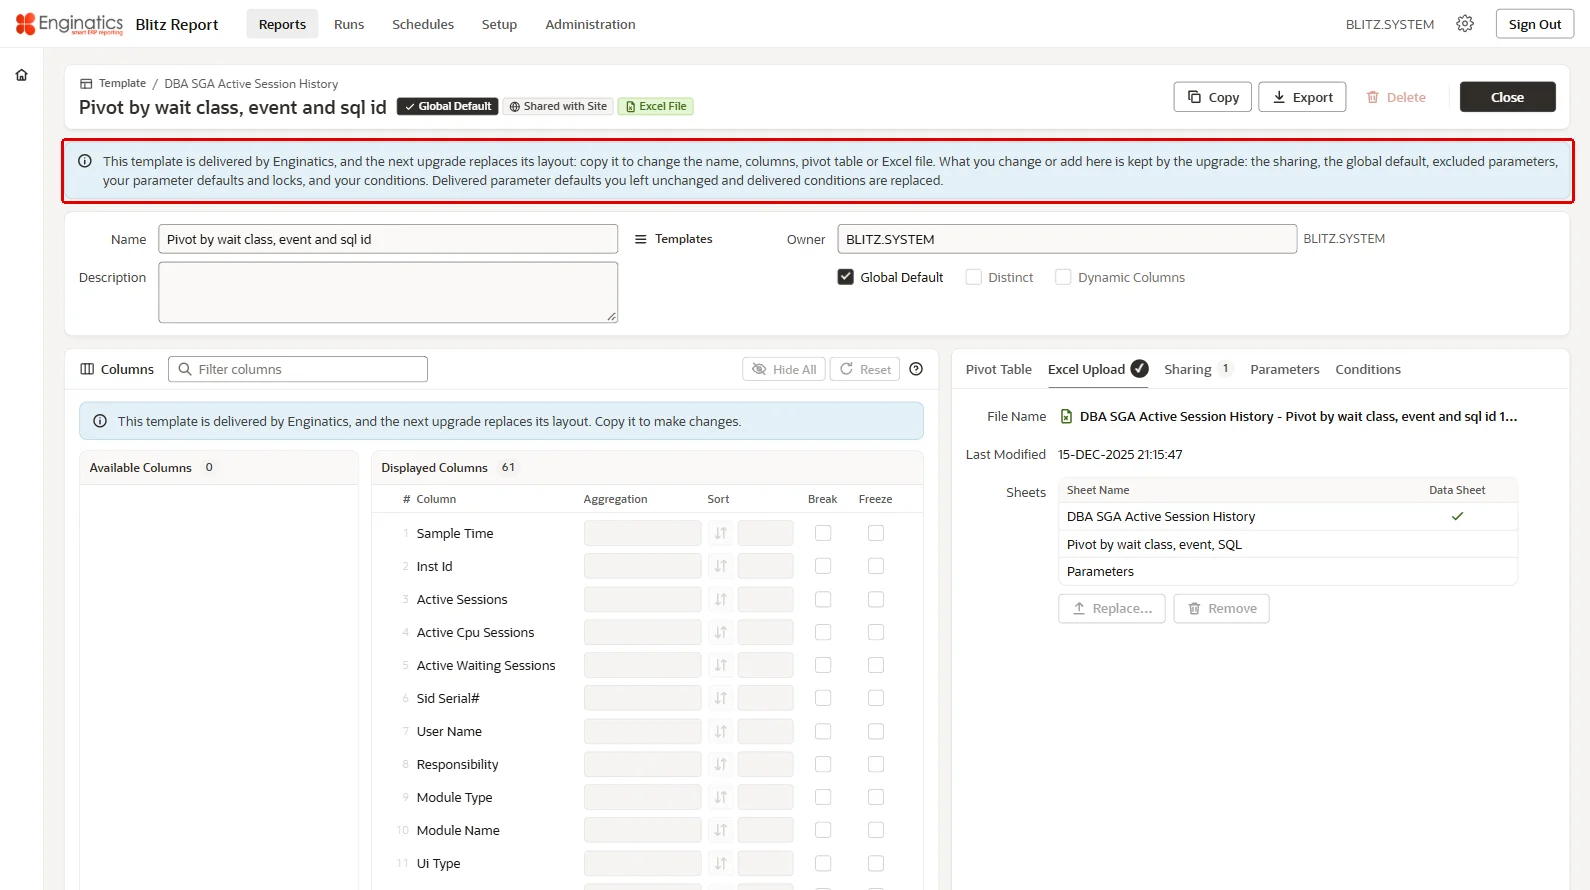
The reports of the Enginatics library come with templates delivered by Enginatics. The next upgrade replaces the layout of such a template, so the editor refuses changes to its name, columns, pivot table and Excel file and opens it with the note This template is delivered by Enginatics, and the next upgrade replaces its layout: copy it to change the name, columns, pivot table or Excel file. What you change or add here is kept by the upgrade: the sharing, the global default, excluded parameters, your parameter defaults and locks, and your conditions. Delivered parameter defaults you left unchanged and delivered conditions are replaced. Copy makes your own template from it.
A delivered template opens with a note:
4 Run history
4.1 The Runs page
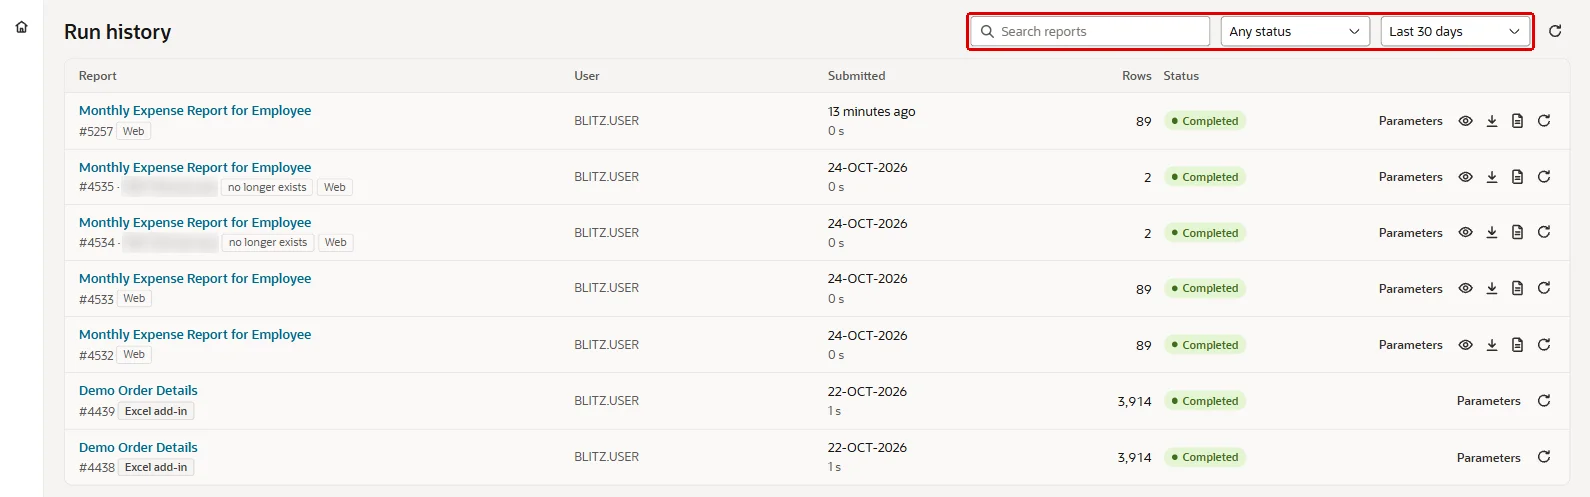
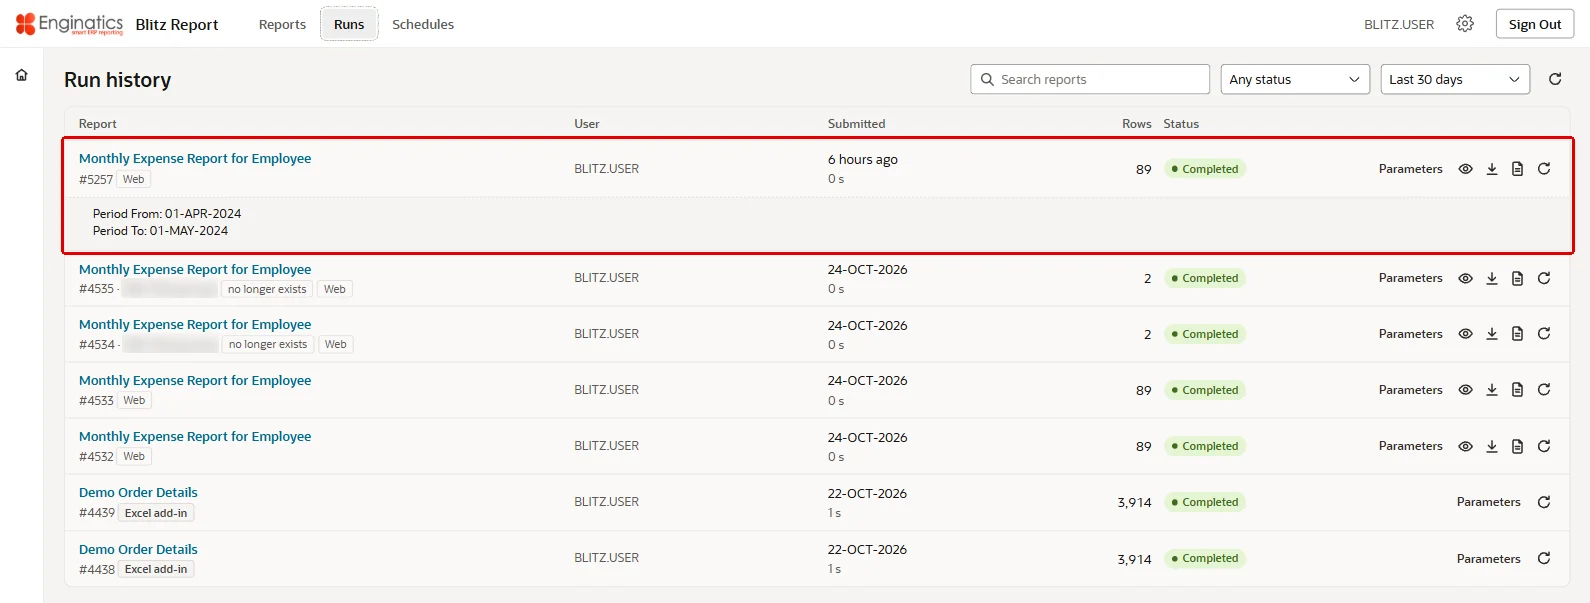
Runs opens the Run history page, which lists the runs of every report: Mine, the runs you submitted, or, with System access, All runs of all users. The list is filtered by the report name (Search reports), the status (Running, Completed, Error, Cancelled) and the period (Last 7 days to All time), and shows the report and template, the user, when the run was submitted, the number of rows and the status. It shows 30 runs, Show More adds the next 30, and while a running row shows, the list refreshes every 10 seconds. Parameters expands a run to the parameter values it ran with. The runs of a schedule carry Schedule #<id>, and the Schedules page opens the runs of one schedule here.
Each run offers Rerun, View, the download of the output, the log, and Cancel Run while it runs. Runs of the Excel add-in and the desktop app are listed with the web runs.
The Runs page lists the runs of every report:
Parameters expands a run to the values it ran with:
4.2 Viewing output and logs
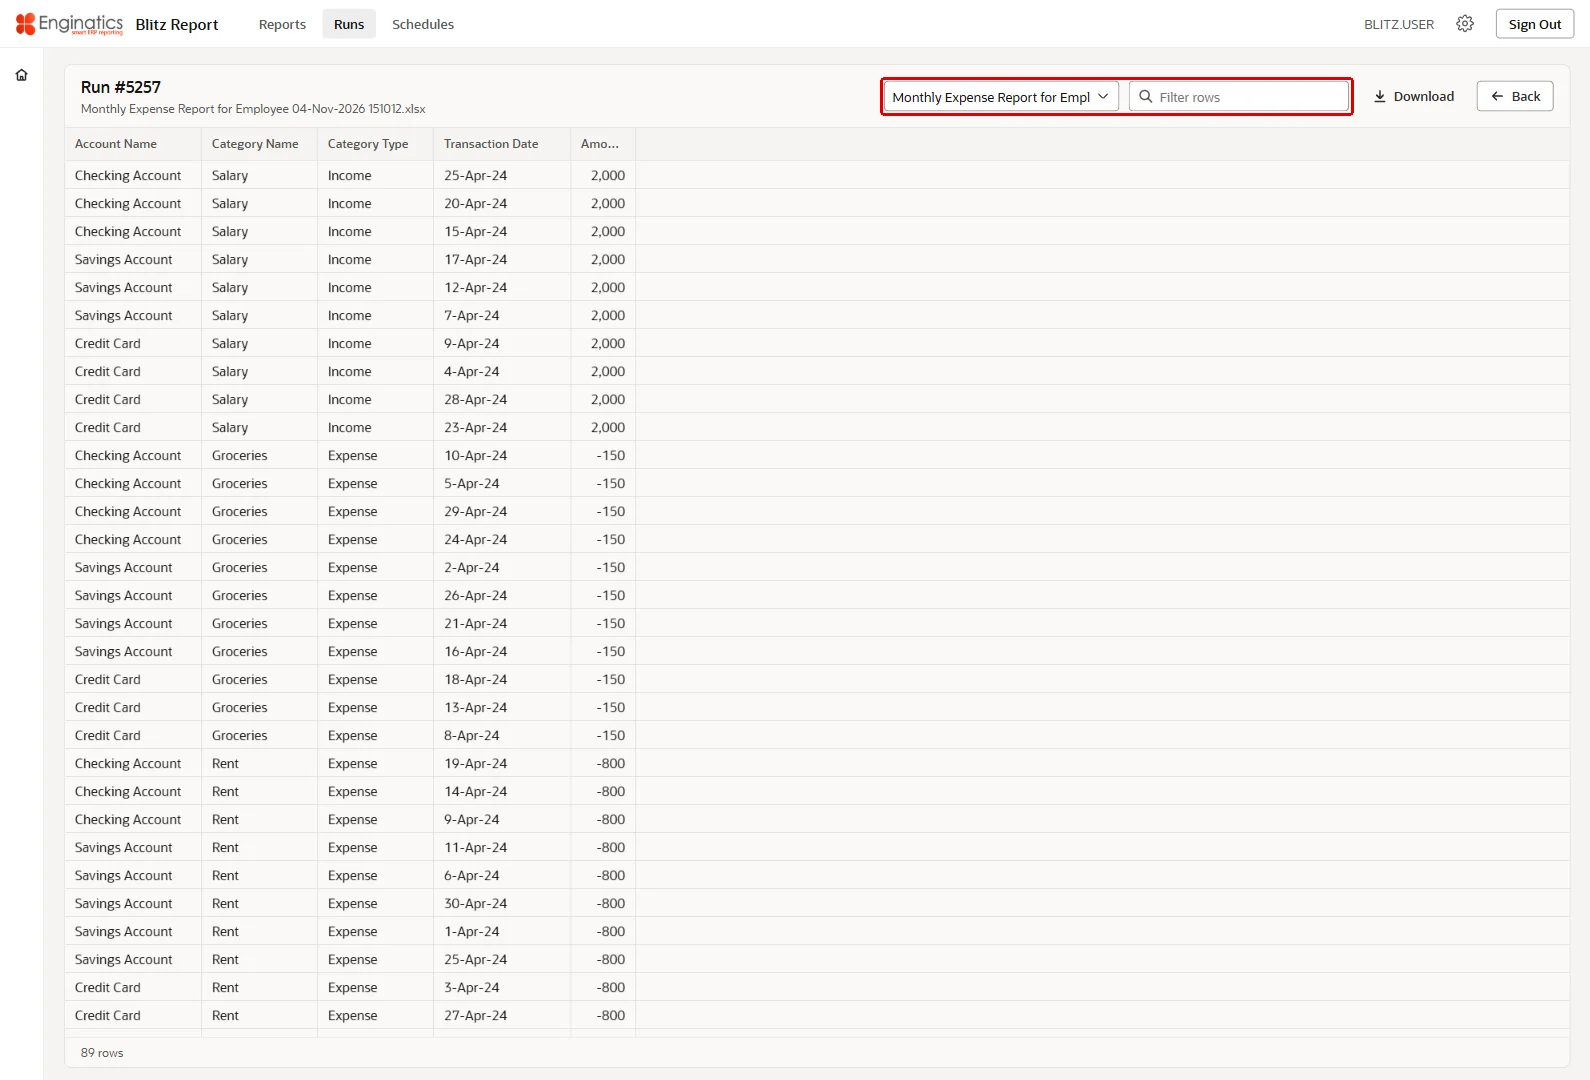
View opens the output of a run in the browser. A workbook shows as a grid with a sticky header: the sheet list at the top left switches between its sheets, a click on a column header sorts by that column, and Filter rows keeps the rows containing the typed text; the row count shows how many rows match. A PDF shows in an embedded frame. Download saves the file, and Back returns to the previous screen.
The viewer shows outputs up to 10 MB and 100,000 cells; a larger output, and an output that is not a workbook or a PDF, offers the download instead: This output is too large to view online: the viewer shows outputs up to 10 MB and 100,000 cells. Download it to open it.
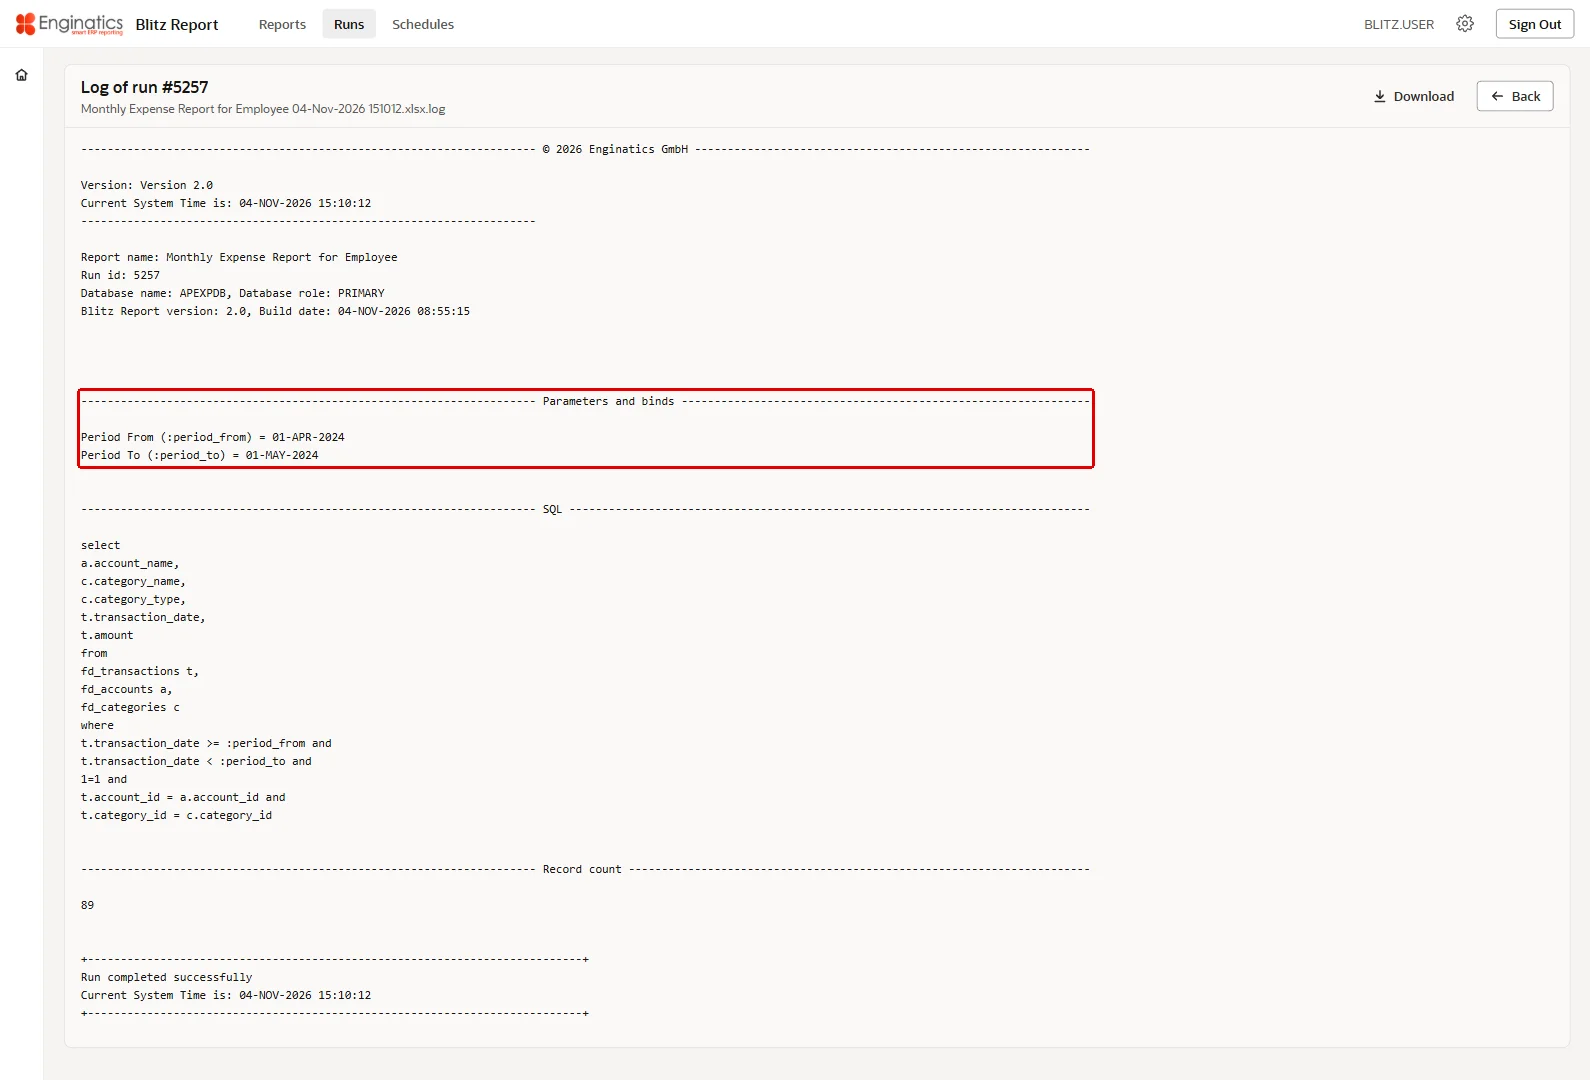
The log of a run (View the log on the Runs page, View Log on the run screen) shows as text in the viewer, with its download. It names the parameters and binds of the run and the cause of a failure.
The viewer shows a workbook as a grid:
The log shows as text in the viewer:
4.3 Rerun and Cancel
Rerun opens the report with the template, parameters and options of the run, so that it can be submitted again as it was or with changed values. The report name opens the report with its current defaults, and the template name opens it with that template.
Cancel Run stops a running request after the confirmation Cancel run #<id>?; Keep running leaves it. A cancelled run keeps its row with the status Cancelled. The Requests card of the run screen offers the same cancel on a running request.
5 Scheduling
Blitz Reports can be scheduled to run at a certain date and time and repeatedly after it. This runs time-consuming reports during non-office hours and distributes files by email or into a folder on the database server. A schedule stores the report, the template, the parameter values and the options of the run screen at the time it is created.
5.1 Scheduling a report
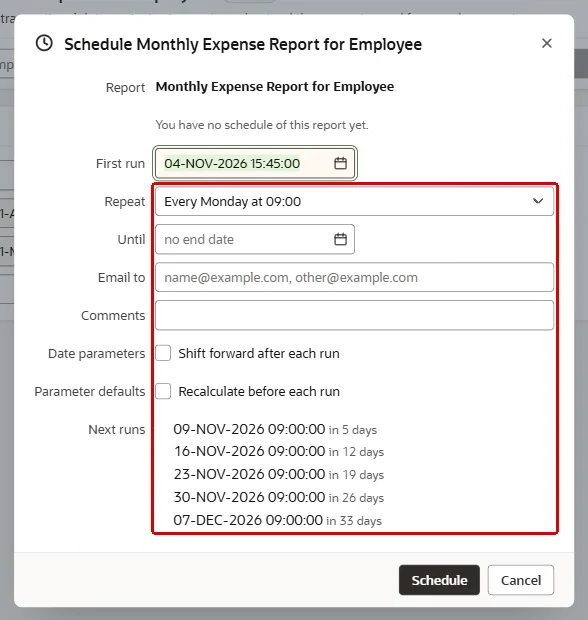
Open the report, enter the parameters and options as for a run, and click Schedule next to Run. The dialog asks for:
- First run: the date and time of the first run, in your time zone.
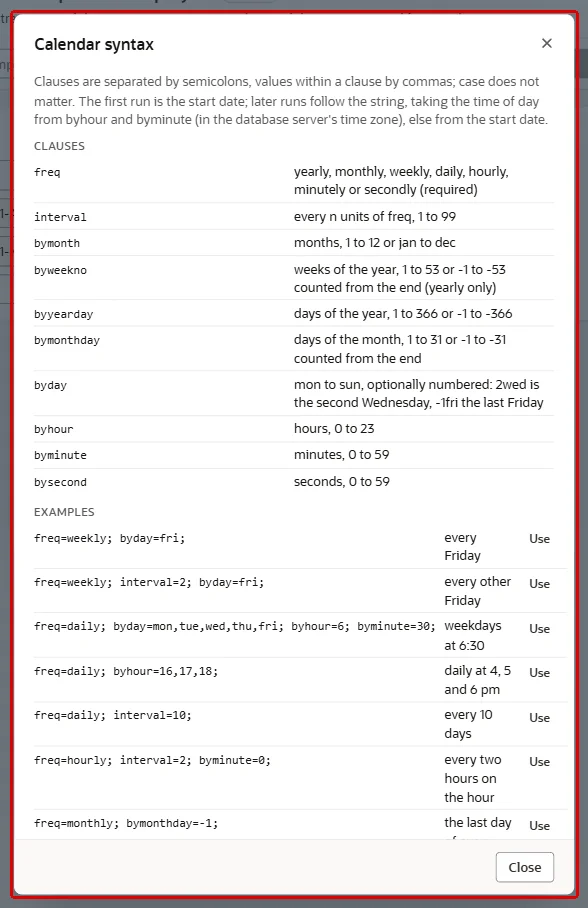
- Repeat: how often the report runs after the first run, from the frequencies the installation offers, or Custom calendar string…, an Oracle Scheduler calendar string such as freq=daily; byhour=6; byminute=0 or freq=weekly; byday=mon,thu; byhour=8. Syntax and examples lists the clauses and examples, each applied with one click. Clauses are separated by semicolons, values within a clause by commas; case does not matter. The first run is the start date; later runs follow the string, taking the time of day from byhour and byminute (in the database server’s time zone), else from the start date.
- Until: the last date and time a run may start; empty for no end.
- Email to: the recipients of the output, separated by commas; empty to only keep the output in the run history.
- Comments.
- Date parameters: Shift forward after each run: the date parameter values move forward by the interval after every run, so a report of a rolling period stays current.
- Parameter defaults: Recalculate before each run: every parameter default is evaluated again when the run starts, as the run screen would show it then; values you entered are kept.
Next runs previews the dates the first run and the frequency give. Schedule saves the schedule and creates its database job; the message names the first run.
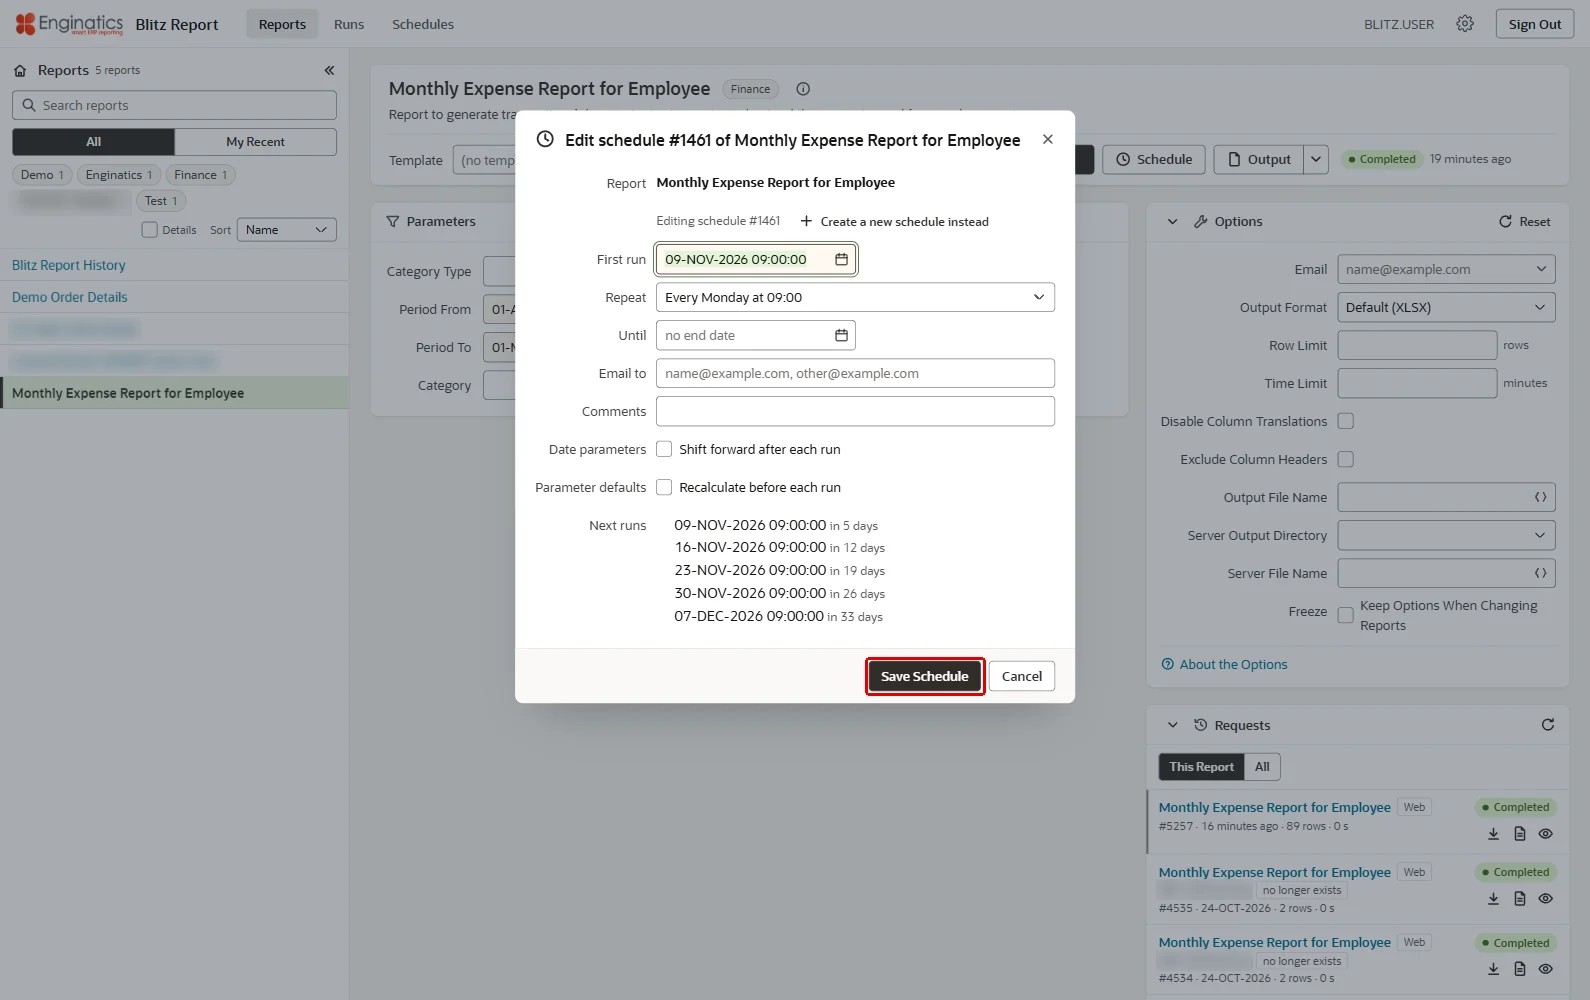
When you already have schedules of the report, the dialog says so and Show lists them. Edit on the Schedules page opens the report with the schedule’s values and the dialog over it: change the parameters on the page and the settings in the dialog, then Save Schedule; Create a new schedule instead leaves the existing one as it is.
The Schedule dialog:
Syntax and examples opens the Calendar syntax dialog with the clauses and examples, each applied with Use:
5.2 Delivery
Every run of a schedule is listed in the run history with its output, whether or not it is delivered elsewhere. The recipients of Email to receive the output as an attachment, sent through the mail server the administrator has configured. A new schedule’s Email to starts with the Email of the Options card, and the schedule keeps its own addresses. A copy on the database server is written where Server Output Directory and Server File Name are set in the Options card before scheduling; the Schedules page shows the directory in its Server File column.
If a scheduled report does not retrieve any data, Blitz Report does not send the empty output file. To send empty output files as well, set the profile option Blitz Report Suppress Empty File Delivery to No.
5.3 The Schedules page
Schedules lists Mine, your schedules, or, with System access, All schedules of all users, filtered by the report name and the state: Active or paused, the default, Active, Paused, Ended or Any state. Each row shows the report and template, the frequency, the next run, the window from the first run until the end, the last run with the number of runs and failures, the server file and the owner. The list is paged.
The actions of a schedule:
- the pause switch pauses or resumes the schedule;
- Edit opens the report with the schedule’s values and the schedule dialog, see Scheduling a report;
- the report name opens the report; the runs link shows the runs of this schedule on the Runs page;
- Run now runs the report at once with the schedule’s values; the run shows in the run history in a moment;
- Delete Schedule removes a schedule that has not run yet;
- End Schedule ends a schedule that has run: it runs no more, its runs stay in the run history, and it cannot be changed afterwards. Schedule the report again to run it on a schedule.
The Schedules page lists your schedules:

Edit opens the report with the values of the schedule and the Schedule dialog over it:
6 Excel add-in
The Blitz Report Excel add-in runs reports, refreshes data and drills down directly from Microsoft Excel. It adds a ribbon tab from which you choose a report, enter its parameters and refresh the data in place, and respects the same report assignments and data security as the web application. Two editions exist: the Blitz Report Excel Add-in for a standalone database installation, which signs in through this application, and the Blitz Report Cloud Excel Add-in for an Oracle Fusion installation, which signs in with your Fusion user name and password and adds Blitz FSG financial statements, described in the GL Financial Statement and Drilldown chapter of the Oracle E-Business Suite user guide; on Oracle Fusion the View Transaction drilldown and the Oracle FSG converter are not available.
6.1 Downloading the add-in and the connection file
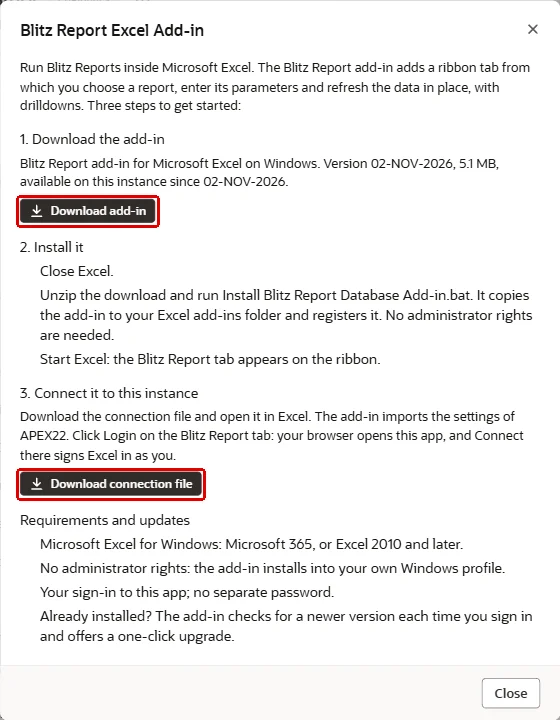
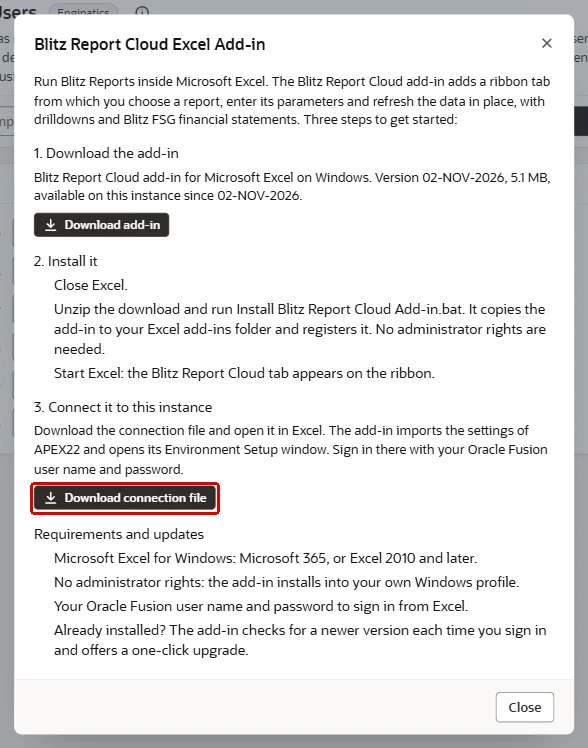
On the run screen of any report, choose Actions > Excel Add-in…. The dialog offers the edition of this installation, the Blitz Report Cloud Excel Add-in where the Oracle Fusion integration is enabled and the Blitz Report Excel Add-in otherwise, and shows the add-in build that comes with the installation, with its version, size and the date since which it is available, and the three steps:
- Download the add-in: Download add-in saves the zip file.
- Install it: close Excel, unzip the download and run the installer script it contains (Install Blitz Report Database Add-in.bat, or Install Blitz Report Cloud Add-in.bat for the Fusion edition). It copies the add-in to your Excel add-ins folder and registers it; no administrator rights are needed. Start Excel: the Blitz Report tab (Blitz Report Cloud for the Fusion edition) appears on the ribbon.
- Connect it to this instance: Download connection file saves a file that holds the connection settings of this installation. Open it in Excel: the add-in imports the settings, so the environment is known to it; the Fusion edition then opens its Environment Setup window with the environment selected, see Signing in. The download is a run of the report Blitz Report Environment Setup and is listed under Runs.
If the installer script is blocked, for example with Access is denied, install the add-in by hand: copy Blitz Report Database.xlam (Blitz Report Cloud.xlam for the Fusion edition) from the unzipped download to the Excel add-ins folder (type %APPDATA%\Microsoft\AddIns into the Windows Explorer address bar), right-click the copied file, select Properties and tick Unblock if it is shown, then in Excel open File > Options > Add-ins, select Excel Add-ins in the Manage box, click Go and tick the add-in, or click Browse and select the copied file.
The dialog’s Requirements and updates names what the add-in needs: Microsoft Excel for Windows (Microsoft 365, or Excel 2010 and later), no administrator rights, and your sign-in. An installed add-in checks for a newer version each time you sign in and offers a one-click upgrade. If the upgrade cannot be started automatically, download the add-in again with Actions > Excel Add-in… and run its installer: the previous version need not be uninstalled. If no add-in build is installed on the instance yet, or its connection settings are not configured yet, the dialog says so; ask your Blitz Report administrator.
Actions > Excel Add-in… offers the add-in and the connection file:
For an Oracle Fusion installation the dialog offers the Cloud edition:
6.2 Signing in
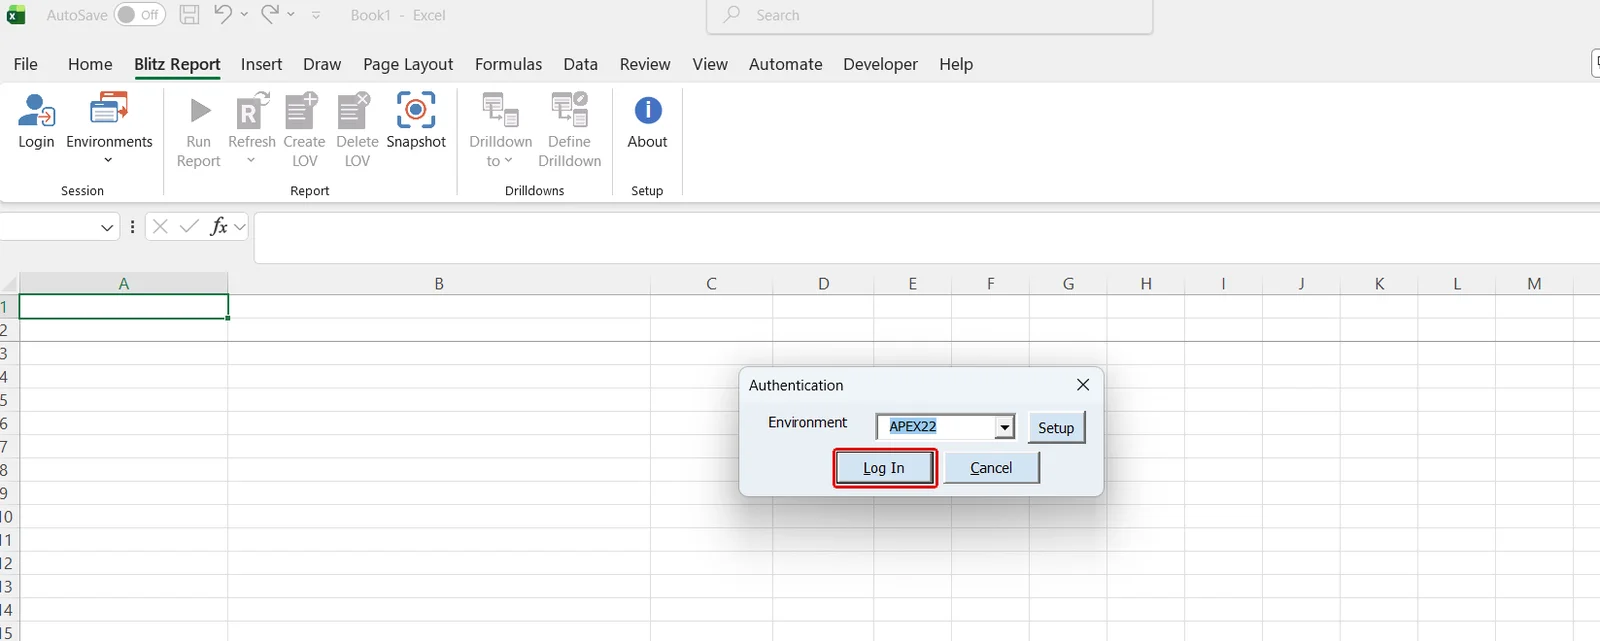
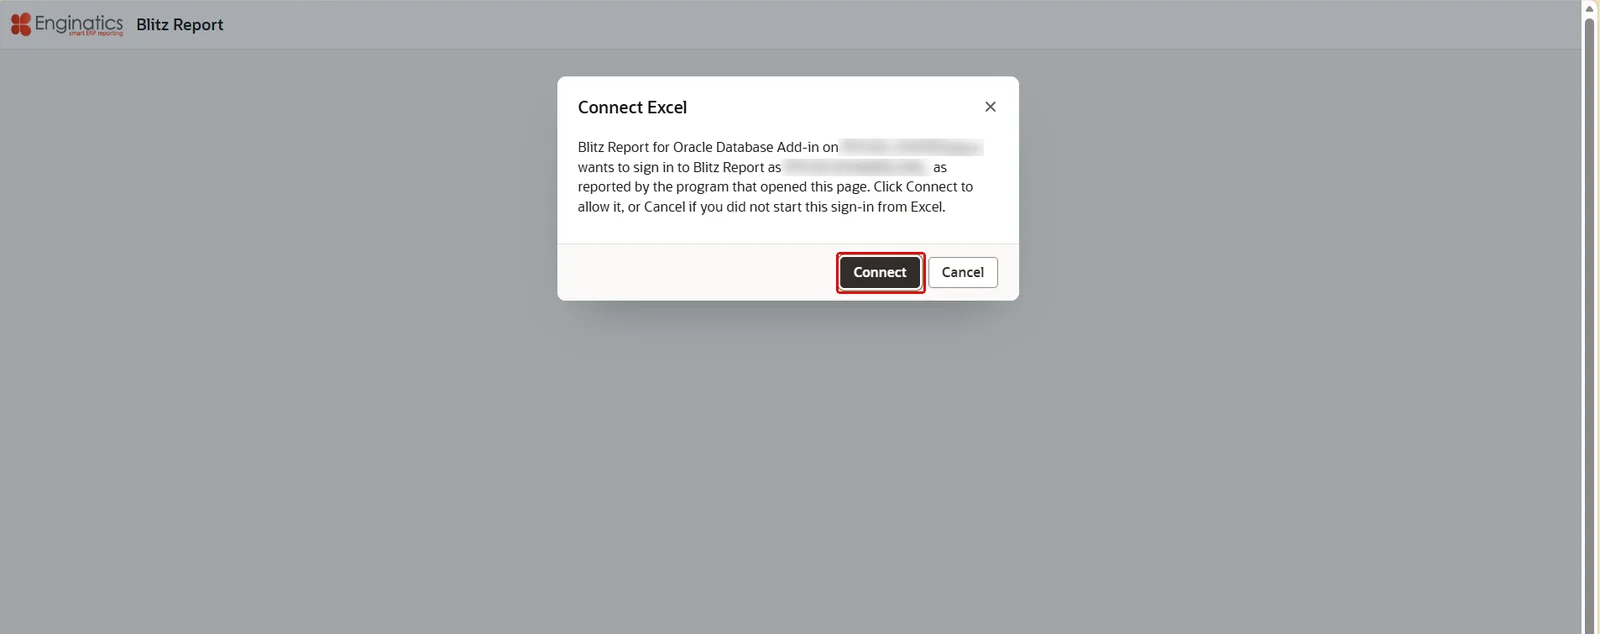
Standalone database installation. Click Login on the Blitz Report tab and select the environment. Your browser opens this application with the dialog Connect Excel, which names the program and computer that asked for the sign-in: click Connect to sign Excel in as you, or Cancel if you did not start this sign-in from Excel. The page then confirms Excel is signed in as <user>. You can close this tab. No separate password is needed.
Login opens the Authentication dialog:
The browser asks you to confirm that Excel may sign in as you:
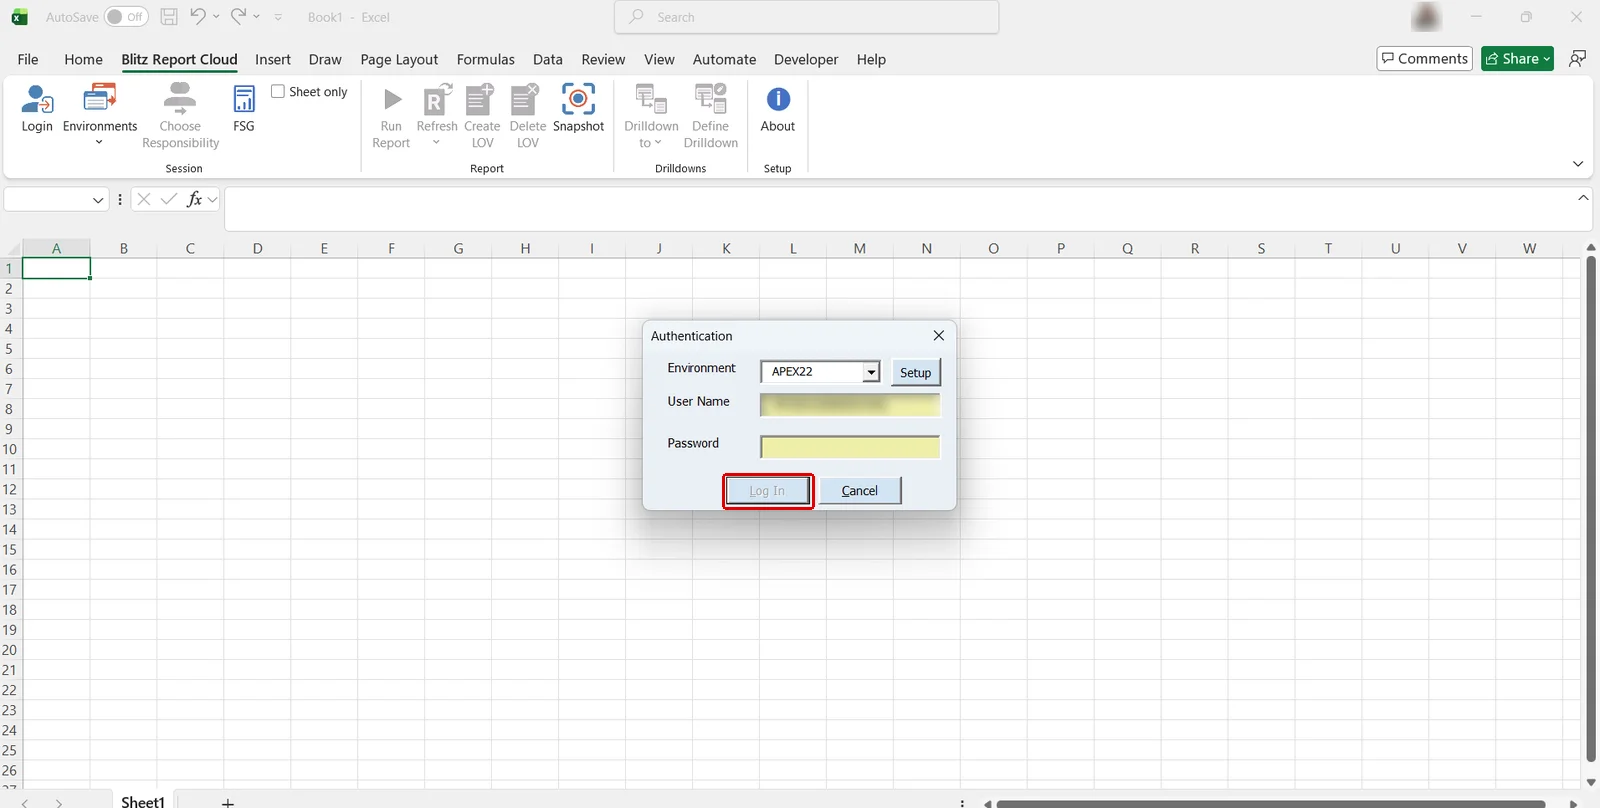
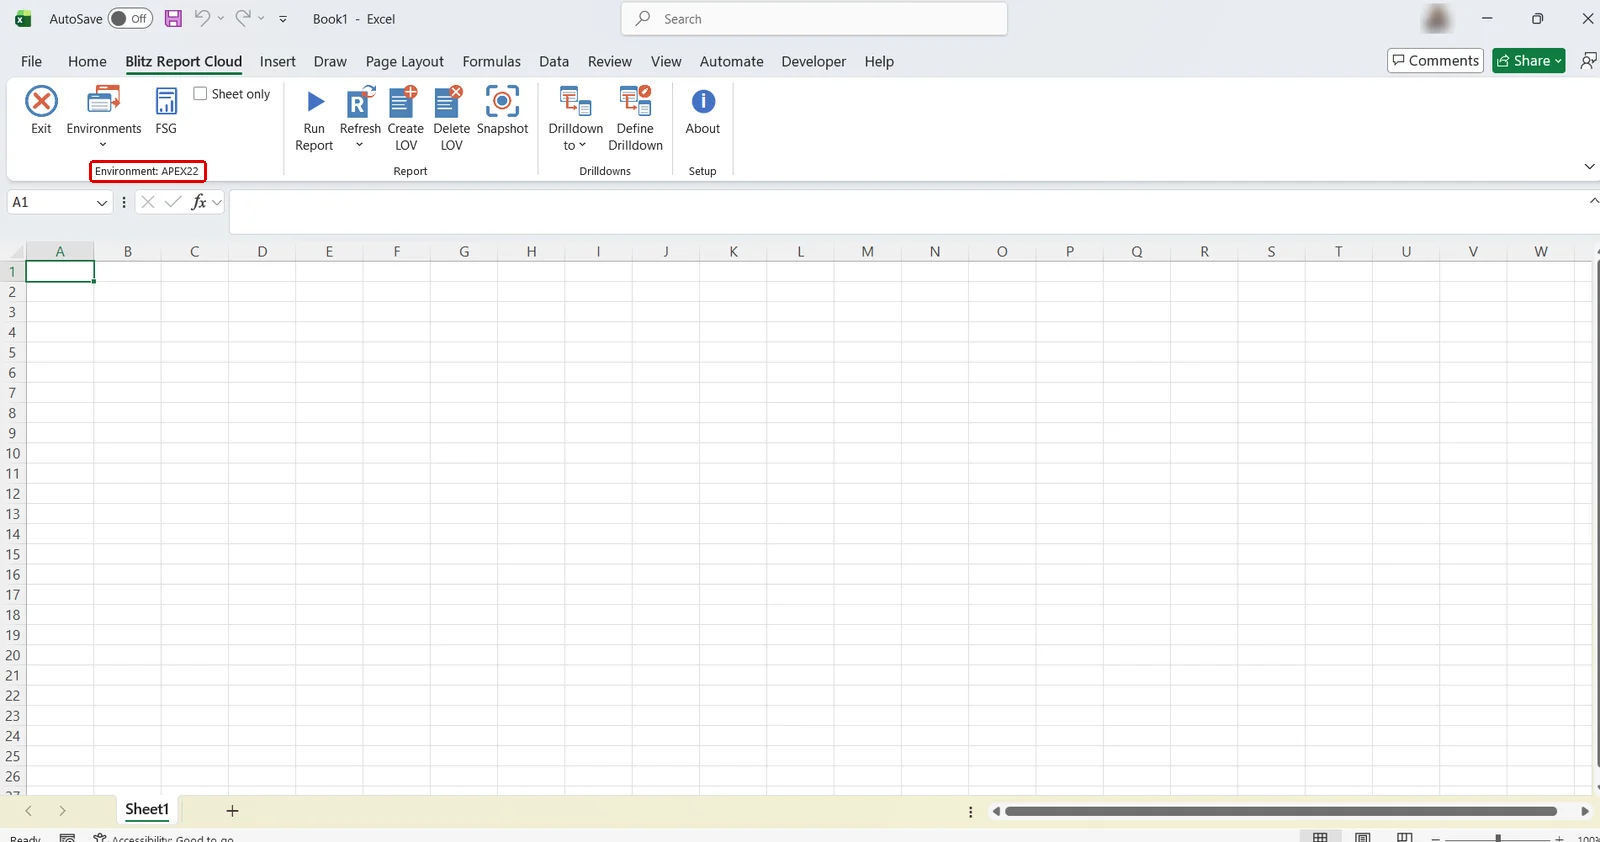
Oracle Fusion installation. The environment is set up once: opening the connection file imports it and opens the add-in’s Environment Setup window with it selected, where Connect signs you in at once, or close the window to sign in later. Each sign-in starts with Login on the Blitz Report Cloud tab: the Authentication dialog shows the environment and asks for your Oracle Fusion User Name and Password; click Log In. The Session group of the ribbon then shows the environment you are signed in to. A wrong password is refused at once: the window shows the reason Oracle Fusion gives, clears the password and stays open, so you can enter it again and click Log In.
Login opens the Authentication dialog, where the Fusion user name and password are entered:
After the sign-in the Session group shows the environment:
6.3 Working in Excel
The ribbon of the add-in is the same as that of the Blitz Report add-in for Oracle E-Business Suite. Its functions are described in the Excel add-in chapter of that user guide: running reports, refresh and the br_run_report formula, background and parallel runs, drilldowns, cell lists of values, snapshot, templates, AI integration and about and diagnostics. The responsibility of that guide has no counterpart here: a report runs under your Blitz Report user. A global drilldown is saved by users with Blitz Report Access Developer or System; every user can save a drilldown in the sheet. The AI skills of this edition come with the add-in: its zip holds them in the folder skills, and section 8.5 of the installation guide says how to load them into Copilot in Excel or Claude in Excel. The AI skills for uploads and for Blitz FSG statements do not apply to the Blitz Report Excel Add-in, which has neither. The runs of the add-in are listed on the Runs page with the runs of the web application.
6.4 Environments
The add-in holds one or more environments, for example production and test. Opening a connection file adds its environment (6.1). Environments on the ribbon lists them, with a check mark on the connected one: select one to switch to it. An environment you signed in to during this Excel session switches at once, any other opens the sign-in. Manage Environments… at the end of the list opens the Environment Setup window, where Connect switches to the selected environment and Delete removes it. Where your IT department manages the environments, the window shows them read-only.
6.5 The run screen
The add-in’s run screen is described under running reports in the Oracle E-Business Suite user guide. Email Report and the license message are not offered on this edition, and the Resp field is not shown.
6.6 Templates
The add-in’s template window is described under templates in the same guide. Templates created from the add-in have an owner, and only the owner changes or deletes them; the add-in’s template window shows no Sharing panel and no Copy, since sharing and copying are done in the template editor of the web application.
7 Oracle Fusion
On an installation integrated with Oracle Fusion Cloud, Blitz Report is opened from Fusion, and reports of the type ERP (Fusion) read Fusion data through BI Publisher. Everything else in this guide applies unchanged.
7.1 Opening Blitz Report from Fusion
Open Blitz Report from the tile your administrator added to the Fusion springboard, or from its entry in the Fusion Navigator. Fusion signs you in: no Blitz Report password is asked, your Fusion user is your Blitz Report user, and the header shows Signed in through Fusion as <name>. Where the administrator embeds Blitz Report inside Fusion, it opens as a page of Fusion. Sign Out signs out of Blitz Report and of Fusion.
Inside Fusion, Blitz Report opens as a page of Fusion:
7.2 Fusion access and its expiry
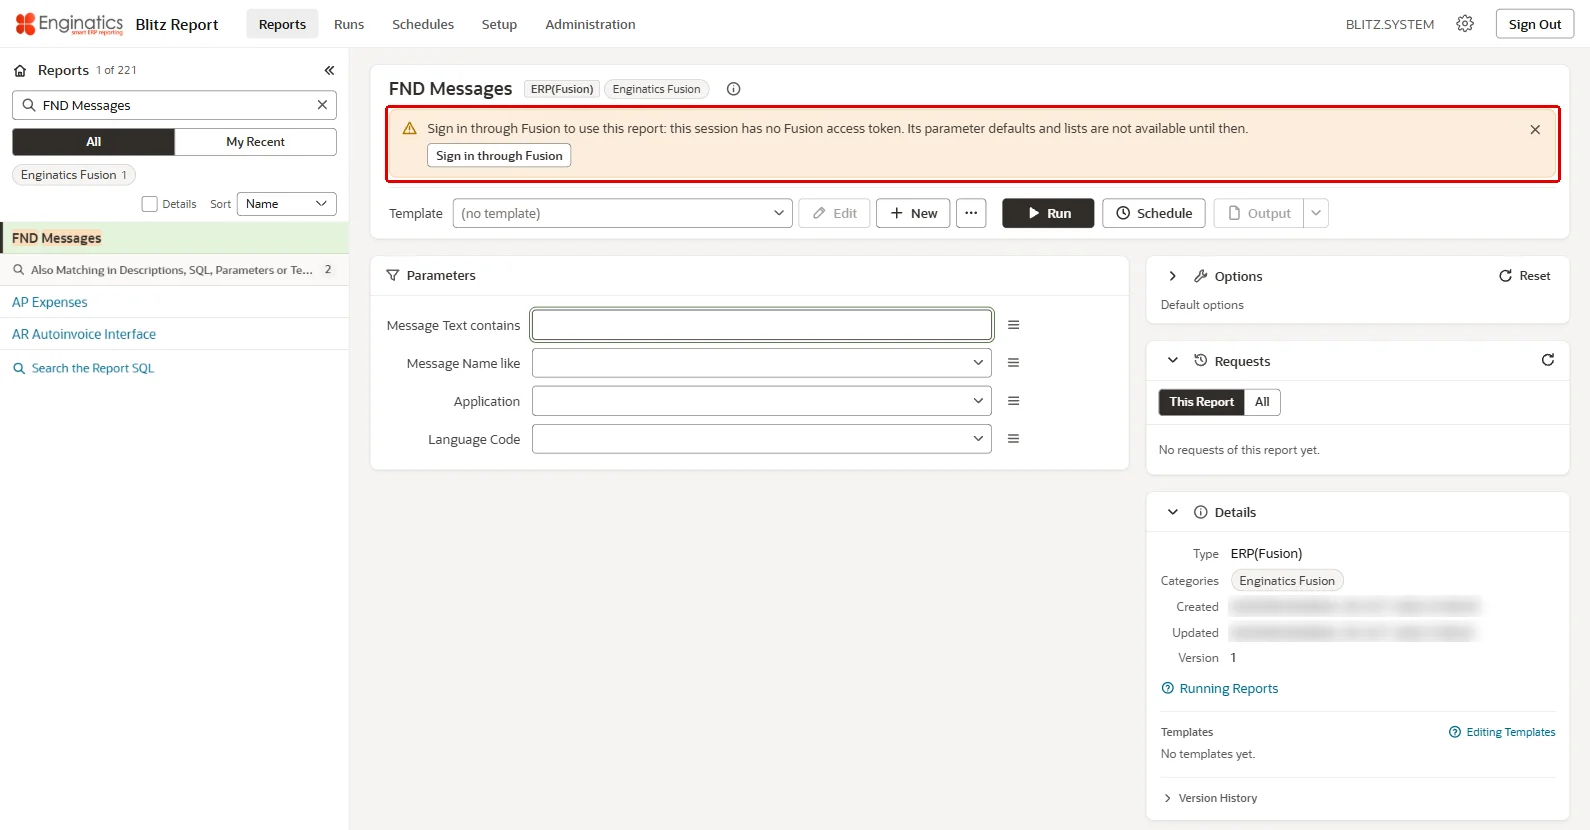
The Fusion sign-in gives the session an access token for Fusion data that is valid for four hours, the lifetime Fusion gives it. Five minutes before it expires, the page warns: Your Fusion access expires in 5 minutes. Fusion reports and lists then need a new sign-in through Fusion. After the expiry, Fusion reports and lists show Fusion sign-in needed with the link Sign in through Fusion; reports on local data keep working. A report opened without Fusion access shows a notice in place of its Fusion defaults and lists: Sign in through Fusion to use this report: this session has no Fusion access token. Its parameter defaults and lists are not available until then. Signing in through Fusion again, or opening Blitz Report from the tile again, renews the access.
A report opened without Fusion access shows a notice in place of its Fusion defaults and lists:
Three sign-in messages look alike and differ: Oracle Fusion’s own, the Fusion access notice of Blitz Report, and the application’s Session Expired message. Oracle Fusion ends its session after its own inactivity period and shows its sign-in again; on an embedded Blitz Report page, the Fusion page loads again after that sign-in and opens Blitz Report again through the Fusion sign-in, on the Reports page, while a Blitz Report tab opened from the tile keeps working, and your runs, schedules and saved defaults are kept either way. The Fusion access notice, shown five minutes before the access token ends and when it has ended (Your Fusion access has expired. Fusion reports and lists need a new sign-in through Fusion.), concerns Fusion data only: you stay signed in to Blitz Report, and reports on local data keep working. The message Session Expired (Your session has expired. Please reload the page to log in again.) means that your Blitz Report session has ended after the application’s own idle time; its Reload button leads to the sign-in, through Fusion on a Fusion installation.
7.3 ERP (Fusion) reports and lists
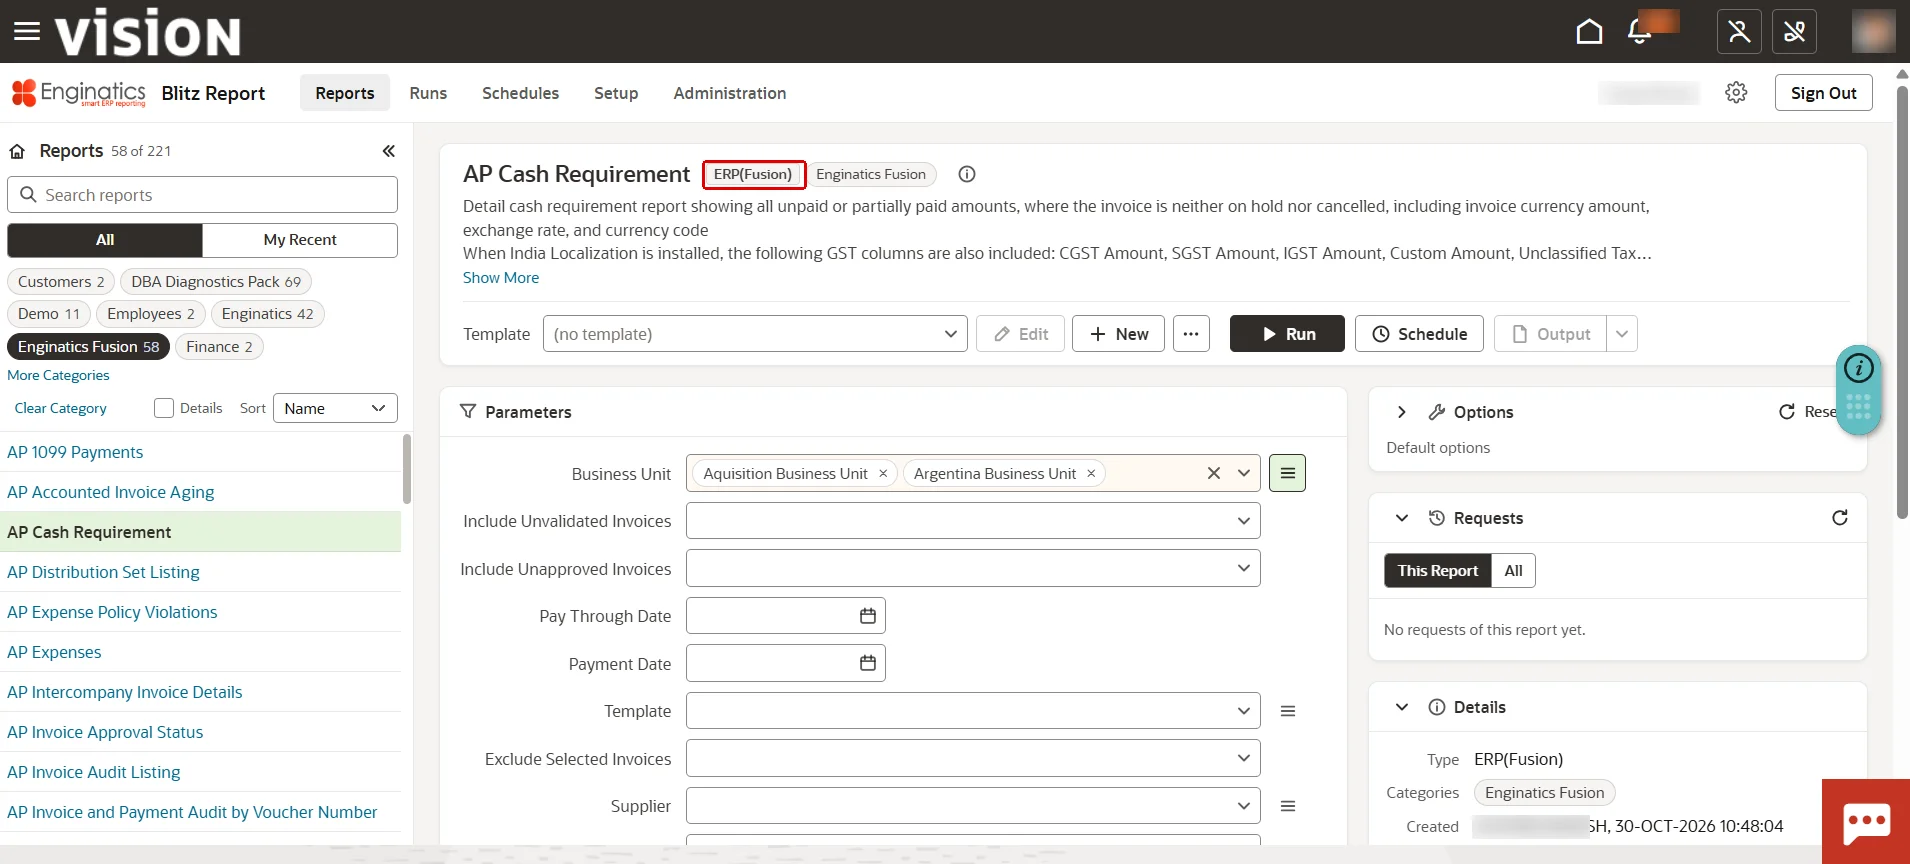
A report that reads Fusion data carries the badge ERP (Fusion) next to its name and the Type ERP (Fusion) in its Details card; the report browser shows the ERP (Fusion) tag next to the report name. Its lists of values and parameter defaults come from Fusion, so they take a few seconds; a large list asks you to type before it searches (Type to search). Run is available once the defaults are in: Default values are still loading from Oracle Fusion. Run is available once they are in. A dependent list is fetched again when its parent value changes.
The run itself is a background process on the database, listed in the Requests card and the run history like every other run. Templates of an ERP (Fusion) report are edited in the same editor; the parse of the report SQL runs on BI Publisher, which takes a few seconds longer.
7.4 Scheduled Fusion runs
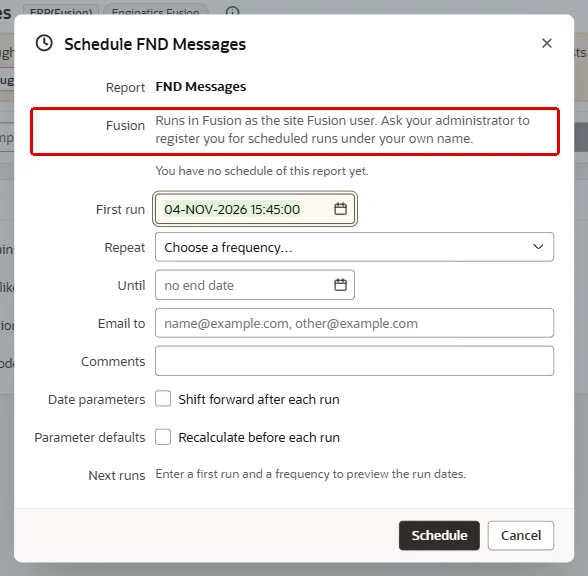
A scheduled run of an ERP (Fusion) report starts without your browser session, so it needs its own Fusion access. The schedule dialog of such a report shows the Fusion row with the user the runs use: Runs in Fusion as <name>. when the administrator has registered you for scheduled runs, otherwise Runs in Fusion as the site Fusion user. Ask your administrator to register you for scheduled runs under your own name. Registration is done in Administration, see the developer guide.
The Schedule dialog of an ERP (Fusion) report names the Fusion user the runs use: